 English
 Indonesia
Introduction to Custom Plastic Colors in Injection Molding
In product manufacturing, color is rarely just an aesthetic choice; it is a fundamental component of brand identity and consumer psychology. Whether it is the distinct "safety orange" of a power tool or the pristine "medical white" of a healthcare device, the color of a plastic part communicates functionality and quality instantly.
Injection molding allows manufacturers to produce millions of identical parts, but achieving precise, consistent color across every single cycle is a complex blend of chemistry, physics, and engineering. Unlike painting or printing, where color is applied to the surface, plastic injection molding requires the color to be integral to the material itself.
This guide explores the science of custom plastic color matching. We will move beyond basic aesthetics to understand how resin selection, processing parameters, and colorant methods impact the final look of your product. Whether you are a product designer, an engineer, or a procurement specialist, understanding these variables is essential for product differentiation and quality control.
Understanding Color Theory for Plastics
Before diving into the machinery, it is critical to understand how color works in a physical, three-dimensional medium like plastic. Many design errors occur because stakeholders rely on digital color models that do not translate well to physical manufacturing.
1. The Basics: Hue, Saturation, and Value
To communicate color requirements to a molder, you must break the color down into three dimensions:
-
Hue: The pigment family (e.g., red, blue, yellow).
-
Saturation (Chroma): The intensity or purity of the color. A neon red is highly saturated; a brick red is less saturated.
-
Value (Lightness): How light or dark the color is. In plastic measurement, this is often referred to as the "L" value (0 is black, 100 is white).
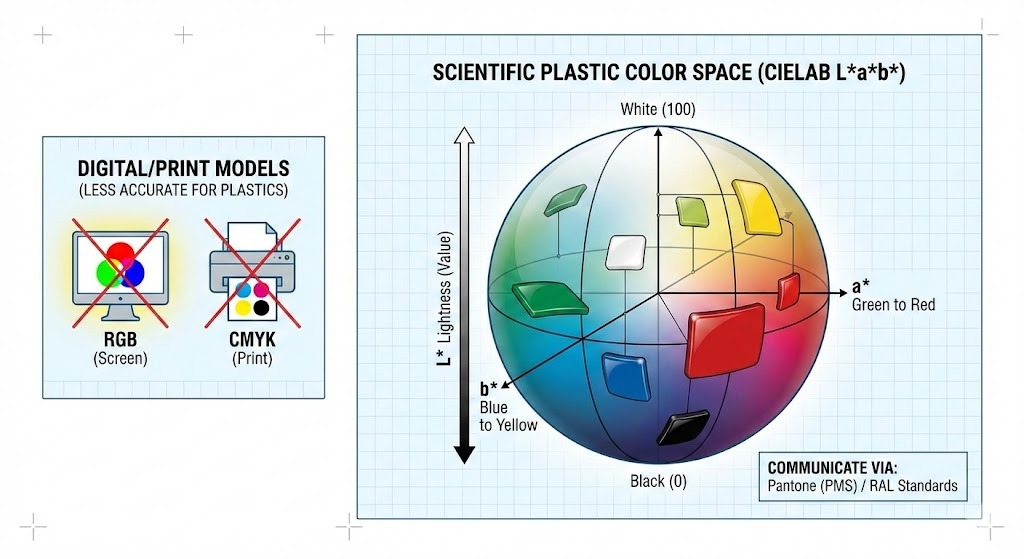
2. Color Spaces: Why RGB and CMYK Don't Work
A common mistake in injection molding is specifying a color using RGB (Red, Green, Blue) or CMYK (Cyan, Magenta, Yellow, Key/Black).
-
RGB is for light-emitting screens (additive color).
-
CMYK is for printing on paper (subtractive color).
Neither of these models accounts for the unique properties of plastic, such as glossy surfaces, textured finishes, or varying thickness. instead, the plastics industry relies on:
-
Pantone (PMS): The universal language for color communication. Most molders request a "Pantone Matching System" code (e.g., Pantone 186 C) to start the matching process.
-
RAL: A color standard system primarily used in Europe, common for industrial and architectural plastic applications.
-
CIELAB ($Lab$):* This is the scientific color space used by spectrophotometers to measure color accuracy.
-
$L$:* Lightness (Light vs. Dark)
-
$a$:* Red vs. Green axis
-
$b$:* Yellow vs. Blue axis
-
Pro Tip: Never approve a color based on a computer screen. Always request a physical "color chip" or "plaque" molded in the specific resin you intend to use.
3. The Challenge of Metamerism
One of the most frustrating phenomena in color matching is Metamerism. This occurs when two color samples appear to match perfectly under one light source (e.g., factory fluorescent lights) but look completely different under another (e.g., natural daylight or retail LED lighting).
This happens because different pigments reflect light wavelengths differently. To avoid this, color matching should be verified under multiple light sources (D65 Daylight, Cool White Fluorescent, and Tungsten A) using a light booth.
4. Opacity vs. Transparency
In plastics, you must also define the opacity. A color formula changes drastically depending on whether the part is:
-
Opaque: Blocks light completely (e.g., a computer mouse).
-
Translucent: Allows light to pass but diffuses it (e.g., a shampoo bottle).
-
Transparent: clear visibility through the part (e.g., a water bottle).
The base resin plays a huge role here; you cannot achieve a glass-like transparent red if your base resin is naturally opaque ABS or milky Polyethylene.
Here is the second part of the article.
This section details the practical methods of getting color into the plastic. Based on our previous discussion, I have added Liquid Color as the fourth major method and structured the section to help readers compare the pros and cons of each approach.
Article Draft: Part 2
Methods for Custom Color Matching in Injection Molding
Once the target color is defined using color theory principles, the next challenge is engineering. How do you physically introduce that color into the base resin during the injection molding process?
There is no single "best" method. The right choice depends on production volume, budget, part complexity, and the specific base material being used. There are four primary methods employed in modern injection molding.
1. Color Masterbatch (The Industry Standard)
Masterbatch is the most common method for coloring plastics in medium-to-high volume production. It consists of a high concentration of pigments and/or additives encapsulated inside a carrier resin. These concentrated pellets are then mixed with the natural base resin at a specific ratio (usually 1% to 4%), known as the "let-down ratio," just before entering the injection molding machine.
How it works: The masterbatch pellets and natural resin pellets are mixed in the machine’s hopper. As they enter the heated barrel, the injection screw melts both. The screw's mixing action disperses the concentrated color evenly throughout the melt.
Pros:
-
Cost-Effective: Cheaper than pre-colored compounds for moderate volumes.
-
Inventory Flexibility: You only need to stock natural resin and smaller amounts of masterbatch, rather than silos of different colored resins.
-
Cleanliness: relatively clean and easy to handle compared to raw powders.
Cons:
-
Dispersion Challenges: If the injection screw doesn't mix well, or if the masterbatch carrier isn't compatible with the base resin, you may get color streaks or specks.
-
Dosing Accuracy: Requires precise feeder equipment to maintain consistent color shot-to-shot.
2. Pre-Colored Compounds (The Premium Option)
Pre-colored compounding is the "ready-to-use" solution. In this process, a resin supplier takes the base resin, pigments, and additives, melts them together in a twin-screw extruder, and re-pelletizes the mixture. The molder receives pellets that are already the exact final color.
How it works: The molder simply pours the pre-colored pellets into the hopper and molds the part. No on-site mixing is required.
Pros:
-
Superior Consistency: Because the color was mixed in a dedicated compounding extruder, dispersion is excellent. Shot-to-shot color variation is minimal.
-
Simplicity: Removes the risk of mixing errors on the molding floor. Ideal for complex engineering resins with tight tolerances.
Cons:
-
Highest Cost: You are paying for an extra processing step by the supplier.
-
Inventory Burden: You must purchase and store quantities of every specific color you need.
-
High MOQs: Compounders usually require high Minimum Order Quantities, making this impractical for small runs.
3. Dry Blending / "Salt and Pepper" (The Prototyping Solution)
Dry blending involves taking raw pigment powder and mixing it directly with natural resin pellets in a tumbler or drum mixer. The pigment powder coats the outside of the pellets like sugar on a donut.
How it works: The coated pellets are dumped into the hopper. The plasticizing screw is entirely responsible for mixing the powder into the melting resin.
Pros:
-
Lowest Material Cost: You are buying raw pigment without a carrier.
-
Speed: Excellent for rapid prototyping or extremely small production runs where quick color changes are needed.
Cons:
-
Poor Consistency: It is very difficult to get uniform color. Streaking and clumping are common issues.
-
Messy and Hazardous: Dealing with fine powder pigments creates dust, requiring careful handling, clean-up, and respiratory protection for workers.
-
Machine Contamination: The fine powder easily contaminates hoppers and dryers, making color changes difficult.
4. Liquid Color (The High-Volume Specialist)
Liquid color consists of pigments suspended in a liquid carrier vehicle (like mineral oil or proprietary surfactants).
How it works: The liquid color is stored in a container next to the press and is pumped directly into the throat of the injection molding machine using a highly precise peristaltic or progressive cavity pump.
Pros:
-
Excellent Dispersion: The liquid carrier allows pigments to mix very easily into the melt, often better than masterbatch. This is ideal for transparent tints.
-
Economy of Scale: Because it is highly concentrated, very low let-down ratios (sometimes under 1%) are possible, making it very economical for massive production runs (e.g., bottle caps, packaging).
Cons:
-
Equipment Cost: Requires specialized pumping and dosing equipment.
-
Messy Clean-up: Spills are notoriously difficult to clean.
-
Screw Slippage: If too much liquid is used, the injection screw can slip, causing processing inconsistencies.
Summary: Choosing Your Method
| Method | Best For... | Cost | Consistency Risk |
| Masterbatch | Most general applications; medium volumes. | Moderate | Medium |
| Compounding | Critical engineering applications; high consistency requirements. | High | Low |
| Dry Blending | Prototyping, very short runs, low budget. | Low | High |
| Liquid Color | Very high volume packaging; transparent parts needing great dispersion. | Low (at high vol) | Medium-Low |
Factors Affecting Color in Injection Molding
Achieving a color match in a laboratory setting is only half the battle. The injection molding process involves intense heat, high pressure, and complex chemical interactions, all of which can alter the final appearance of the color.
Understanding these factors is crucial for bridging the gap between a design prototype and high-volume production.
1. The Impact of Base Resin Selection (The Canvas)
Think of the base resin as the canvas you are painting on. If the canvas isn't perfectly white, the paint won't look true to color.
-
Natural Resin Color: Very few "natural" resins are truly clear or pure white.
-
Polycarbonate (PC) and Acrylic (PMMA) are generally "water-clear," offering the best blank canvas for vibrant transparent or bright opaque colors.
-
ABS and Nylon (PA) have a naturally yellowish or creamy off-white tint. Achieving a brilliant, refrigerator-white in these materials is difficult because you are constantly fighting the base yellowing. Blues may lean slightly green due to the underlying yellow tint.
-
-
Material Grade Variations: Not all polypropylene is created equal. A recycled grade will have darker, more variable background color than a prime virgin grade, making consistent coloring more difficult. Even different lots from the same supplier can have slight base color variations.
-
Opacity and Thickness: For translucent and transparent parts, the wall thickness dramatically affects color perception. A thin section of a part may look light blue, while thick ribs on the same part look dark navy. Color matches must be approved at the actual part thickness.
2. Processing Parameters (The Heat History)
Injection molding is a thermal process, and heat is the enemy of color stability. Most organic pigments have a thermal ceiling; cross it, and they begin to degrade.
-
Melt Temperature and Residence Time: This is the most critical factor. If the barrel temperature is too high, or if the material sits in the heated barrel for too long (long "residence time") before being injected, the colorant will "burn."
-
Signs of degradation: Whites turn yellow; bright colors darken or shift in hue; black specks appear.
-
-
Shear Heat: Even if barrel heaters are set correctly, aggressive screw designs or high injection speeds create intense friction (shear). This friction generates internal heat that can exceed the set temperature, degrading heat-sensitive pigments locally and causing color streaks.
-
Mold Finish: The surface texture of the tool changes how light reflects off the plastic. A highly polished mirror finish (SPI A-1) will make a black part look deeper and richer than a textured matte finish (e.g., MT-11010), which diffuses light and makes the black appear lighter or greyer.
3. Additives and Their Influence (The Hidden Ingredients)
Plastic parts rarely consist of just resin and color. Additives used to improve performance often interfere with aesthetics.
-
Pigments vs. Dyes:
-
Pigments are solid particles that do not dissolve into the plastic. They are excellent for opacity and preventing light transmission.
-
Dyes are organic chemicals that dissolve completely into the plastic matrix. They are used for brilliant transparent colors but offer poor hiding power and can sometimes "migrate" (bleed) out of the plastic over time.
-
-
Functional Additives:
-
UV Stabilizers: Essential for outdoor products, but many UV additives have a slight inherent yellowish tint that must be compensated for in the color formula.
-
Flame Retardants (FR): Often make the base resin cloudy or opaque, making it impossible to achieve transparent colors.
-
Glass Fibers: Used for strength, glass fibers tend to rise to the surface, creating a rough texture that dulls the finish and makes color appear lighter and less saturated.
-
-
Regulatory Compliance: For food contact (FDA) or medical applications (USP Class VI), the list of available, safe pigments is significantly smaller. Highly vibrant neon colors or certain heavy-metal-based reds and yellows may not be compliant options.
Article Draft: Part 4
The Color Matching Process: A Step-by-Step Guide
Bringing a custom plastic color to life is a methodical process that requires precision, communication, and specialized tools. It's an iterative loop between defining the color, formulating, testing, and refining.
1. Defining Color Requirements & Setting the Standard
The journey begins by clearly defining the target color. This is the most crucial step, as any ambiguity here will lead to costly rework.
-
Physical Standard: The most reliable way to communicate color is with a physical sample. This could be:
-
A Pantone (PMS) Color Chip: For general opaque colors.
-
A RAL Color Standard: Common for industrial applications.
-
An Existing Product Part: "Match this red cap."
-
A Fabric Swatch, Paint Chip, or Print Sample: While challenging due to metamerism, these can be used as a starting point.
-
-
Defining the Material & Finish: Specify the exact base resin (e.g., "Natural ABS," "Clear Polypropylene"), the desired opacity (opaque, translucent, transparent), and the required surface finish (glossy, matte, textured).
-
Environmental Requirements: Inform the color matcher about any special needs, such as UV stability for outdoor use, food-grade compliance (FDA), or medical compatibility (USP Class VI).
2. Selecting the Appropriate Colorant System
Based on the standard, material, and budget, the color matcher will choose the most suitable coloring method (Masterbatch, Compounding, Dry Blending, or Liquid Color) and select appropriate pigments and dyes. This involves considering:
-
Heat Stability: Are the pigments stable enough for the resin's processing temperature?
-
Chemical Resistance: Will the color hold up to cleaning agents or environmental exposure?
-
Cost vs. Performance: Balancing desired aesthetics with budget constraints.
3. Formulation and Initial Trial Blends
The colorist, often using specialized software, will develop an initial color formula. This formula specifies the exact ratios of various pigments, dyes, and opacifiers needed to achieve the target color in the chosen resin.
-
Trial Blends: Small batches of the formulated colorant are mixed with the natural resin.
-
Test Samples: These trial blends are then molded into standardized plaques or actual part prototypes using a small injection molding machine. These samples are critical for evaluating the color in its final processed state.
4. Using Color Measurement Instruments
Visual assessment alone is subjective and prone to error. Professional color matching relies on objective measurements.
-
Colorimeters: These devices measure color in the $L*a*b*$ color space by simulating human eye response to reflected light. They are useful for quick checks and process control.
-
Spectrophotometers: These are more advanced instruments that measure the exact amount of light reflected at each wavelength across the visible spectrum. They generate a "spectral curve" which is the definitive fingerprint of a color.
-
Delta E ($\Delta E$): Spectrophotometers calculate the $\Delta E$ value, which quantifies the difference between the sample color and the target standard. A $\Delta E$ of 1.0 or less is generally considered an acceptable match to the human eye, but specific project tolerances may vary. A value of 0.5 is often a target for tight matches.
-
Metamerism Check: Spectrophotometers can also predict metamerism by comparing spectral curves under different illuminants.
-
5. Adjusting Formulations & Iteration
Based on the $\Delta E$ values and visual assessment under a controlled light booth, the colorist will adjust the formulation.
-
Iterative Process: This is often an iterative process. The colorist might add a tiny amount of blue pigment to reduce yellowing (adjusting the b* value), or increase a black pigment to darken the L* value.
-
Customer Approval: Once a satisfactory $\Delta E$ is achieved (typically within a tolerance of $\Delta E < 1.0$), the molded color chip is sent to the customer for final approval. It is critical for the customer to approve this physical plastic chip under their preferred lighting conditions.
Equipment and Tools for Color Matching
Beyond the basic injection molding machine, specialized equipment is essential for precise color matching:
-
Light Booth (Color Viewing Booth): A controlled environment that allows for visual assessment of color under various standardized light sources (e.g., D65 Daylight, Cool White Fluorescent, Incandescent A). This is critical for detecting and preventing metamerism.
-
Colorimeters and Spectrophotometers: As detailed above, these instruments objectively measure and quantify color, reducing subjectivity.
-
Color Formulation Software: Advanced software that helps colorists predict pigment ratios, manage color databases, and calculate $\Delta E$ values more efficiently.
-
Dosing Units / Feeders: For masterbatch and liquid color, highly accurate gravimetric (weight-based) or volumetric (volume-based) feeders are essential to ensure consistent let-down ratios.
-
Small Injection Molding Machines / Lab Extruders: Used for quickly molding trial plaques or small parts to evaluate new color formulations without tying up production machines.
-
Mixing and Blending Equipment: Tumblers, ribbon blenders, or drum mixers for dry blending, or specialized masterbatch mixers for uniform dispersion.
Troubleshooting Color Issues in Injection Molding
Even with the best preparation and a perfectly matched color formula, issues can arise during production. Many color problems are not due to the colorant itself, but rather to inconsistencies in material handling, processing, or equipment. Effective troubleshooting requires a systematic approach to identify the root cause.
Common Problems and Their Manifestations
Here are the most frequently encountered color problems:
-
Color Variations and Inconsistencies:
-
Shot-to-Shot Variation: Parts produced back-to-back have noticeable color differences.
-
Batch-to-Batch Variation: Different production runs of the same part show color drift.
-
Part-to-Part Variation: Different cavities in a multi-cavity mold produce different colors.
-
-
Streaking, Swirling, and Specks:
-
Color Streaks/Flow Lines: Visible lines of unmixed colorant, often following the flow path of the melt.
-
Color Swirls/Mottling: Irregular patterns of varying color intensity, giving a marbled appearance.
-
Black Specks/Color Clumps: Small, dark, or concentrated spots of colorant, or burnt material.
-
-
Fading, Discoloration, and Color Shift:
-
Yellowing/Browning: Especially common for white or light-colored parts.
-
Darkening/Dulling: Colors lose their vibrancy or become muddier.
-
Hue Shift: The color changes significantly (e.g., a blue turning greenish, or a red turning brownish).
-
Causes and Solutions
A systematic approach to identifying the root cause involves checking material, processing, and equipment.
A. Material-Related Issues
-
Problem: Inconsistent Masterbatch/Liquid Color Dosing.
-
Cause: Dosing equipment (feeder) is inaccurate, improperly calibrated, or running out of colorant.
-
Solution: Calibrate feeder regularly (gravimetric feeders are more accurate than volumetric). Ensure sufficient colorant supply. Check for bridging in the hopper.
-
-
Problem: Incompatible Carrier Resin.
-
Cause: The carrier resin in the masterbatch is not fully compatible with the base resin, preventing proper dispersion.
-
Solution: Use masterbatch designed for your specific base resin (e.g., PP-based masterbatch for PP resin). Avoid "universal" masterbatches for critical applications.
-
-
Problem: Degraded Base Resin or Colorant.
-
Cause: Excessive regrind (reprocessed material) with high heat history, or expired/improperly stored resin/colorant.
-
Solution: Minimize regrind usage, especially for sensitive colors. Check material expiry dates. Store materials in dry, temperature-controlled environments.
-
-
Problem: Contamination.
-
Cause: Previous color left in the hopper, barrel, or dryer; dust/dirt; or foreign particles.
-
Solution: Thoroughly clean all equipment before color changeover. Purge the machine with natural resin until completely clean.
-
-
Problem: Moisture in Resin.
-
Cause: Hygroscopic resins (e.g., Nylon, PC, ABS) not dried properly.
-
Solution: Ensure correct drying temperatures and times. Moisture can cause splay marks and react with pigments.
-
B. Processing Parameter Issues
-
Problem: Color Degradation (Yellowing, Darkening, Hue Shift).
-
Cause: Melt Temperature Too High: Overheats pigments.
-
Cause: Residence Time Too Long: Material sits in the barrel too long, leading to thermal degradation. This often happens with smaller shot sizes on larger machines.
-
Cause: High Shear Heat: Excessive screw speed, back pressure, or restrictive gates/nozzles create frictional heat.
-
Solution: Reduce barrel temperatures incrementally, starting from the nozzle. Optimize screw speed and back pressure. Check shot size relative to barrel capacity (aim for 20-80% of barrel capacity). Consider gate/runner design.
-
-
Problem: Poor Dispersion (Streaks, Swirls, Specks).
-
Cause: Insufficient Mixing: Not enough shear or mixing action from the screw.
-
Cause: Low Melt Temperature: Material isn't fully molten, hindering pigment dispersion.
-
Solution: Slightly increase melt temperature (cautiously, avoiding degradation). Increase back pressure (provides more mixing). Consider a different screw design with more mixing elements (e.g., a mixing screw tip). Increase hold time slightly.
-
-
Problem: Color Shift Due to Mold Temperature.
-
Cause: Significant variations in mold temperature can affect the crystallization of semi-crystalline resins, changing gloss and perceived color.
-
Solution: Maintain consistent mold temperature using a reliable TCU (Temperature Control Unit).
-
C. Equipment-Related Issues
-
Problem: Color Streaks/Weld Line Visibility.
-
Cause: Poor mixing in the nozzle or hot runner. Obstructions in the melt path.
-
Solution: Check nozzle for obstructions. Ensure hot runner is clean and heated evenly. Consider a static mixer in the nozzle.
-
-
Problem: Uneven Mixing in Multi-Cavity Molds.
-
Cause: Unbalanced runners leading to different flow rates and heat histories across cavities.
-
Solution: Optimize runner balance. If possible, use separate dosing for critical cavities in advanced systems.
-
Best Practices for Maintaining Color Consistency
-
Establish Clear Standards: Always work against an approved physical color chip, and specify an acceptable Delta E ($\Delta E$) range.
-
Regular Equipment Calibration: Calibrate dosing feeders, temperature controllers, and dryers regularly.
-
Process Control: Document and strictly adhere to validated processing parameters for each part and color.
-
Material Traceability: Lot numbers for resin and colorants should be tracked.
-
Operator Training: Train operators on proper material handling, feeder operation, and visual color assessment.
-
Light Booth Usage: Perform visual checks under a standardized light booth to catch metamerism.
-
Quality Control Checks: Implement regular color checks using a colorimeter or spectrophotometer during production.

