 English
 Indonesia
Quick Summary for Professionals
Injection mold repair is the specialized process of restoring damaged tooling to its original engineering specifications to ensure part quality and prevent production halts. The most effective modern approach combines precision laser welding—which adds material with minimal heat impact—and advanced surface treatments (such as PVD coatings or hard chrome plating) to increase the mold’s lifespan. By utilizing these techniques, manufacturers can reduce downtime by up to 70% compared to traditional TIG welding or full tool replacement.
1. Introduction to Injection Mold Repair
Why is Proper Mold Maintenance Critical?
Mold maintenance is the routine practice of inspecting, cleaning, and repairing injection units to prevent defects. In high-speed manufacturing, even a microscopic scratch on a cavity surface can lead to “flash” (excess plastic on a part) or structural weaknesses. Proactive repair ensures dimensional accuracy and saves thousands of dollars by avoiding the high cost of machining a completely new mold.
What are the Common Causes of Injection Mold Damage?
Mold damage typically falls into four categories:
- Mechanical Wear: Abrasive friction from glass-filled resins wearing down the gate and cavity.
- Corrosion: Chemical attacks from outgassing plastics (like PVC) that pit the steel surface.
- Human Error: Scratches caused by using metal tools to remove stuck parts.
- Thermal Fatigue: Stress cracks resulting from constant heating and cooling cycles during production.
2. Understanding Injection Molds: The Technical Foundation
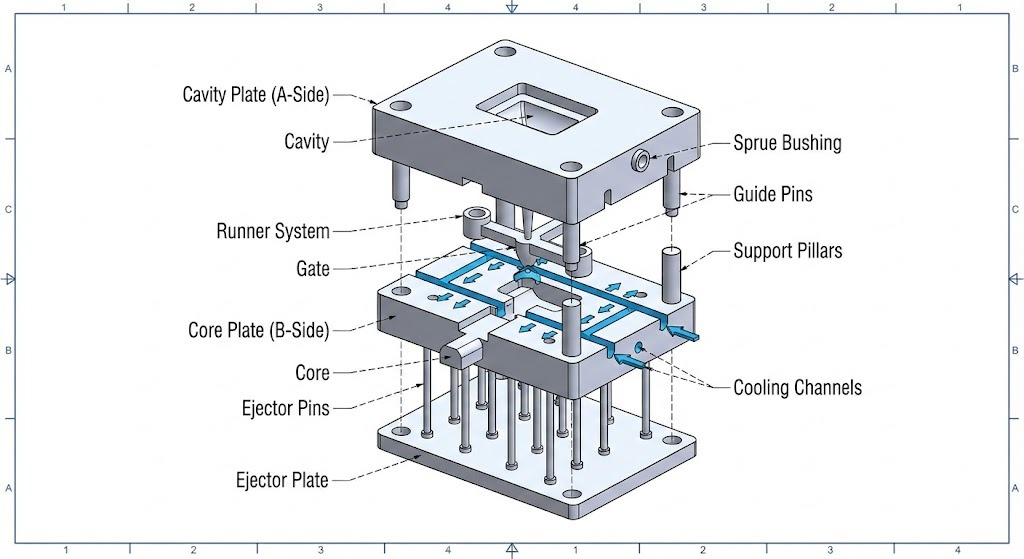
What are the Basic Components of an Injection Mold?
To perform a successful repair, a technician must identify which component is failing.
- The Cavity and Core: The primary “A” and “B” sides that form the shape of the plastic part.
- Ejector Pins: Mechanical components that push the finished part out of the mold.
- Cooling Channels: Internal pathways where water or oil flows to regulate temperature.
- Gate and Runner System: The “plumbing” that directs molten plastic into the cavity.
Common Materials Used in Injection Molds
The choice of repair technique depends heavily on the mold material. Most high-production molds are made from Tool Steel, which is steel alloyed with elements like chromium or vanadium to increase hardness.
Table 1: Common Mold Materials and Repair Compatibility
| Material Type | Common Grade | Repair Difficulty | Best Repair Method |
|---|---|---|---|
| P20 Steel | Pre-hardened Steel | Low | Laser or TIG Welding |
| H13 Steel | Hot-Work Tool Steel | Medium | Laser Welding (Requires Pre-heating) |
| S7 Steel | Shock-Resistant Steel | High | Precision Laser Welding |
| Aluminum | 7075-T6 | Medium | Specialized Laser Wire |
What is the Difference Between Hot Runner and Cold Runner Systems?
- Hot Runner Systems: Use heated manifolds to keep plastic molten inside the mold, reducing waste but making repairs more complex due to integrated electrical components.
- Cold Runner Systems: Simple channels that solidify with the part; they are easier to repair but result in more scrap material.
Technical Definitions
- HAZ (Heat Affected Zone): The area of base metal that has not been melted but has had its microstructure altered by the heat of welding. Minimizing the HAZ is the primary goal of laser welding.
- Rockwell Hardness (HRC): A scale used to measure the indentation hardness of a material. Most mold steels range from 30 to 60 HRC.
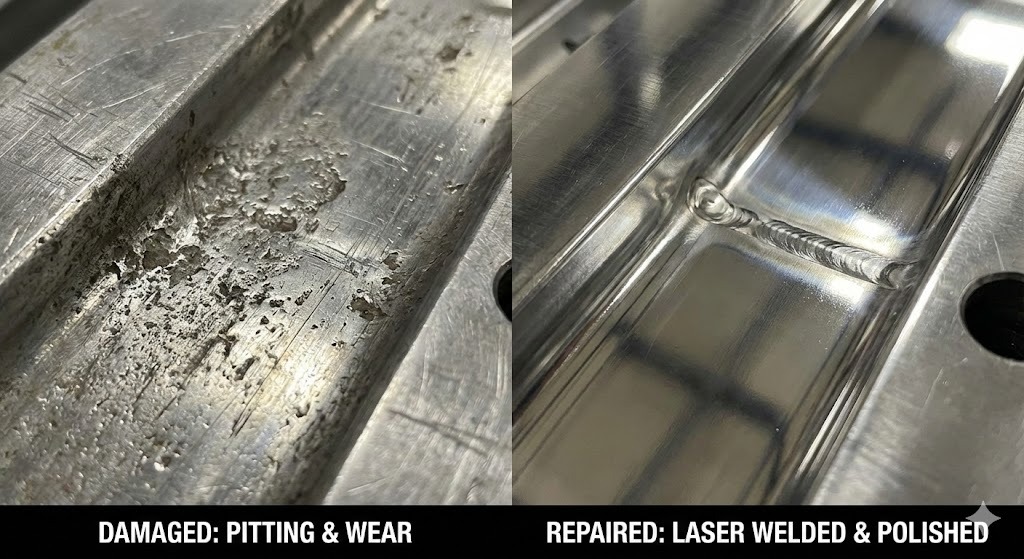
- Flash: An injection molding defect where thin layers of plastic escape between the mold halves, usually indicating a worn parting line.
3. Laser Welding for Injection Mold Repair
What is Laser Welding in Mold Repair?
Laser welding is a high-precision repair process that uses a concentrated beam of light to melt a specialized filler wire onto the damaged area of a mold. Unlike traditional welding, the laser concentrates energy so tightly that it creates a strong metallurgical bond with almost no distortion to the surrounding steel.
What are the Advantages of Laser Welding?
For technicians, laser welding is the preferred method for high-value tooling because:
- Minimal Heat Affected Zone (HAZ): The localized heat prevents the mold steel from warping or losing its original hardness.
- Extreme Precision: Technicians can repair damage as small as 0.05mm, allowing for work on intricate textures and sharp corners.
- Complex Geometries: The non-contact nature of the laser allows repairs inside deep cavities or narrow ribs where a TIG torch cannot reach.
- Reduced Post-Processing: Because the weld is so clean, the time required for manual grinding and polishing is reduced by over 50%.
3.4. Laser Welding Process: A Step-by-Step Guide
To achieve a professional-grade repair, technicians must follow a standardized sequence:
Step 1: Preparation of the Mold Surface
Cleanliness is the most critical factor. Any residual plastic, oil, or rust will cause porosity (tiny bubbles) in the weld.
- Action: Use ultrasonic cleaning or specialized solvents to remove all contaminants.
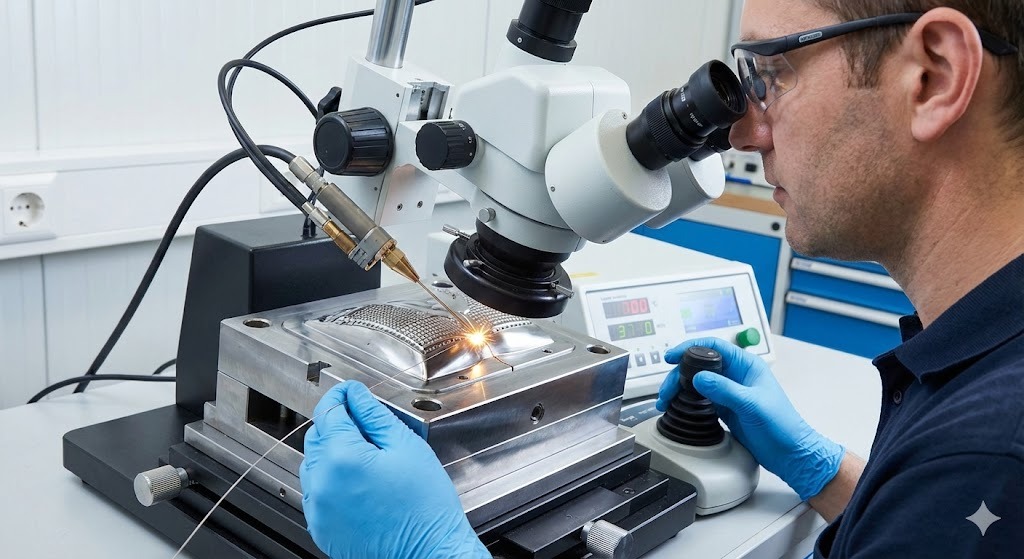
- Verification: Inspect the area under a 10x microscope to ensure the metal is “bright” and free of carbonized residue.
Step 2: Selecting Welding Parameters and Settings
Laser settings must be tuned based on the base metal and the thickness of the repair.
- Pulse Energy (Joules): Controls the depth of the weld penetration.
- Pulse Duration (ms): Determines how long the laser stays on; longer pulses are used for thicker wires.
- Frequency (Hz): The speed of the laser pulses.
- Spot Size (mm): The diameter of the laser beam; usually set between 0.2mm and 1.5mm.
Step 3: Execution of Welding Techniques
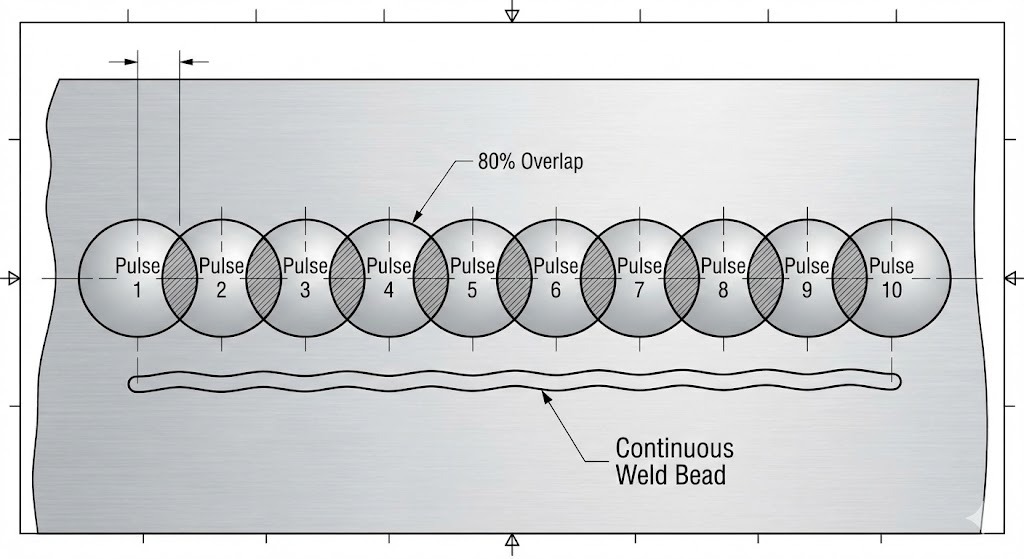
- Pulse Welding: The standard method for repair. Each pulse creates a tiny “dot” of molten metal.
- Continuous/Overlapping Welding: Technicians overlap each “dot” by 70-80% to create a seamless, solid bead of metal.
3.5. Best Practices for Technicians
- Match the Filler Wire: Always use a laser wire that matches the chemistry of the mold steel (e.g., use H13 wire for an H13 mold) to ensure uniform hardness and color after polishing.
- Manage the Shielding Gas: Use Argon gas at a steady flow rate to prevent oxidation, which turns the weld black and brittle.
- Avoid Over-Building: Only add the minimum amount of material needed. Excess welding increases the risk of heat buildup and extra machining time.
3.6. Common Problems and Solutions
| Problem | Likely Cause | Professional Solution |
|---|---|---|
| Undercutting | Power (Voltage) is too high | Lower the pulse energy and increase the spot size. |
| Pores/Bubbles | Contaminated surface | Re-clean the area with alcohol and check gas flow. |
| Cracking | High carbon steel cooling too fast | Pre-heat the mold to 150-200°C before welding. |
| Sinking | Improper wire feeding | Ensure the wire is pushed into the center of the melt pool. |
Key Technical Insight: The Importance of Microstructure
When a laser pulse hits the steel, the cooling rate is extremely high. This creates a martensitic microstructure in the weld area, which is very hard but can be brittle. To ensure long-term durability, large repairs should undergo a “stress relief” heating cycle to stabilize the metal structure.
4. Surface Treatment Techniques for Injection Molds
What is Surface Treatment in Mold Repair?
Surface treatment is the application of a thin layer of specialized material or a chemical change to the outer “skin” of the mold steel. In the repair cycle, this is the final step after welding and polishing. It is designed to restore or enhance the mold’s original performance, specifically its resistance to wear, corrosion, and friction.
Types of Surface Treatments for Molds
4.2.1. Hard Chrome Plating
This is a traditional electrochemical process that applies a layer of chromium directly to the steel.
- Best for: Protecting against corrosive plastics like PVC and improving the “release” of the part.
- Hardness: Typically 65–70 HRC.
4.2.2. Electroless Nickel Plating
Unlike standard plating, this uses a chemical reaction rather than electricity, ensuring a perfectly uniform thickness even inside deep holes or cooling channels.
- Best for: Complex geometries where uniform thickness is mandatory.
4.2.3. Titanium Nitride (TiN) Coating
A gold-colored PVD (Physical Vapor Deposition) coating that is extremely hard.
- Best for: High-abrasion environments, such as molds using glass-filled resins.
- Hardness: Up to 80+ HRC.
4.3. Benefits of Surface Treatment
Applying the correct treatment provides three primary technical advantages:
- Improved Wear Resistance: Prevents “washout” at the gates where high-pressure plastic flows.
- Enhanced Corrosion Protection: Protects the expensive tool steel from water vapor and acidic byproduct gases.
- Improved Release Properties: Reduces the “stiction” between the plastic and the metal, allowing for faster cycle times and fewer damaged parts.
4.4. How to Select the Right Treatment
The choice depends on the “Failure Mode” of the mold:
- If the mold is scratching: Use TiN or DLC (Diamond-Like Carbon) for maximum hardness.
- If the mold is rusting: Use Electroless Nickel for 100% coverage.
- If the plastic is sticking: Use Hard Chrome or specialized PTFE-infused coatings.
4.5. Surface Treatment Process: Step-by-Step Guide
Step 1: Mold Preparation and Cleaning
The coating will only bond to a perfectly clean surface.
- Action: Perform a final polish to the required SPI finish (e.g., A-2 mirror finish).
- Technical Note: Any microscopic oils left from the polishing compound will cause the coating to peel (delamination).
Step 2: Application of the Coating
The mold is placed in a vacuum chamber (for PVD/CVD) or a chemical bath (for plating).
- Precision: Coatings are usually applied at a thickness of 0.002mm to 0.010mm so they do not change the final dimensions of the part.
Step 3: Post-Treatment Processes
- Action: Inspect the surface for “pinholes” or uneven thickness.
- Action: Conduct a final dimension check to ensure the coating has not put the tool “out of tolerance.”
4.6. Troubleshooting Common Surface Treatment Issues
| Problem | Likely Cause | Professional Solution |
|---|---|---|
| Peeling/Flaking | Poor surface cleaning | Strip the coating, re-polish, and use ultrasonic cleaning. |
| Dulling of Finish | Coating is too thick | Reduce deposition time; check the micron thickness gauge. |
| Edge Buildup | High current density (in plating) | Use “dummy” cathodes to pull excess current away from sharp corners. |
Technical Definition: PVD vs. CVD
- PVD (Physical Vapor Deposition): A low-temperature vacuum process (under 500°C) that does not warp the mold steel.
- CVD (Chemical Vapor Deposition): A high-temperature process (up to 1000°C) that creates a stronger bond but can require the mold to be re-hardened afterward.
5. Practical Considerations for Technicians
How Do Technicians Stay Safe During Mold Repair?
Safety is paramount when handling high-energy lasers and chemical treatments.
- Laser Safety: Always work in a designated Class 4 laser area. Technicians must wear wavelength-specific safety glasses to prevent permanent retinal damage from reflected beams.
- Fume Extraction: Welding and chemical cleaning release microscopic metal particulates and VOCs (Volatile Organic Compounds). Use localized exhaust ventilation to maintain air quality.
- Thermal Protection: Even with a localized HAZ, the mold base can retain significant heat. Use thermal-resistant gloves when handling components post-weld.
Required Equipment and Tools for Success
A professional mold repair workstation requires more than just a welder. Essential tools include:
- Stereo Microscope: Minimum 10x magnification for viewing weld pools.
- Precision Grinders: High-speed pneumatic or electric rotary tools for “roughing in” the weld.
- Micro-Polishing Kits: Diamond pastes and ceramic stones to restore the SPI surface finish.
- Digital Micrometers: To verify that the repair has returned the component to its original tolerance.
Cost Analysis: Mold Repair vs. Replacement
One of the most important roles of a technician is advising management on whether a mold should be repaired or scrapped.
Table 2: Decision Matrix for Repair vs. Replacement
| Factor | Repair (Laser + Surface) | Full Replacement |
|---|---|---|
| Typical Cost | 5% – 20% of original tool cost | 100% of tool cost |
| Lead Time | 24 – 72 hours | 8 – 16 weeks |
| Durability | 80% – 100% of original life | 100% (New life cycle) |
| Best For | Localized damage, gates, parting lines | Catastrophic frame cracking, total washout |
Case Study: Reducing Downtime in Automotive Tooling
A Tier 1 automotive supplier experienced a “gate freeze” due to abrasion on a 32-cavity mold.
- The Problem: Parting line flash was causing a 15% reject rate.
- The Solution: Technicians used H13 laser wire to rebuild the parting line, followed by a TiN (Titanium Nitride) PVD coating.
- The Result: The mold was back in production within 36 hours, and the surface hardness increased from 52 HRC to 82 HRC, preventing future wear.
6. Advanced Techniques and Technologies
What are Hybrid Repair Methods?
Hybrid repair involves using Laser Welding for structural restoration followed by Surface Treatment for functional enhancement.
- Example: Welding a damaged ejector pin hole and then applying an Electroless Nickel coating to the entire plate. This ensures the repair is strong and the entire surface is protected against rust.
Automation in Mold Repair
The industry is moving toward CNC Laser Welding. Instead of a technician manually guiding the wire under a microscope, a robotic arm follows a pre-programmed path. This ensures 100% consistency in weld thickness and is ideal for repairing large batches of identical inserts.
Emerging Technologies: 3D Metal Printing (Additive Manufacturing)
For catastrophic failures where large sections of a mold are missing, technicians are now using Directed Energy Deposition (DED). This “3D prints” tool steel directly onto the existing mold base, which is then CNC-machined back to the final shape.
7.Summary of Key Points
- Precision is Key: Laser welding is the gold standard for mold repair because it minimizes the HAZ and prevents tool distortion.
- Surface Synergy: Surface treatments like TiN or Chrome are not just for new molds; they are essential for extending the life of a repaired tool.
- Proactive Maintenance: Identifying wear early through microscopic inspection can prevent the need for costly replacements.
The Future of Injection Mold Repair
As plastic parts become more complex and lead times shorter, the integration of AI-driven diagnostics and automated laser repair will become standard. Technicians who master both the metallurgical science of welding and the chemistry of surface coatings will be the most valuable assets in the modern “Smart Factory.”
Technical Troubleshooting Checklist for Technicians
- Is the steel type identified? (Match wire to base metal).
- Is the surface “bright clean”? (No oils or residues).
- Are laser parameters set? (Check Joules and Spot Size).
- Is Argon gas flowing? (Prevent oxidation).
- Does the coating match the resin? (e.g., Chrome for PVC).
Frequently Asked Questions: Injection Mold Repair
How much does laser welding for mold repair typically cost?
The cost of laser welding for mold repair generally ranges from $200 to $2,000 per repair session, depending on the complexity of the geometry and the volume of material needed. This represents a significant saving, as it typically costs only 5% to 15% of the price of a replacement mold.
Can you weld a mold that has already been surface-treated?
Yes, but the surface coating must be removed in the repair area first. Coatings like Hard Chrome or TiN must be stripped via chemical etching or precision grinding before welding. Welding directly over a coating will cause contamination, leading to a brittle weld and poor bonding.
What is the best surface treatment for abrasive plastics?
For plastics reinforced with glass fibers or minerals, Titanium Nitride (TiN) or Diamond-Like Carbon (DLC) are the best surface treatments. These PVD coatings provide a surface hardness of over 80 HRC, which effectively resists the “sandblasting” effect of abrasive resins.
How long does a typical laser weld repair take?
Most minor laser weld repairs can be completed in 2 to 4 hours, including preparation and cleaning. If the repair requires extensive post-weld polishing or secondary surface treatments like PVD coating, the total lead time is usually 24 to 72 hours.
Does laser welding cause mold warping?
No, laser welding does not cause warping when performed correctly. Because the laser delivers a highly concentrated beam with a Minimal Heat Affected Zone (HAZ), the bulk of the mold remains at room temperature, preserving the structural integrity and dimensional tolerances of the tool.
What is the difference between TIG welding and Laser welding for molds?
The primary difference is heat input.
- TIG welding uses a high-heat arc that creates a large HAZ, often requiring the entire mold to be annealed and re-hardened.
- Laser welding uses a precise light beam that creates a microscopic melt pool, allowing for repairs on finished, hardened tools without affecting the surrounding material.
How do I choose the correct laser welding wire?
You must match the chemical composition of the welding wire to the base mold steel. For example, use H13 wire for H13 tool steel. Using an incorrect wire can lead to “witness lines” or “ghosting” after the mold is polished, which will show up as defects on the final plastic parts.
Quick Reference Table: Repair Solutions by Defect
| Defect Type | Recommended Repair | Why? |
|---|---|---|
| Parting Line Flash | Laser Welding (P20/H13) | Rebuilds sharp edges with zero distortion. |
| PVC Acid Corrosion | Electroless Nickel Plating | Provides 100% chemical barrier in all cavities. |
| Gate Washout | Laser Weld + TiN Coating | Restores dimensions and adds abrasion resistance. |
| Ejector Pin Scoring | Micro-polishing + DLC | Reduces friction to prevent pin seizing. |

