 English
 Indonesia
Introduction to Overmolding and Bonding Challenges
Overmolding is a transformative manufacturing process where one material, typically a soft thermoplastic elastomer (TPE) or rubber, is molded directly over or around a second, rigid material (the substrate). This technique is incredibly versatile, allowing for the creation of components with multiple material properties in a single part. Think of a comfortable, non-slip grip on a tool, a waterproof seal on an electronic device, or aesthetically pleasing multi-color designs on consumer products.
The benefits of overmolding are numerous: enhanced ergonomics, improved aesthetics, noise and vibration dampening, electrical insulation, and simplified assembly by eliminating the need for adhesives or fasteners. However, the success of overmolding hinges on one critical factor: achieving a strong, permanent bond between the two distinct materials.
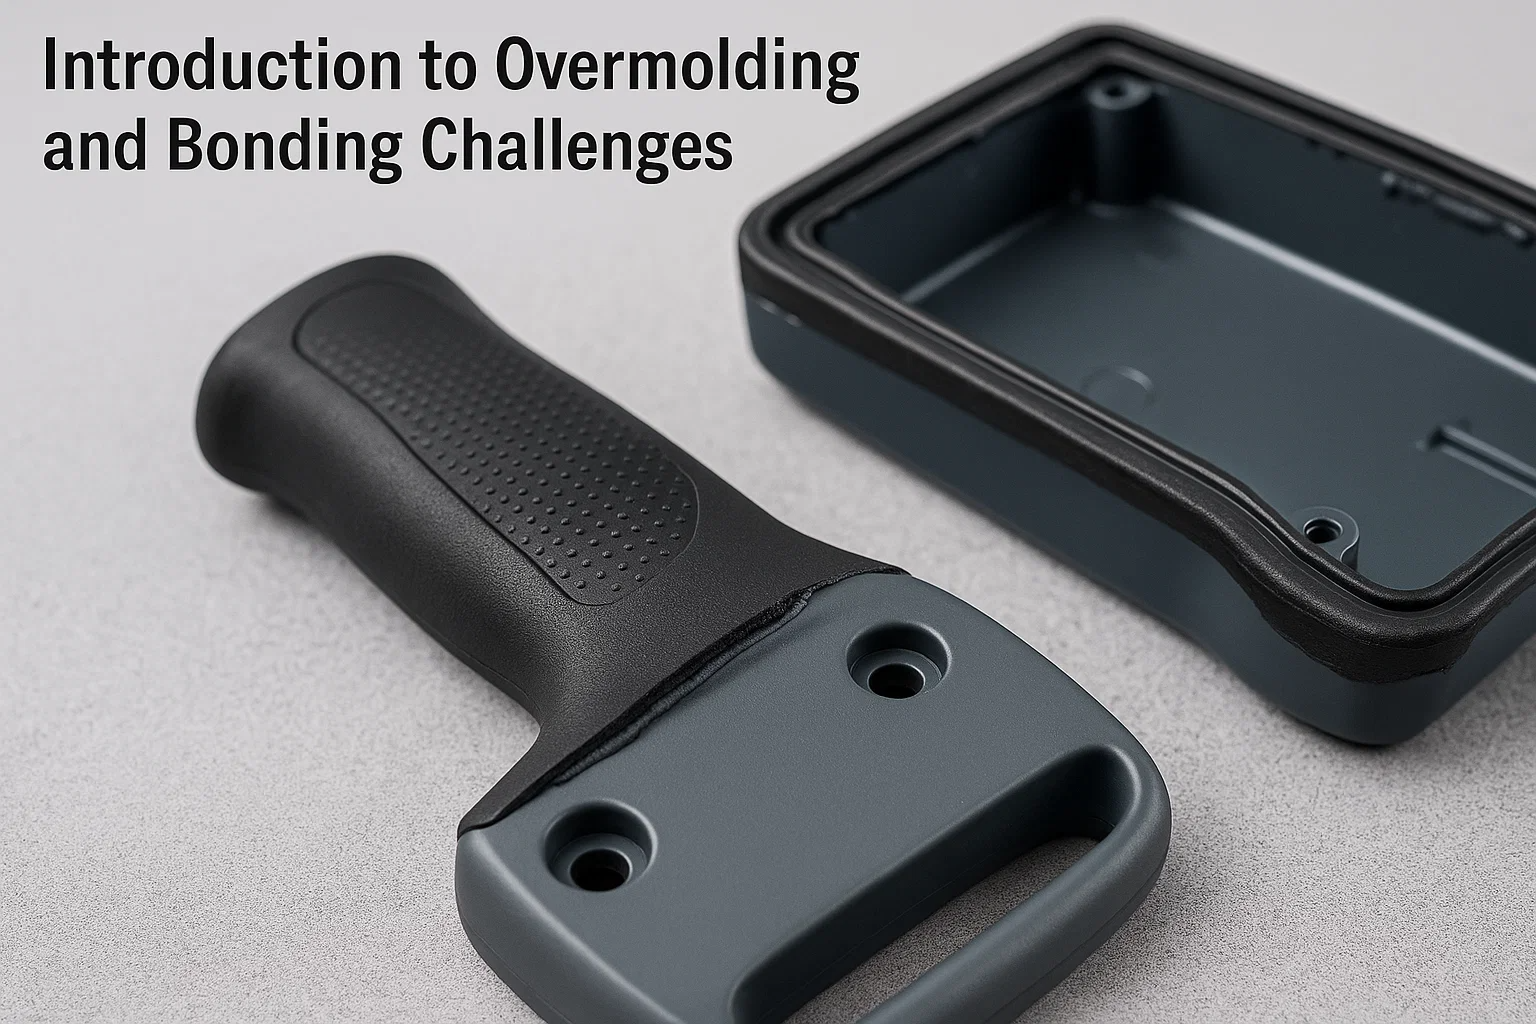
Without a robust bond, overmolded parts can suffer from common and frustrating issues like material separation, peeling, bubbling, or delamination. Imagine a soft-touch handle detaching from its rigid core, or a sealed electronic enclosure failing due to moisture ingress. These failures not only compromise product functionality and durability but can also lead to costly warranty claims, product recalls, and significant damage to a brand's reputation.
Understanding the Science of Material Bonding in Overmolding
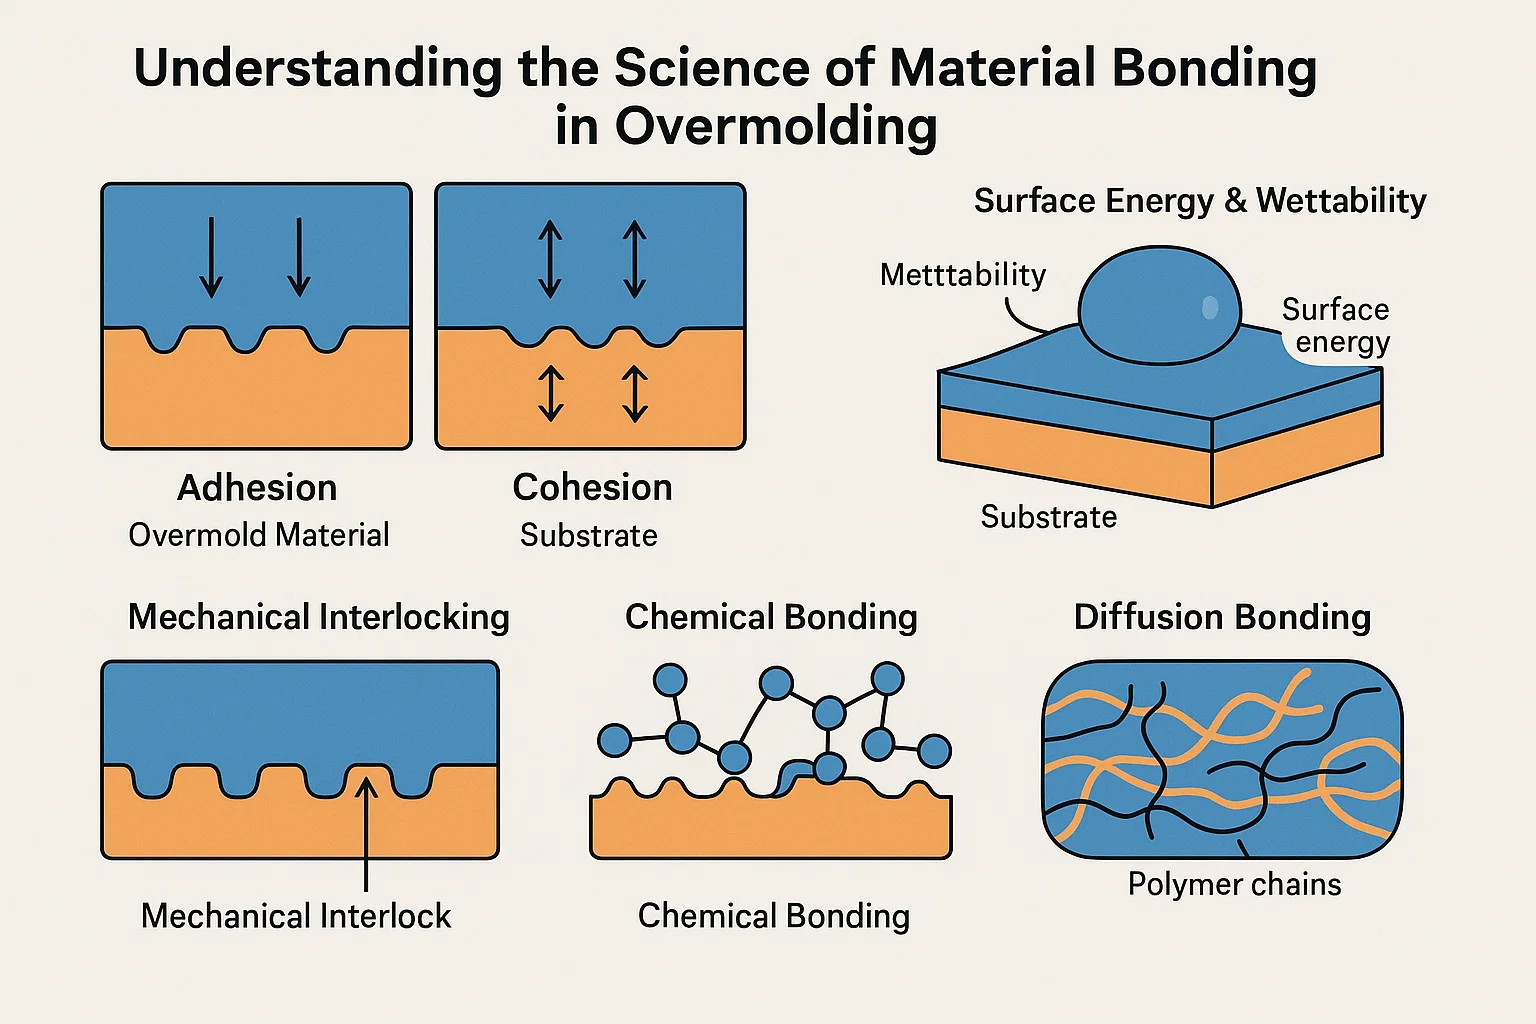
Achieving a permanent bond in overmolding isn't magic; it's a science rooted in how materials interact at a microscopic level. To truly master overmolding, we need to grasp the fundamental principles of adhesion and cohesion, and how they apply to the interface between your substrate and overmold material.
Adhesion refers to the attractive forces between twodissimilarsurfaces. Think of it like sticky tape; the tape adheres to the wall. In overmolding, this is the bond between the substrate (the first material) and the overmold material (the second material). Strong adhesion means the two materials won't easily pull apart at their contact surface.
Cohesion, on the other hand, refers to the internal strength of asinglematerial. If your sticky tape tears, that's a cohesive failure within the tape itself, not an adhesive failure from the wall. In overmolding, both materials need good cohesive strength to prevent tearing or fracturing internally. A strong overmold bond requires both excellent adhesion at the interface and sufficient cohesion within each material.
Central to adhesion are surface energy and wettability:
-
Surface Energy: Every material has a certain amount of energy at its surface. For effective bonding, the overmold material (in its molten state) generally needs to have a lower surface energy than the substrate it's flowing over. This allows the molten plastic to spread out and "wet" the substrate's surface thoroughly.
-
Wettability: This is the ability of a liquid (the molten overmold material) to spread over a solid surface (the substrate). Good wettability ensures the molten plastic can intimately contact the substrate, maximizing the potential for bonding. Imagine water beading up on a waxed car versus spreading out on clean glass; the latter shows better wettability.
When these conditions are met, various bonding mechanisms come into play to create that strong, permanent connection:
-
Mechanical Interlocking: This is like a microscopic puzzle. The molten overmold material flows into tiny irregularities, pores, or deliberately designed features (like undercuts or holes) on the substrate's surface. As it cools and solidifies, it physically interlocks with these features, creating a mechanical anchor that resists separation. This is often the primary bonding mechanism, especially when chemical compatibility is limited.
-
Chemical Bonding: This is the strongest form of adhesion, involving the formation of primary chemical bonds (like covalent or ionic bonds) or secondary forces (like Van der Waals forces, hydrogen bonds) between the molecules of the two materials at their interface. This typically occurs when materials have similar chemical structures or when specific reactive groups can interact. For instance, certain grades of TPE are engineered to chemically bond with specific engineering plastics.
-
Diffusion Bonding: In some cases, particularly with materials that are chemically very similar and processed at high temperatures, the polymer chains from the overmold material can actually diffuse and entangle with the polymer chains of the substrate. This creates a true interpenetrating network, effectively blurring the line between the two materials and forming an incredibly strong, almost inseparable bond. This is often seen in two-shot molding where both materials are plastics with similar melt properties.
Key Factors Influencing Bond Strength
Achieving a superior bond in overmolding isn't just about understanding the science; it's about meticulously controlling several practical factors throughout the design and manufacturing process. Neglecting any one of these can significantly compromise the final bond strength.
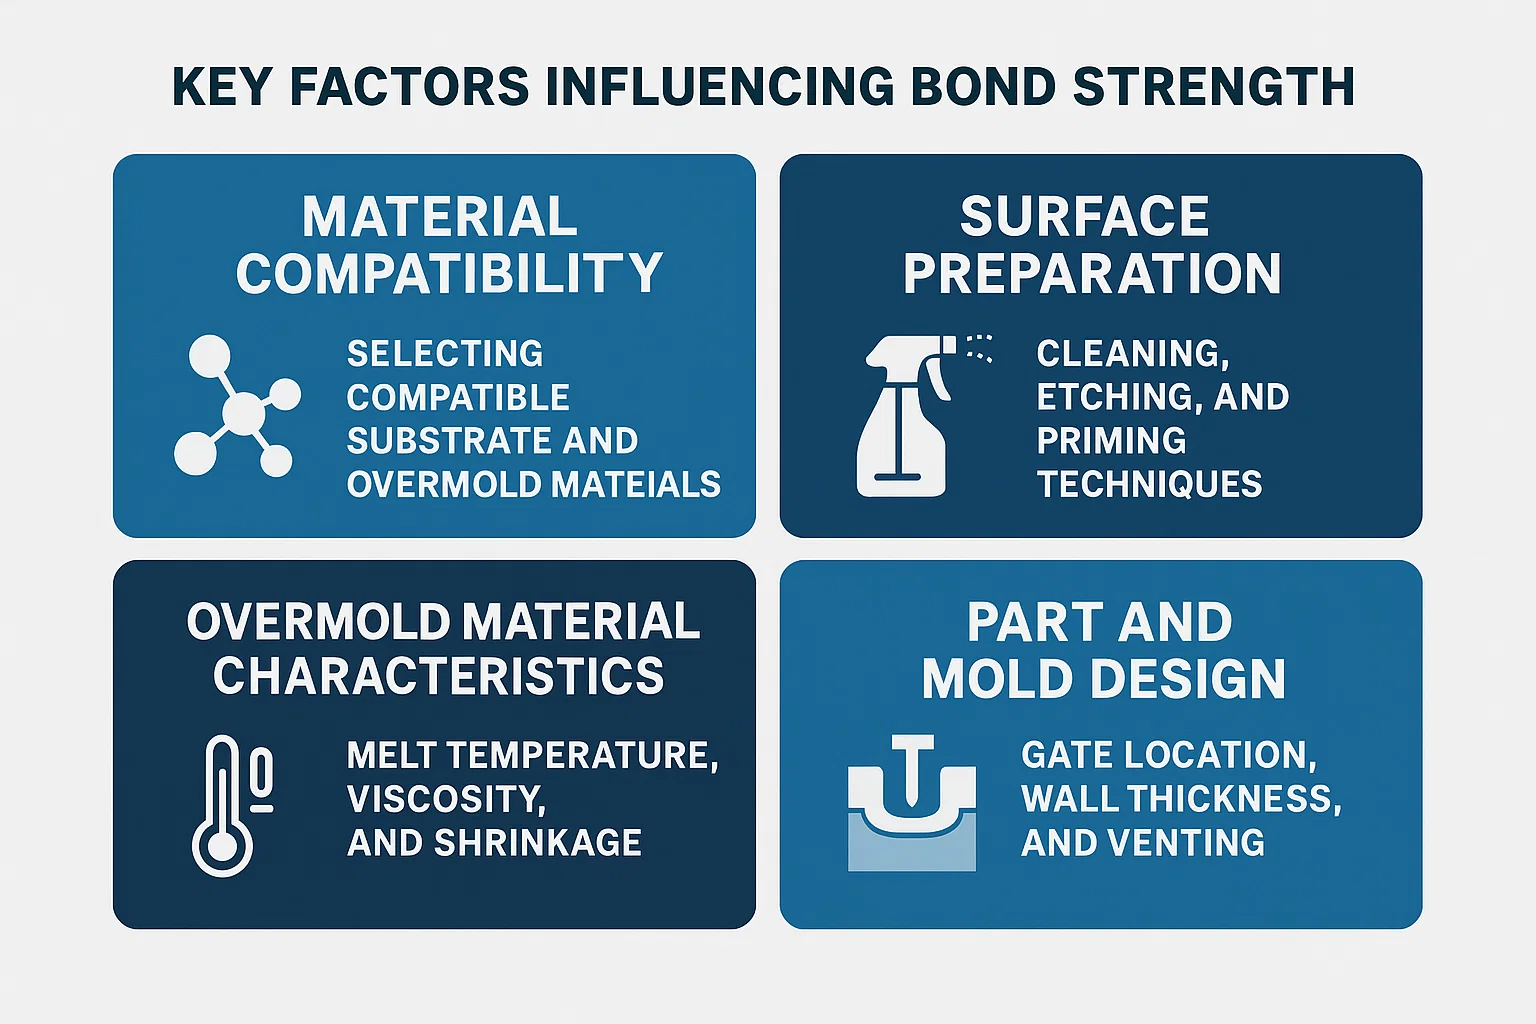
1. Material Compatibility: Selecting Compatible Substrate and Overmold Materials
This is often the most critical starting point. The choice of materials dictates the potential for chemical bonding and diffusion.
-
Chemical Affinity: Some material pairs naturally "like" each other. For instance, certain TPEs (thermoplastic elastomers) are specifically formulated to bond well with common rigid plastics like PC (polycarbonate), ABS (acrylonitrile butadiene styrene), PC/ABS blends, and even Nylon. Conversely, bonding TPE to materials like PP (polypropylene) or PE (polyethylene) can be challenging without special formulations or surface treatments due to their low surface energy.
-
Melt Temperature Similarity: Ideally, the overmold material should have a processing temperature that allows it to flow and bond effectively without deforming or degrading the substrate. If the overmold material requires a much higher temperature than the substrate's heat deflection temperature, it can lead to warping or melting of the first shot.
-
Shrinkage Rates: Materials shrink as they cool. If the overmold and substrate materials have significantly different shrinkage rates, internal stresses can build up, leading to delamination or cracking over time, especially at edges or corners. Engineers carefully select pairs with similar or complementary shrinkage behaviors.
2. Surface Preparation: Cleaning, Etching, and Priming Techniques
Even with compatible materials, a contaminated or poorly prepared substrate surface can severely weaken the bond.
-
Cleaning: The substrate surface must be meticulously clean and free of mold release agents, oils, dust, or other contaminants. These act as barriers, preventing intimate contact and bonding. Depending on the substrate, cleaning methods can range from simple washing to ultrasonic cleaning or solvent wiping.
-
Mechanical Etching/Texturing: Creating a microscopically rough surface on the substrate can significantly enhance mechanical interlocking. This can be achieved through techniques like sandblasting, laser etching, or even by designing texture directly into the first shot mold. The increased surface area also provides more points for potential chemical interaction.
-
Chemical Priming/Adhesion Promoters: For challenging material combinations, primers or adhesion promoters can be applied to the substrate surface. These chemicals act as a bridge, forming a bond with both the substrate and the overmold material. This is common in rubber-to-plastic or metal-to-plastic overmolding.
-
Plasma Treatment / Corona Treatment: These advanced surface treatments use electrical discharge to alter the surface energy of the substrate, making it more receptive to bonding. They can increase wettability and create reactive sites for chemical bonding.
3. Overmold Material Characteristics: Melt Temperature, Viscosity, and Shrinkage
The properties of the overmold material itself play a critical role during the injection process.
-
Melt Temperature: The temperature at which the overmold material is processed needs to be precisely controlled. It must be hot enough to achieve proper flow and wetting of the substrate but not so hot that it degrades the material or the underlying substrate.
-
Viscosity: The viscosity (flow resistance) of the molten overmold material affects its ability to fill complex mold features and intimately contact the substrate surface. A material that's too viscous might not fill fine details for mechanical interlocking, while one that's too fluid could flash.
-
Shrinkage: As mentioned, the overmold material's shrinkage needs to be managed in relation to the substrate to prevent internal stress and bond failure.
4. Part and Mold Design: Gate Location, Wall Thickness, and Venting
Smart design from the outset can prevent many bonding issues.
-
Gate Location: The gate (where the molten plastic enters the mold) should be placed strategically to ensure even and complete filling of the overmold cavity. Poor gate location can lead to incomplete filling, weld lines, or areas with insufficient pressure, all of which compromise bond strength.
-
Wall Thickness: Maintaining consistent wall thickness in the overmold material helps ensure uniform cooling and shrinkage, minimizing internal stress. Abrupt changes in wall thickness can lead to differential cooling, warping, and weakened bonds.
-
Venting: As the molten material fills the mold, air is displaced. If this air cannot escape through proper venting, it can become trapped, leading to short shots, burn marks, or areas where the overmold material doesn't fully contact the substrate, creating weak spots.
-
Undercuts, Grooves, and Holes: As discussed in mechanical interlocking, incorporating these features into the substrate design is crucial for creating physical anchors for the overmold material. These features must be designed with appropriate draft angles to allow for easy demolding without damaging the overmolded part.
Techniques for Enhancing Mechanical Interlocking
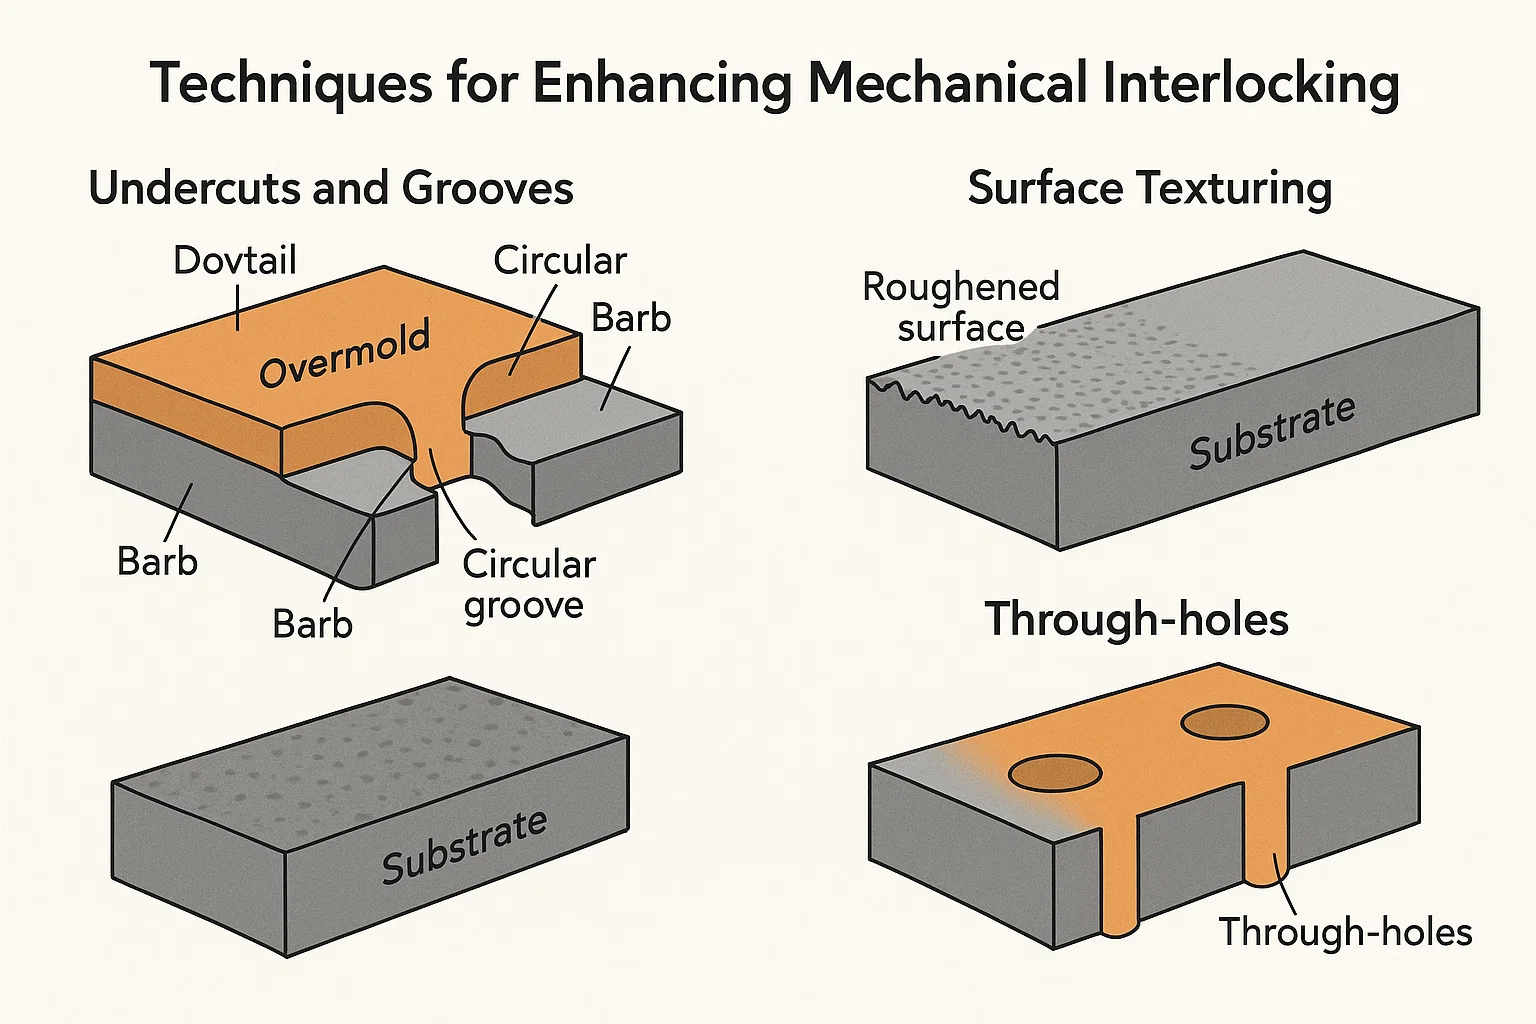
While chemical compatibility and optimized processing are vital, mechanical interlocking stands as a robust and often indispensable method to ensure a strong, physical bond in overmolding. It creates a literal "grip" between the two materials, preventing separation even when chemical adhesion is limited. This is especially crucial when overmolding materials with poor chemical affinity, such as bonding a soft TPE to a low surface energy plastic like polypropylene (PP).
Here are key design techniques for maximizing mechanical interlocking:
1. Undercuts and Grooves: Designing Features for Mechanical Retention
Think of undercuts and grooves as microscopic hooks or anchors within the substrate. When the molten overmold material flows into these features and cools, it solidifies around them, creating a physical lock.
-
Undercuts: These are features that create an "overhang" or a shape that is largerbeneaththe surface than at the opening. As the overmold material cools and shrinks, it pulls tightly into these undercuts. Examples include:
-
Dovetail grooves: V-shaped channels where the base is wider than the opening.
-
Circular grooves: Rings or channels that the overmold material can flow into and grip.
-
Barbs or ribs: Small, protruding features on the substrate that the overmold material encapsulates.
-
-
Grooves: Simple channels or recesses on the substrate surface allow the overmold material to fill and solidify, creating a mechanical key. These can be straight, curved, or follow the contour of the part.
Design Tip: When designing undercuts, always consider draft angles for easy demolding without damaging the overmolded part or the mold itself. The overmold material needs to be flexible enough to deform slightly during ejection if the undercut isn't part of a slide or lifter mechanism in the mold.
2. Surface Texturing: Creating a Rough Surface for Increased Adhesion
A smooth surface offers minimal points for mechanical contact. By creating a rough or textured surface on the substrate, you dramatically increase the surface area available for the overmold material to flow into and grip.
-
As-Molded Texture: The simplest method is to design a texture directly into the mold for the substrate part. This could be a fine stipple, a matte finish, or even a subtle abrasive pattern.
-
Abrasive Blasting: After the substrate part is molded, it can be sandblasted or grit-blasted. This physically roughens the surface, creating microscopic peaks and valleys that the overmold material can flow around and interlock with. This also helps remove any surface contaminants.
-
Laser Etching: Precision laser etching can create intricate and highly controlled textures or patterns on the substrate surface, optimizing the mechanical bond for specific areas.
-
Chemical Etching: Certain chemicals can selectively etch the surface of plastics, creating a microscopically rougher topography that enhances mechanical adhesion.
Benefit: Increased surface area not only improves mechanical interlocking but can also indirectly aid chemical bonding by exposing more reactive sites.
3. Through-holes: Utilizing Holes for Material Flow and Interlocking
Incorporating strategically placed through-holes in the substrate allows the overmold material to flow completely through and form a solid "rivet" or "post" on the other side. This creates a very strong, two-sided mechanical lock.
-
Material Rivets: When the overmold material flows through a hole, it creates a material "rivet" that firmly anchors the overmold to the substrate.
-
Load Distribution: Multiple through-holes can distribute stress more evenly across the bonded interface, improving the overall durability of the overmolded part.
-
Ventilation (Indirect Benefit): In some cases, through-holes can also aid in venting trapped air during the overmolding process, ensuring complete filling and contact.
Consideration: The size and placement of through-holes are crucial. They should be large enough to allow for good material flow but not so large that they compromise the structural integrity of the substrate.
Leveraging Chemical Bonding for Superior Adhesion
While mechanical interlocking provides a strong physical anchor, chemical bonding offers the highest level of adhesion, creating a virtually inseparable interface between the substrate and the overmold material. This method relies on the actual molecular interaction between the two polymers, leading to a bond that is often stronger than the cohesive strength of either material.
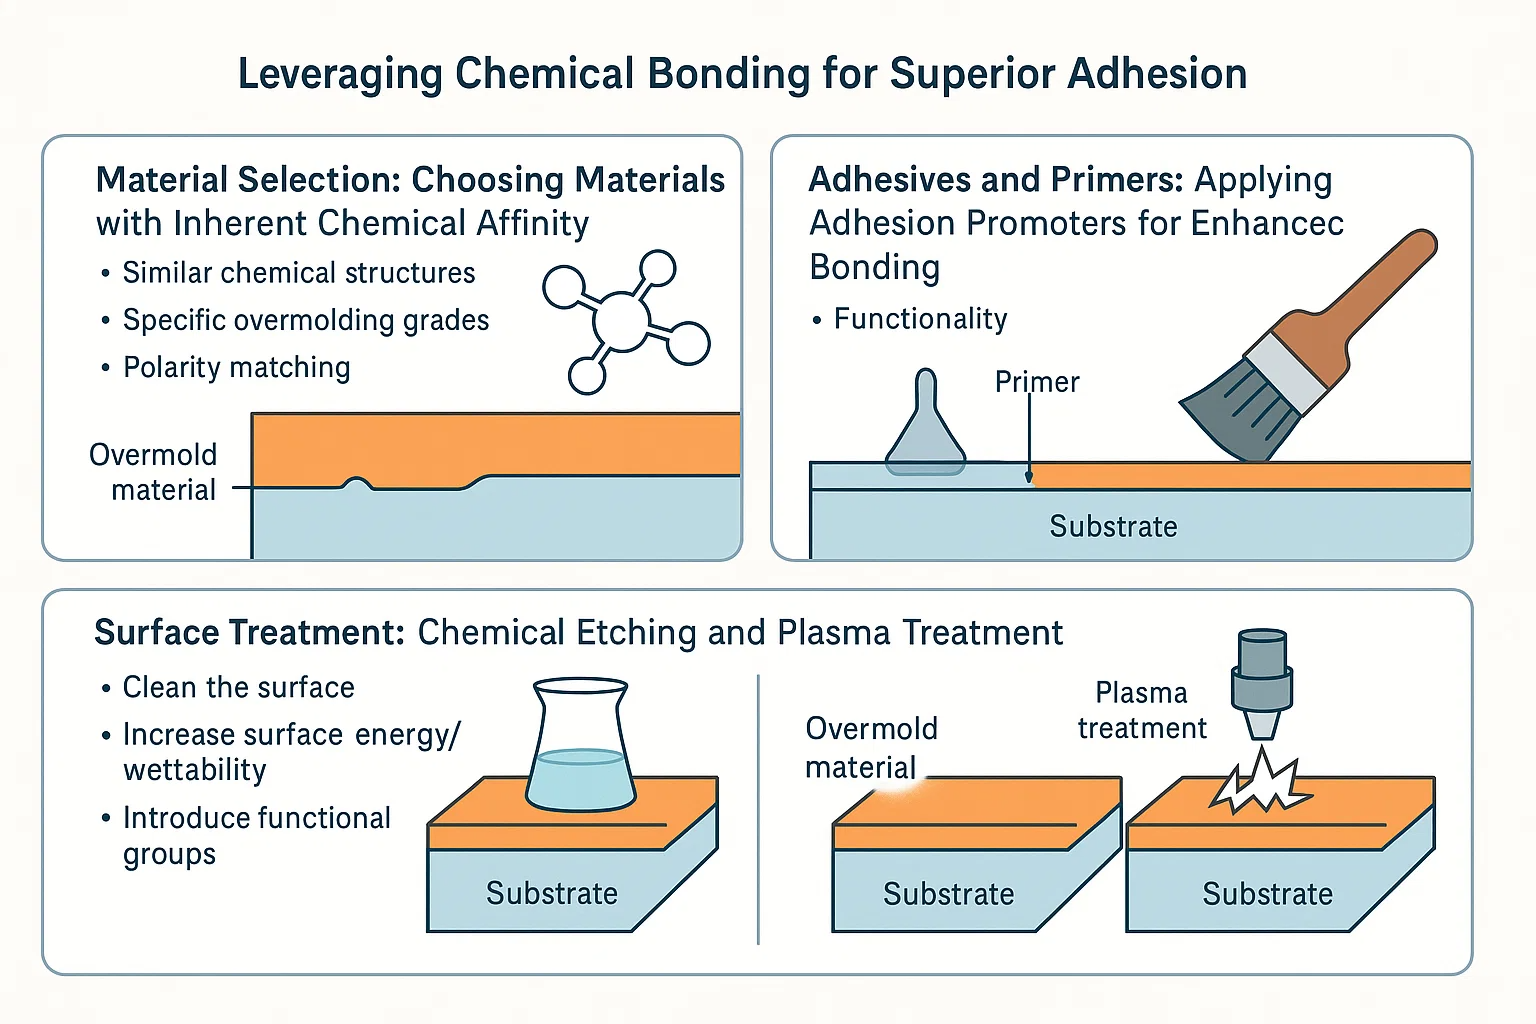
1. Material Selection: Choosing Materials with Inherent Chemical Affinity
The foundation of chemical bonding lies in selecting materials that are inherently compatible at a molecular level. This is where expertise in polymer chemistry becomes crucial.
-
Similar Chemical Structures: Polymers with similar chemical backbones or functional groups tend to bond more readily. For example, certain thermoplastic polyurethanes (TPUs) are known to form strong chemical bonds with polycarbonates (PC) and acrylonitrile butadiene styrene (ABS) due to shared polar characteristics and potential for hydrogen bonding or other molecular attractions.
-
Specific Overmolding Grades: Many material suppliers offer specialized overmolding grades of TPEs or other polymers. These grades are engineered to contain additives or unique polymer chain structures that promote chemical reactivity and adhesion with specific rigid substrates (e.g., TPEs designed to bond with Nylon, PE, or PP, which are typically challenging).
-
Polarity Matching: Materials with similar polarity tend to interact better. Polar materials (like PC, ABS, Nylon) are more likely to bond with other polar materials, while non-polar materials (like PP, PE) require specific additives or surface treatments to achieve good adhesion with polar overmold materials.
Working closely with material suppliers to choose the optimal resin pair for your specific application is often the most straightforward path to achieving chemical bonding.
2. Adhesives and Primers: Applying Adhesion Promoters for Enhanced Bonding
When inherent chemical affinity between materials is limited, or an extra layer of security is needed, adhesives or primers (adhesion promoters) can be used. These substances act as a bridge, creating a bond with both the substrate and the overmold material.
-
Primers/Tie Layers: These are typically thin coatings applied to the substrate before the overmolding process. They contain chemical groups that can react with both the substrate surface and the molten overmold material, forming a molecular bridge.
-
Reactive Adhesives: In some specialized applications, a thin layer of a reactive adhesive might be applied. However, this adds a secondary process step and is less common in high-volume injection overmolding where the goal is often to eliminate such steps.
-
Functionality: Primers are particularly useful for bonding dissimilar materials, such as silicone rubber to plastic or metal to plastic, where direct chemical bonding through conventional overmolding is challenging.
The application method (spraying, dipping, wiping) and drying conditions for primers are critical to their effectiveness.
3. Surface Treatment: Chemical Etching and Plasma Treatment
Even with chemically compatible materials, surface contaminants or low surface energy can hinder bonding. Various surface treatments can prepare the substrate to be more receptive to chemical interaction.
-
Chemical Etching: This involves exposing the substrate surface to specific chemical solutions that microscopically alter its topography and chemical composition. It can remove weak boundary layers and create reactive sites, thereby increasing the surface energy and promoting stronger chemical bonds. For example, some polyolefins can be chemically etched to improve their bondability.
-
Plasma Treatment (Atmospheric or Vacuum): This highly effective method uses ionized gas (plasma) to modify the top few atomic layers of the substrate surface. Plasma treatment can:
-
Clean the surface: Remove organic contaminants at a molecular level.
-
Increase surface energy/wettability: Make the surface more "receptive" to the molten overmold material, allowing it to spread more effectively.
-
Introduce functional groups: Create new chemical groups on the surface that can directly react with the overmold material, forming covalent bonds.
-
-
Corona Treatment: Similar to plasma treatment, corona discharge treatment uses high-frequency electrical discharge to modify the surface properties of non-porous materials, commonly used on films and sheets, but also applicable to some molded parts to improve wettability and adhesion.
By strategically combining material selection with appropriate surface preparation techniques, manufacturers can unlock the full potential of chemical bonding, leading to overmolded parts with exceptional, long-lasting adhesion and structural integrity.
Optimizing the Overmolding Process
Even with the perfect material selection and a brilliantly designed mold, the actual overmolding process parameters are the linchpin that ensures a strong, consistent bond. Small deviations in temperature, pressure, or speed can significantly impact the quality of the interface between the substrate and the overmold material. Precise control of these parameters is crucial for achieving a permanent bond.
1. Temperature Control: Managing Melt Temperature and Mold Temperature
Temperature plays a dual role in overmolding, affecting both material flow and bonding.
-
Melt Temperature: The temperature of the molten overmold material entering the mold is critical.
-
Too Low: If the melt temperature is too low, the material won't flow easily. It might not fully wet the substrate surface, fail to fill intricate mechanical interlocks, or solidify too quickly, leading to incomplete contact and a weak bond.
-
Too High: Conversely, an excessively high melt temperature can cause material degradation, leading to poor mechanical properties, discoloration, or even burning. It can also risk deforming or damaging the substrate, especially if the substrate has a lower heat deflection temperature.
-
Optimal Balance: The ideal melt temperature ensures the material's viscosity is low enough for good flow and wetting, promoting intimate contact and chemical interaction, without causing degradation.
-
-
Mold Temperature: The temperature of the mold itself directly impacts how the overmold material cools and solidifies.
-
Too Cold: A mold that's too cold can cause the overmold material to "freeze off" prematurely, leading to incomplete filling, poor surface finish, and inadequate contact with the substrate, preventing effective bonding.
-
Too Hot: An overly hot mold can prolong cycle times, cause material degradation, or lead to excessive shrinkage and warpage as the part cools outside the mold.
-
Substrate Considerations: For overmolding, the mold temperature also influences the surface temperature of the substrate. An appropriately warm mold can help keep the substrate surface slightly pliable, improving the overmold material's ability to bond. However, it must not be so hot as to cause the substrate to deform.
-
2. Pressure and Injection Speed: Adjusting Parameters for Optimal Material Flow
The force and speed at which the overmold material enters the cavity are vital for proper filling and adhesion.
-
Injection Speed:
-
Too Slow: A slow injection speed can lead to premature cooling of the molten material before it fully fills the cavity or intimately contacts the substrate. This can result in short shots, flow lines, and weak bond areas.
-
Too Fast: An excessively fast injection speed can cause "jetting" (uncontrolled flow causing turbulance), air entrapment (leading to voids or weak spots), or even erode the substrate surface, all of which compromise bond strength.
-
Controlled Fill: The optimal injection speed ensures a smooth, laminar flow that allows the molten material to uniformly fill the cavity and fully wet the substrate surface, promoting maximum contact and mechanical interlocking.
-
-
Injection Pressure (Fill Pressure & Holding/Packing Pressure):
-
Fill Pressure: This is the pressure used during the initial filling phase. Sufficient pressure ensures the material reaches every part of the cavity, especially into intricate features designed for mechanical interlocking.
-
Holding/Packing Pressure: After the mold is filled, holding pressure is applied for a specific duration. This pressure packs additional material into the cavity to compensate for material shrinkage as it cools. This is critically important for bond strength. Without adequate holding pressure, the overmold material can pull away from the substrate, leading to voids, sink marks, and bond failure. It ensures intimate contact is maintained until the material solidifies.
-
3. Cooling Rate: Controlling Cooling to Minimize Shrinkage and Stress
The rate at which the overmolded part cools significantly impacts internal stress and the integrity of the bond.
-
Uniform Cooling: Non-uniform cooling can lead to differential shrinkage between the overmold and substrate materials, creating internal stresses that can cause warpage, cracking, or delamination over time. Proper mold design with optimized cooling channels helps ensure an even cooling rate.
-
Cooling Time: Sufficient cooling time in the mold is necessary to allow the overmold material to solidify completely and develop enough strength to withstand ejection forces without deforming or separating from the substrate. Pulling a part out too early can damage the nascent bond.
-
Minimizing Stress: Controlled cooling helps minimize residual stresses within the part. High residual stresses, particularly at the material interface, are a common cause of long-term bond failure.
Mastering these process parameters requires precise machine control, often through sophisticated injection molding machines capable of fine-tuning each stage of the cycle. Continuous monitoring and adjustment based on part quality and bond integrity are essential for successful overmolding.
Design Considerations for Durable Overmolded Parts
A strong bond in overmolding starts long before the material enters the machine. It begins with intelligent product and mold design. Thoughtful design minimizes stress, ensures proper material flow, and integrates features that inherently strengthen the bond, leading to durable and reliable overmolded parts.
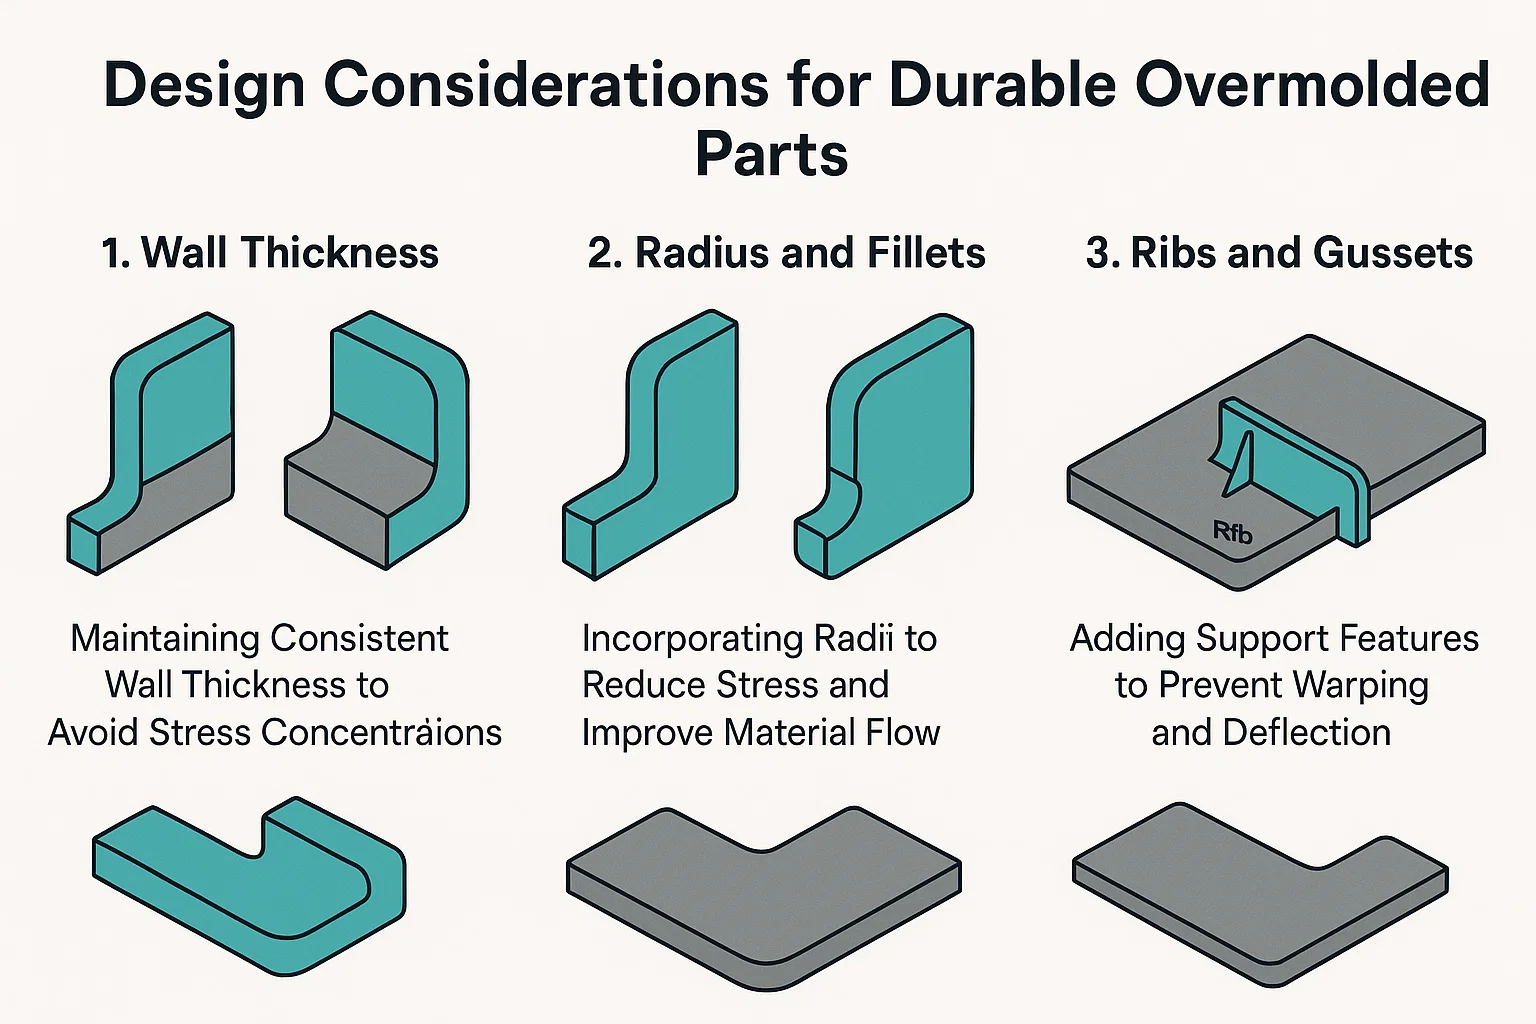
1. Wall Thickness: Maintaining Consistent Wall Thickness to Avoid Stress Concentrations
One of the most fundamental rules in plastic part design applies directly to overmolding: maintain consistent wall thickness.
-
Problem: Abrupt changes in wall thickness create areas where the material cools and shrinks at different rates. This differential cooling leads to internal stresses within the overmolded material and, critically, at the interface with the substrate. These stresses can manifest as warping, sink marks, or, most damagingly for overmolding, delamination and bond failure over time.
-
Solution: Design the overmold layer with as uniform a wall thickness as possible. If thickness variations are unavoidable due to part geometry, implement gradual transitions (e.g., using long, gentle tapers instead of sharp steps). This allows for more even cooling and minimizes stress concentrations at the bond line.
2. Radius and Fillets: Incorporating Radii to Reduce Stress and Improve Material Flow
Sharp corners are notorious stress concentrators in plastic parts. In overmolding, they pose a double threat to bond integrity.
-
Stress Concentration: Internal sharp corners (where the overmold material meets the substrate) create localized stress points, making the bond vulnerable to cracking or peeling under load or temperature changes. External sharp corners can also be weak points.
-
Poor Material Flow: Molten plastic prefers to flow smoothly. Sharp corners create resistance, potentially leading to incomplete filling, voids, or weaker areas where the material struggles to fully wet and encapsulate the substrate.
-
Solution: Incorporate generous radii (rounded external corners) and fillets (rounded internal corners) at all transitions and intersections within the overmold design and on the substrate where the overmold will contact it.
-
Benefits: Radii and fillets allow for smoother material flow, reduce stress concentrations, improve part strength, and enhance moldability, all of which contribute to a more robust bond. Aim for radii that are at least 0.5 to 1.0 times the wall thickness.
-
3. Ribs and Gussets: Adding Support Features to Prevent Warping and Deflection
While primarily known for adding stiffness and strength to plastic parts, properly designed ribs and gussets can indirectly support bond integrity in overmolding by preventing deformation of the part.
-
Preventing Warpage: Large, flat areas of overmolded material are prone to warping as they cool. If the overmold warps away from the substrate, the bond will inevitably fail. Ribs are thin, supporting walls added to the non-cosmetic side of the part. They increase rigidity without adding significant mass or requiring excessive wall thickness.
-
Reducing Deflection: Gussets are triangular support structures often placed at the junction of a wall and a boss, or at the base of a rib. They prevent deflection and reinforce corners.
-
Indirect Bond Protection: By maintaining the overall shape and dimensional stability of the overmolded part, ribs and gussets ensure that the substrate and overmold material remain in their intended configuration, preventing stresses that could pull them apart. They help maintain the integrity of the primary bonding mechanisms (mechanical or chemical).
Design Tip: When designing ribs for overmolded parts, ensure their thickness is a percentage (typically 40-60%) of the nominal wall thickness to avoid sink marks on the cosmetic side. Also, ensure they have proper draft angles for easy mold ejection.
Case Studies: Successful Overmolding Applications
Seeing how overmolding principles are applied in real-world products is the best way to understand its power and versatility in achieving robust bonds. From enhancing user experience to ensuring critical functionality, overmolding is a key enabler across diverse industries.
1. Medical Devices: Examples of Overmolding in Medical Applications
The medical device industry demands extreme precision, biocompatibility, and often, the ability to withstand sterilization. Overmolding is crucial for creating safe, comfortable, and highly functional medical products.
-
Surgical Hand Tools and Handles: Many surgical instruments, from scalpels to endoscopic tools, feature overmolded grips.
-
Bonding Success: A rigid plastic (like PEEK or ABS) forms the structural core, while a soft, often medical-grade TPE (thermoplastic elastomer) is overmolded onto the grip area. The bond ensures the grip doesn't slip during critical procedures, enhancing surgeon control and patient safety.
-
Techniques Used: Mechanical interlocking (e.g., small textured features or undercuts on the rigid handle) is often combined with chemically compatible medical-grade TPEs specifically formulated for strong adhesion to the substrate. The choice of TPE ensures biocompatibility and resistance to sterilization cycles.
-
-
Fluid Delivery Systems (e.g., IV Drip Sets, Catheters): Overmolding is used to create secure connections and prevent leaks in fluid pathways.
-
Bonding Success: A rigid connector (e.g., PC or ABS) might be overmolded with a flexible, biocompatible TPE or silicone to create a leak-proof seal or a soft, patient-friendly interface. This eliminates the need for adhesives and reduces assembly steps.
-
Techniques Used: Chemical bonding is paramount here to ensure a hermetic seal. Specialized silicone or TPE grades are chosen for their intrinsic adhesion properties to medical plastics, often coupled with surface activation (e.g., plasma treatment) on the rigid substrate for optimal molecular fusion.
-
2. Automotive Components: Overmolding Solutions in the Automotive Industry
The automotive sector leverages overmolding for both functional and aesthetic improvements, aiming for durability, noise reduction, and a premium feel.
-
Interior Trim and Buttons: Automotive interiors frequently use overmolding for features like dashboard buttons, shifter knobs, and door handle grips.
-
Bonding Success: A rigid ABS or PC substrate forms the base, overmolded with a soft-touch TPE. This provides a tactile, comfortable feel and improved ergonomics, while the bond prevents the soft-touch layer from peeling, even after years of use and exposure to temperature extremes.
-
Techniques Used: Focus on material compatibility between the TPE and the chosen rigid plastic (e.g., specific TPE grades for ABS/PC). Mechanical interlocking through subtle textures or features on the substrate further reinforces the bond against shear forces.
-
-
Gaskets and Seals: Overmolding is increasingly used to create integrated seals directly onto plastic housings or components.
-
Bonding Success: Instead of a separate O-ring or gasket that needs to be assembled, a flexible material (like TPE or a specialized rubber) is overmolded directly onto a rigid plastic housing (e.g., engine cover, sensor housing). This creates a highly effective and reliable seal, crucial for preventing fluid ingress or dust.
-
Techniques Used: Primarily relies on chemical bonding and precise mold design. The overmold material is chosen for its sealing properties and its ability to chemically adhere to the rigid component, often with careful process parameter control (e.g., injection pressure) to ensure complete filling and intimate contact for a continuous seal.
-
3. Consumer Electronics: Applications in Electronic Devices and Enclosures
Consumer electronics benefit from overmolding for improved durability, water resistance, and user comfort.
-
Wearable Devices (e.g., Smartwatches, Fitness Trackers): The bands and sometimes even parts of the device housing are overmolded.
-
Bonding Success: A rigid internal frame or sensor module (often PC or metal) is overmolded with a flexible silicone or TPE to create a comfortable, skin-friendly strap or a water-resistant enclosure. The bond must withstand flexing, sweat, and daily wear.
-
Techniques Used: Critical use of mechanical interlocking (e.g., holes, ribs, or specially designed anchor points on the rigid insert) combined with chemical bonding through specialized overmolding grades of TPE or LSR (Liquid Silicone Rubber) designed to adhere to plastics or metals. Surface preparation (e.g., plasma treatment on metal inserts) is common.
-
-
Power Tool Handles and Grips: Similar to medical tools, power tools use overmolded grips for better ergonomics and vibration dampening.
-
Bonding Success: A durable, impact-resistant plastic body (e.g., PA, ABS) is overmolded with a softer TPE or rubber. The bond provides a secure, comfortable grip that reduces user fatigue and prevents slippage, even in wet or oily conditions.
-
Techniques Used: A combination of mechanical interlocking (e.g., aggressive texturing, undercuts on the rigid handle) and optimized process parameters to ensure the overmold material fully encapsulates the grip features. Material selection focuses on TPEs with good haptics and robust adhesion to the chosen engineering plastic.
-

