 English
 Indonesia
Introduction: More Than Just a “Soft Touch”
Think about the last time you picked up a high-quality power tool or a premium toothbrush. You likely felt a hard, sturdy plastic structure underneath, but your hand was resting on a soft, grippy rubber surface. It didn’t feel like two separate parts glued together; it felt like a single, unified object.
That is the power of overmolding.
In the world of custom manufacturing, we are often forced to choose between durability and comfort, or between functionality and aesthetics. Overmolding removes that choice. It allows designers to combine multiple materials into a single part, merging the structural integrity of a rigid plastic with the tactile benefits of a soft elastomer.
But overmolding isn’t just about making things feel nice. For engineers and B2B buyers, it represents a strategic manufacturing decision that can simplify assembly lines, seal out moisture, and absorb vibration—often while lowering total production costs.
What is Overmolding?
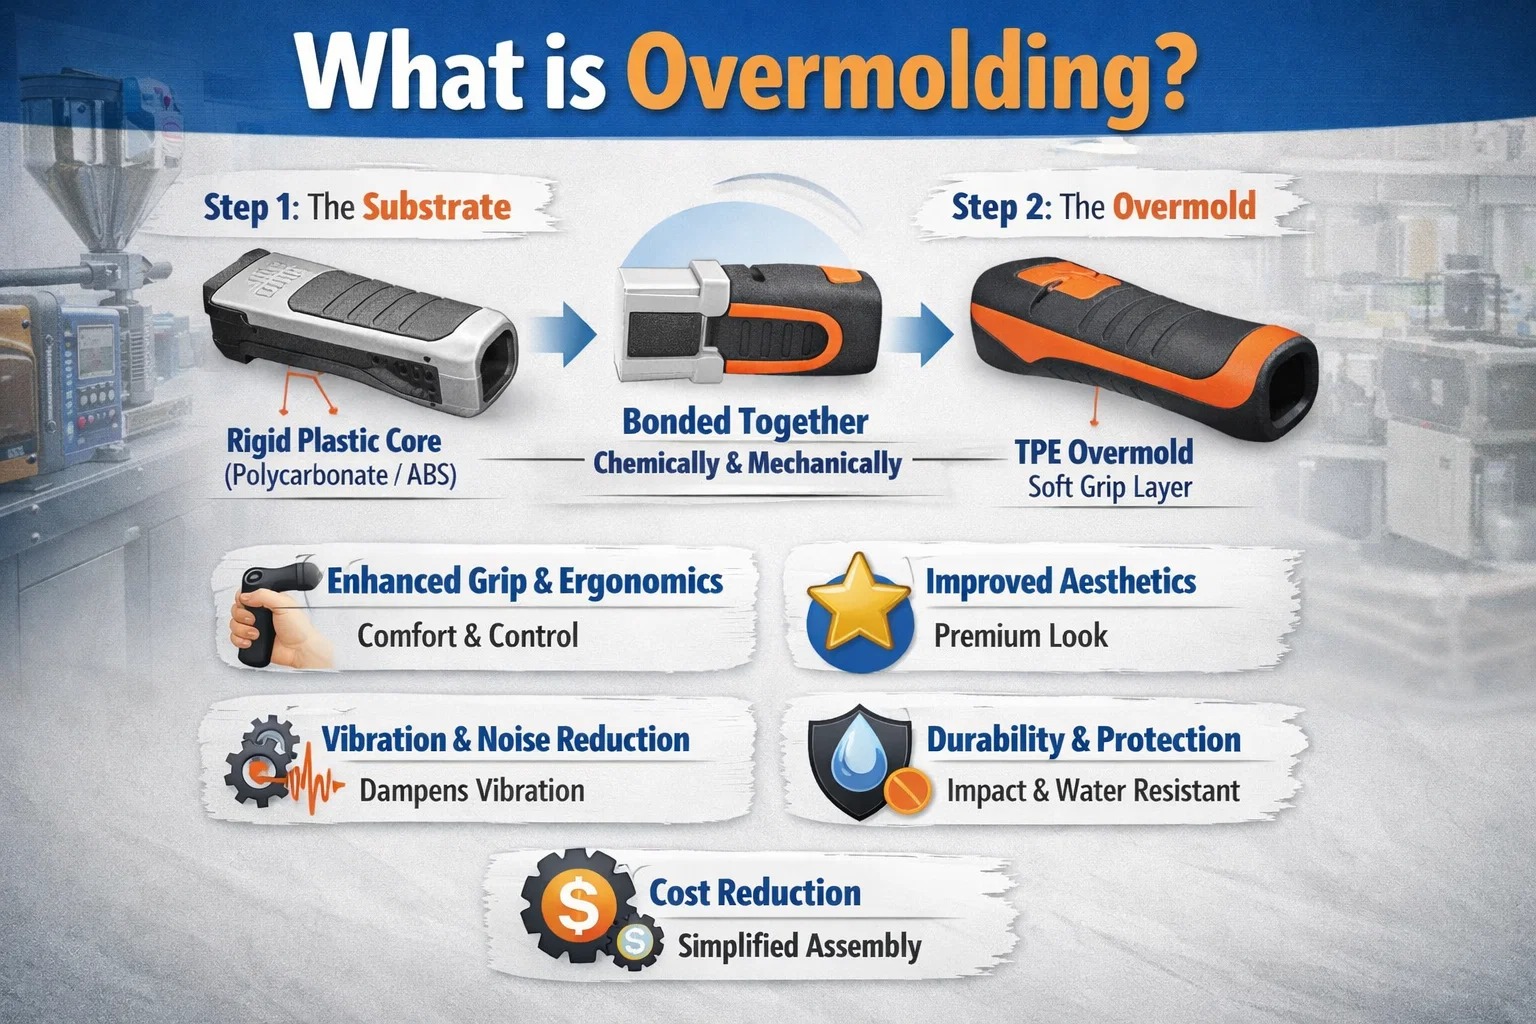
At its core, overmolding is an injection molding process where one material (usually a soft rubber or thermoplastic elastomer) is molded directly onto a second material (usually a rigid plastic).
It’s helpful to think of it as a two-step relationship:
- The Substrate: This is the base part. It’s usually a rigid plastic like Polycarbonate or ABS that provides the “skeleton” or structure.
- The Overmold: This is the material molded over the substrate. It acts as the “skin,” providing grip, color, or protection.
Unlike simple assembly where you might screw a rubber bumper onto a plastic box, overmolding creates a permanent bond. This bond is achieved either chemically (the materials melt together at the molecular level) or mechanically (the overmold flows into undercuts and holes in the substrate to lock itself in).
The Benefits of Overmolding
Why go through the trouble of designing a two-shot mold or managing two different materials? Because the payoff in product value is massive. Here is why manufacturers choose overmolding for their custom parts:
1. Enhanced Grip and Ergonomics
This is the most visible benefit. If you are designing a handheld device—whether it’s a surgical instrument or a barcode scanner—user fatigue is a real issue. A rigid plastic handle becomes slippery when wet or sweaty. Overmolding a TPE (Thermoplastic Elastomer) layer adds friction and softness, making the product safer and more comfortable to hold for long periods.
2. Improved Aesthetics and Branding
Let’s be honest: looks matter. A plain grey plastic enclosure looks functional, but it doesn’t scream “premium.” Overmolding allows you to use contrasting colors and textures. You can add a bright orange rubber bumper to a black casing to highlight brand colors or indicate touchpoints. It gives the product a finished, high-end appearance that stands out on the shelf.
3. Vibration and Noise Reduction
In industrial applications or automotive interiors, rattling parts are a sign of low quality. A soft overmolded layer can act as a built-in shock absorber. It dampens vibrations from motors and prevents plastic-on-plastic noise, protecting delicate internal electronics from shock damage.
4. Increased Durability and Protection
Overmolding effectively creates a seal. By molding a soft material over buttons or seams, you can make a device water-resistant or dust-proof without needing separate o-rings or gaskets. It also provides impact resistance; if a device is dropped, the soft overmold absorbs the energy of the impact, protecting the rigid core from cracking.
5. Cost Reduction Through Assembly Simplification
This might seem counterintuitive—doesn’t overmolding require more expensive tooling? Initially, yes. However, overmolding eliminates secondary assembly steps. You don’t need to pay a worker to glue a grip onto a handle or screw in a gasket. By integrating these features into the molding process itself, you reduce labor costs, eliminate the need for adhesives (which are messy and can fail), and speed up overall production time.
Where You’ll See Overmolding
Once you start looking for overmolding, you realize it is everywhere. Different industries use it for very different reasons, but the goal is always to improve the user experience.
- Automotive Industry: It’s all about the “premium feel” and noise reduction. That soft-touch knob on your dashboard? That’s overmolding. It eliminates the cheap, hollow sound of plastic and provides a tactile grip that feels luxurious.
- Medical Devices: Here, function rules over form. Surgeons need instruments that won’t slip when wet. Furthermore, overmolding eliminates crevices where bacteria can hide, making sterilization much easier and more effective.
- Consumer Electronics: Think of your smartphone case or a waterproof Bluetooth speaker. Overmolding provides the impact protection needed to survive a drop and the seals required to keep water out.
- Industrial Tools: Power drills and hammers take a beating. Overmolding uses impact-resistant materials to protect the tool’s motor housing and reduce vibration transfer to the worker’s hand, preventing injury over long shifts.
Overmolding Materials: The Chemistry of the Bond
This is where the rubber—quite literally—meets the road.
You can design a beautiful part with perfect geometry, but if you choose materials that aren’t chemically compatible, the overmold will peel off like a sticker. Successful overmolding is a chemistry experiment. You need the substrate (the rigid part) and the overmold (the soft part) to want to stick together.
Here are the most common players in the game:
1. Thermoplastics (The Most Common Choice)
For the vast majority of custom parts, you will be dealing with Thermoplastic Elastomers (TPEs) or Thermoplastic Polyurethanes (TPUs).
- TPE (Thermoplastic Elastomer): This is the industry workhorse. It’s versatile, easy to color, and feels soft to the touch. It bonds exceptionally well with common plastics like Polycarbonate (PC) and ABS. If you are making a toothbrush grip or a soft handle, TPE is likely your best bet.
- TPU (Thermoplastic Polyurethane): If TPE is the “soft comfortable” choice, TPU is the “tough guy.” It offers incredible resistance to abrasion, scratches, and chemicals. You’ll often see TPU used on the bottom of electronics cases or industrial gear that gets dragged across rough surfaces.
- TPV (Thermoplastic Vulcanizate): This material is closer to actual rubber. It has excellent heat resistance and weather resistance, making it perfect for under-the-hood automotive parts or outdoor seals.
2. Thermosets (Rubber and Silicone)
Sometimes, thermoplastics just aren’t enough. You might need the extreme heat resistance or biocompatibility of silicone (LSR) or natural rubber.
- Liquid Silicone Rubber (LSR): LSR is the gold standard for medical implants and high-heat cooking utensils. However, it is tricky. Because silicone cures (cross-links) rather than just melts, it doesn’t naturally want to bond to many plastics. Overmolding silicone usually requires specialized “self-bonding” grades or mechanical interlocks (holes and anchors) in the design to hold it in place.
How to Select the Right Materials
When our clients come to us with a project, we start by asking four questions to narrow down the material list:
1. What is the Substrate?
This is the most critical constraint. If your base part is Nylon, you need a TPE specifically formulated to bond with Nylon. If your base part is Polypropylene, you need a different TPE. We often say, “Like likes like.” Polar materials bond best with other polar materials.
2. What is the Environment?
Will this part be used inside an air-conditioned office, or will it be bolted to an engine block? If it needs to withstand high UV exposure (outdoors) or oil and grease (automotive), standard TPE might degrade. In those cases, you might move up to TPV or TPU.
3. How Soft Should it Feel?
We measure hardness using the Shore A scale.
- Shore 30A-40A: Very soft, gel-like (like a gel shoe insole).
- Shore 60A-70A: Firm but flexible (like a car tire or shoe heel).
- Shore 90A: Hard, barely any give (like a shopping cart wheel).
Most hand grips sit comfortably in the 50A–70A range.
4. Friction and Haptics
Do you want the grip to feel “sticky” (high friction) or “silky” (low friction)? A high-friction grip is great for a hammer, but terrible for a device that needs to slide easily into a pocket.
A Note on Bonding Compatibility
If you take nothing else away from this section, remember this: Chemical adhesion is king.
While we can design mechanical locks (more on that in the Design section), true chemical bonding creates the strongest parts.
- Best Friends: ABS and Polycarbonate generally bond very well with TPE and TPU.
- Difficult Relationships: Nylon (PA) and POM (Acetal) are notoriously difficult to bond to. They often require specialized, more expensive grades of overmold material to achieve adhesion.
The Overmolding Process: Two Ways to Get the Job Done
When you decide to overmold a part, you have to choose a manufacturing method. This choice usually comes down to your budget and your production volume.
There are generally two ways we achieve overmolding:
1. Insert Molding (The Flexible Choice)
Insert Molding is the most common method for lower production volumes or when overmolding onto metal parts.
How it works:
- The substrate (the rigid part) is molded first in a separate machine.
- A worker (or a robot) takes that finished rigid part and places it by hand into a second mold cavity.
- The machine closes, and the soft TPE is injected over the rigid part.
Pros: Lower tooling costs (you use standard machines).
Cons: Higher labor costs (someone has to move the parts) and slower cycle times.
2. Two-Shot (2K) Molding (The High-Speed Choice)
If you are making millions of toothbrushes or disposable razors, this is how you do it. Two-shot molding requires a specialized machine with two injection units.
How it works:
- The machine injects the rigid plastic to form the substrate.
- The mold creates a space—usually by rotating 180 degrees or using a sliding steel core—and immediately injects the second material (the TPE) into the same tool.
- The part comes out fully finished.
Pros: Incredibly fast, precise, and consistent quality. No manual handling means less contamination.
Cons: The tooling is expensive. You are paying for a complex, rotating mold and a specialized machine.
Design Considerations: How to Avoid a Mess
Designing for overmolding is trickier than standard injection molding. You aren’t just managing the flow of one material; you are managing the interaction of two materials with different thermal properties.
Here are the “Golden Rules” we give our engineering clients to ensure their design is manufacturable.
1. Wall Thickness is Critical
Just like in standard molding, consistency is key. If your TPE layer is too thick, it will shrink significantly as it cools. Since the rigid substrate underneath won’t shrink as much, this causes the whole part to warp or bow.
- The Rule: Keep the TPE wall thickness uniform. We generally recommend a TPE thickness between 0.5mm and 3.0mm. Anything thicker invites sink marks and warping.
2. Use Mechanical Interlocks (The “Belt and Suspenders” Approach)
Even if your materials are chemically compatible, we always recommend designing mechanical interlocks. This is a physical feature that traps the overmold material so it can’t peel away.
Think of it like buttoning a shirt. Chemical adhesion is the fabric; the interlock is the button.
- Holes: If you design holes in the substrate, the TPE flows through to the other side, essentially “mushrooming” out to lock itself in.
- Undercuts: Create a dovetail or groove in the rigid part that the TPE flows into.
- Wraparounds: Simply wrapping the TPE around the edge of the part to the back side creates a physical anchor.
3. Manage the “Shut-Off”
The “shut-off” is the line on your part where the soft material stops and the hard plastic begins. This is the most common place for defects.
- If the steel tool doesn’t press down hard enough on the substrate, the high-pressure TPE will squirt past the line, creating ugly “flash.”
- Design Tip: Design a groove or a step at the shut-off line. It creates a crisp, clean transition and helps the steel tool seal tightly against the plastic to prevent flashing.
4. Don’t Feather the Edges
Avoid designing the TPE layer to taper off to zero thickness (a “feather edge”). Thin rubber is weak. It will peel up, curl, and tear almost immediately.
- The Fix: Always end the TPE layer abruptly in a groove or flush with a wall. Give the material enough thickness (at least 0.5mm) right up to the edge so it has structural integrity.
Troubleshooting: When Things Go Wrong
Even seasoned engineers run into issues with overmolding. Because you are wrestling with two different materials and thermal dynamics, the margin for error is smaller than in standard molding. Here are the three most common defects we see and how to fix them.
1. Delamination (Peeling)
The Symptom: The soft overmold peels off the rigid substrate like a sticker.
The Cause: This is almost always a chemical incompatibility or a “cold substrate.” If the rigid part cools down too much before the soft material hits it, the molecular bond won’t form.
The Fix:
- Check Compatibility: Are you trying to bond TPE to Nylon without a bonding agent?
- Preheat the Substrate: In insert molding, we often preheat the rigid parts in an oven before placing them in the mold. This helps the two materials fuse better.
2. Flash (The Messy Edge)
The Symptom: Excess thin material squirting out past the intended design line.
The Cause: TPE is often very fluid (low viscosity). If the steel tool doesn’t shut off perfectly against the rigid substrate, the TPE will escape.
The Fix: You need a “crush” fit. The steel tool should be designed to press into the substrate slightly (about 0.002 inches) to create a tight seal.
3. Short Shots
The Symptom: The mold isn’t filling completely; parts of the grip are missing.
The Cause: Trapped air. As the TPE flows over the substrate, air can get trapped at the end of the fill, preventing the material from completing the shape.
The Fix: Improve venting in the mold. The air needs a way to escape so the plastic can fill the void.
The Cost Reality: Is Overmolding Worth It?
Let’s talk numbers. B2B buyers often hesitate when they see the initial quote for overmolding.
The Upfront Investment
Yes, overmolding is expensive initially.
- Tooling: You are essentially paying for two molds (or one highly complex 2-shot mold). Expect tooling costs to be 50% to 100% higher than a standard single-shot mold.
- Machine Time: If you are using a 2-shot machine, the hourly rate is higher than a standard press.
The Long-Term Savings
However, the “sticker shock” usually disappears when you look at the Total Cost of Ownership.
- Zero Assembly Labor: You eliminate the labor cost of gluing, screwing, or snapping parts together.
- No Adhesives: You stop buying expensive industrial glues and primers.
- Quality Control: You eliminate the risk of assembly errors (e.g., a worker forgetting to install a gasket).
The Verdict: If you are producing low volumes (under 1,000 units), overmolding might be overkill—stick to manual assembly. But for high-volume production (10,000+ units), the labor savings almost always outweigh the higher tooling cost.
Selecting an Overmolding Partner
Not every injection molding shop can handle overmolding. It requires specific equipment and deeper material science knowledge. When vetting a supplier, look for these three things:
- Two-Shot Experience: Ask for samples. If they only do “insert molding” (hand-loading parts), they might struggle with high-volume precision.
- Material Expertise: Ask them, “What grade of TPE do you recommend for bonding to Glass-Filled Nylon?” If they can’t answer that immediately or offer to talk to their material supplier, run.
- Simulation Software: Do they use Moldflow analysis? Simulation is critical in overmolding to predict how the second material will flow over the first one without re-melting or warping it.
Conclusion
Overmolding is one of the most effective ways to elevate your product from “functional” to “market leader.” It turns a simple plastic enclosure into a durable, ergonomic, and premium device.
While the design rules are stricter and the initial tooling is an investment, the payoff—in product performance, aesthetics, and assembly savings—is undeniable.
Whether you are designing the next generation of medical devices or rugged industrial tools, the key to success lies in early collaboration. Don’t wait until the design is frozen. Bring your manufacturing partner in early to discuss material pairing and shut-off locations, and you’ll ensure a bond that lasts a lifetime.
Bonus Resource: The Overmolding Compatibility Matrix
Engineers often ask us, “Will TPE stick to this?” The answer is rarely a simple yes or no—it depends on the chemistry.
Use this chart as a quick reference guide. We’ve categorized the bonds into three levels:
- Chemical Bond: The materials fuse naturally during molding.
- Mechanical Lock Required: They won’t stick chemically; you must design holes or undercuts to trap the overmold.
- Incompatible: These materials clash (e.g., melt temperatures are too different) and should not be used together.
Common Material Pairings
| Substrate (Rigid) | TPE (Styrenic) | TPU (Urethane) | TPV (Vulcanizate) | Silicone (LSR) |
|---|---|---|---|---|
| ABS | Excellent | Good | Fair | Primers Needed |
| Polycarbonate (PC) | Excellent | Excellent | Fair | Primers Needed |
| Polypropylene (PP) | Good | Poor | Excellent | Poor |
| Nylon (PA6 / PA66) | Difficult* | Fair | Fair | Poor |
| Polystyrene (PS) | Good | Poor | Poor | Poor |
| POM (Acetal) | Poor | Poor | Poor | Poor |
Engineering Pro-Tips for this Chart
1. The “Nylon Problem”
You will notice Nylon (PA) is marked as “Difficult.” This is the most common trap for new designers. Nylon is hygroscopic (absorbs moisture) and has high heat resistance. Standard TPE will peel right off.
- The Solution: You must specify a modified TPE grade specifically designed for Nylon adhesion. You also need to keep the Nylon substrate hot (often pre-heating it) so the TPE doesn’t freeze the moment it touches the surface.
2. The “Like Likes Like” Rule
The secret to reading this chart is Polarity.
- Polar Materials (ABS, PC, TPU) like to bond with other Polar materials.
- Non-Polar Materials (PP, PE, Standard TPE) like to bond with other Non-Polar materials.
- Mixing them (e.g., TPU on Polypropylene) usually fails without chemical modification.
3. When in Doubt, Interlock
Even if you have an “Excellent” rating (like ABS + TPE), we still recommend adding a small mechanical interlock if the part will face heavy abuse. It costs nothing extra in the design phase but provides insurance against delamination in the field.
Final Call to Action (CTA)
Since this is a B2B lead generation article, here is a suggested closing CTA to place after the chart:
"Still unsure if your material combination will work?
Don’t guess with your mold budget. At IMTEC Mould, we have overmolded thousands of custom parts. Send us your 3D file or material list today, and our engineers will perform a free DFM (Design for Manufacturability) review to ensure your materials bond perfectly—before you cut steel."
Frequently Asked Questions About Overmolding
Q: What is the difference between insert molding and overmolding?
A: The main difference is the process, not the result. Insert molding involves placing a pre-formed part (often metal or a rigid plastic) into a mold manually before injecting the second material. Overmolding (specifically two-shot molding) is a continuous, automated process where a machine injects the first material and immediately injects the second material into the same tool. Insert molding is generally better for low volumes, while two-shot overmolding is better for high-volume mass production.
Q: Why does my overmolded part peel off (delaminate)?
A: Peeling usually happens for one of three reasons:
- Chemical Incompatibility: You chose two materials that don’t bond naturally (e.g., TPU onto Polypropylene).
- Cold Substrate: If the first rigid part cools down too much before the second material is injected, they won’t fuse.
- Contamination: If you are insert molding, dust or oil on the surface of the substrate will prevent adhesion.
Q: Can you overmold plastic onto metal?
A: Yes. This is almost always done via Insert Molding. Common examples include overmolding a soft handle onto a metal wrench or molding plastic insulation around copper electrical contacts. Since metal and plastic don’t bond chemically, you must design the metal part with holes, knurling, or grooves so the plastic can mechanically lock onto it.
Q: How much does overmolding cost compared to standard molding?
A: Expect tooling costs to be 50% to 100% higher than a standard single-shot mold because the tool is more complex. However, the piece price (cost per unit) often drops because you eliminate the labor costs of manual assembly and adhesives. For production runs over 10,000 units, overmolding is usually the more cost-effective option.
Q: What is the minimum wall thickness for the overmolded layer?
A: We recommend a minimum thickness of 0.5mm (0.020 inches) for the soft TPE layer. Anything thinner than this tends to tear during ejection or peel up at the edges. For the best “soft touch” feel without causing sink marks, a thickness between 1.5mm and 3.0mm is ideal.

