 English
 Indonesia
Introduction
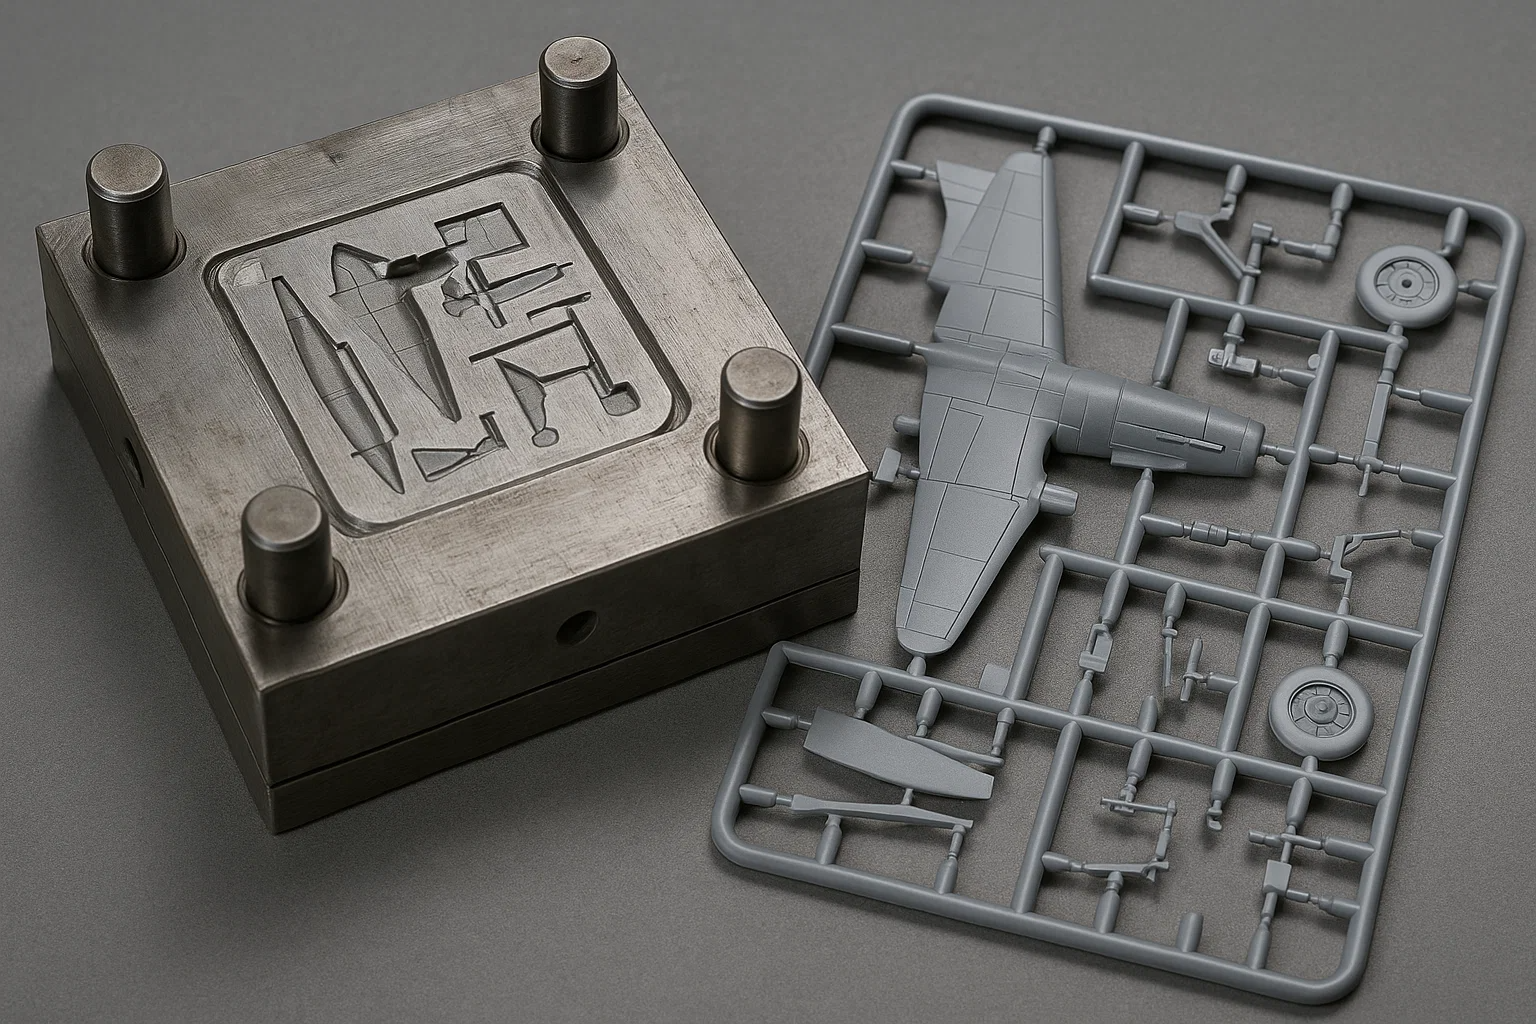
Plastic model kits have captivated enthusiasts of all ages for decades, offering a tangible way to recreate everything from historic aircraft and iconic automobiles to futuristic spacecraft and fantastical creatures. Their enduring popularity lies in the meticulous detail and accuracy they bring to miniature replicas, allowing hobbyists to assemble, paint, and customize their favorite subjects. But have you ever wondered how these incredibly detailed parts are made?
The secret lies in the high-quality molds used in their production. These molds are the unsung heroes of the model kit world, directly influencing the precision, fit, and overall quality of every single component. Without expertly crafted molds, even the most intricate designs would fall flat, resulting in ill-fitting parts and a less-than-satisfying building experience.
This article will pull back the curtain on the fascinating and intricate process of making plastic model molds. We'll take you on a journey from the initial design concept through advanced manufacturing techniques like CNC machining, delving into the materials, finishing touches, and rigorous testing that ensure each mold produces perfect parts. By understanding this complex journey, you'll gain a new appreciation for the engineering and artistry behind your favorite plastic models.
Understanding the Basics of Injection Molding
At the heart of nearly all modern plastic model kit manufacturing lies a sophisticated process known as injection molding(tolerances measured in microns). This technique is the cornerstone for mass-producing identical plastic parts with high precision and efficiency, making it ideal for the intricate components found in model kits. Before we delve into the specifics of mold creation, it's crucial to grasp the fundamental principles of how injection molding works, as the mold itself is designed specifically to function within this process.
How Injection Molding Works
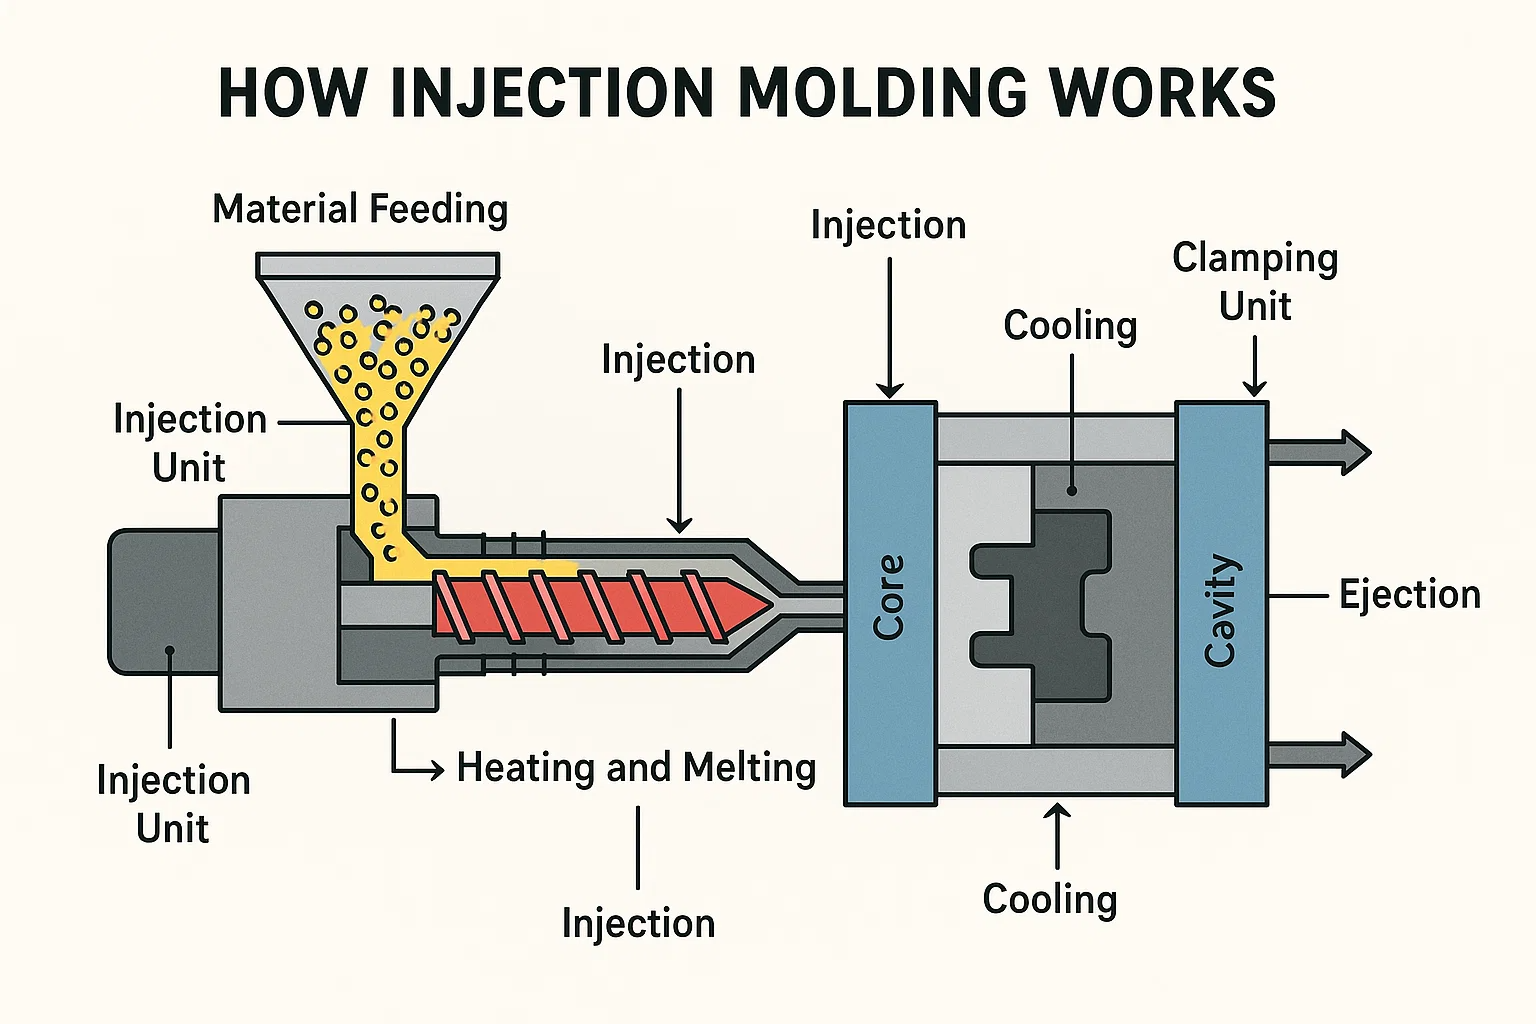
Imagine a highly controlled and automated process that transforms raw plastic pellets into a perfectly shaped component in a matter of seconds. That's essentially what happens during injection molding. The process can be broken down into several key stages:
- Material Feeding: Raw plastic material, typically in granular or pellet form, is fed from a hopper into a heated barrel.
- Heating and Melting: Inside the barrel, a large screw rotates, moving the plastic forward while simultaneously heating it to a molten state. The temperature is precisely controlled to ensure the plastic reaches the correct viscosity.
- Injection: Once the plastic is molten and homogeneous, the screw acts like a plunger, rapidly injecting the liquid plastic under high pressure into the closed mold cavity. This pressure ensures that the plastic fills every nook and cranny of the mold, capturing even the finest details.
- Cooling: After the molten plastic fills the mold, it begins to cool and solidify. The mold itself is designed with cooling channels through which water or oil circulates, quickly dissipating heat and allowing the part to solidify rapidly. This cooling time is critical for the part's structural integrity and cycle efficiency.
- Ejection: Once the plastic has sufficiently cooled and solidified into the desired shape, the mold halves open, and ejector pins push the finished part out of the mold cavity. The mold then closes, ready for the next injection cycle.
Key Components of an Injection Molding Machine
An injection molding machine, often simply called an "injection molder" or "press," is a complex piece of equipment with several vital components working in concert:
- Clamping Unit: This unit holds the mold halves together with immense force during the injection and cooling phases to prevent the mold from opening under the high pressure of the injected plastic.
- Injection Unit: This unit is responsible for melting and injecting the plastic material. It typically consists of a hopper, a barrel with heating bands, and a reciprocating screw.
- Mold: As the star of our show, the mold is the custom-designed tool that gives the plastic its final shape. It's typically made of two halves (the "cavity" and "core") that mate precisely to form the part geometry.
- Control System: Modern injection molding machines feature sophisticated computer control systems that precisely regulate temperature, pressure, speed, and timing throughout the entire process, ensuring consistent quality and efficiency.
Understanding this fundamental process is essential because every decision made during mold design and manufacturing directly impacts how well the mold will perform within an injection molding machine, ultimately determining the quality and consistency of the plastic model parts it produces.
The Mold Design Phase
With a clear understanding of how injection molding transforms raw plastic into finished parts, we can now appreciate the paramount importance of the mold design phase. This is where the magic truly begins, as abstract ideas and 2D sketches evolve into a precise digital blueprint that will guide the mold's physical creation. It’s a meticulous process where every curve, angle, and dimension of the final plastic model part is carefully considered and translated into the mold's geometry.
Conceptualization and CAD (Computer-Aided Design)
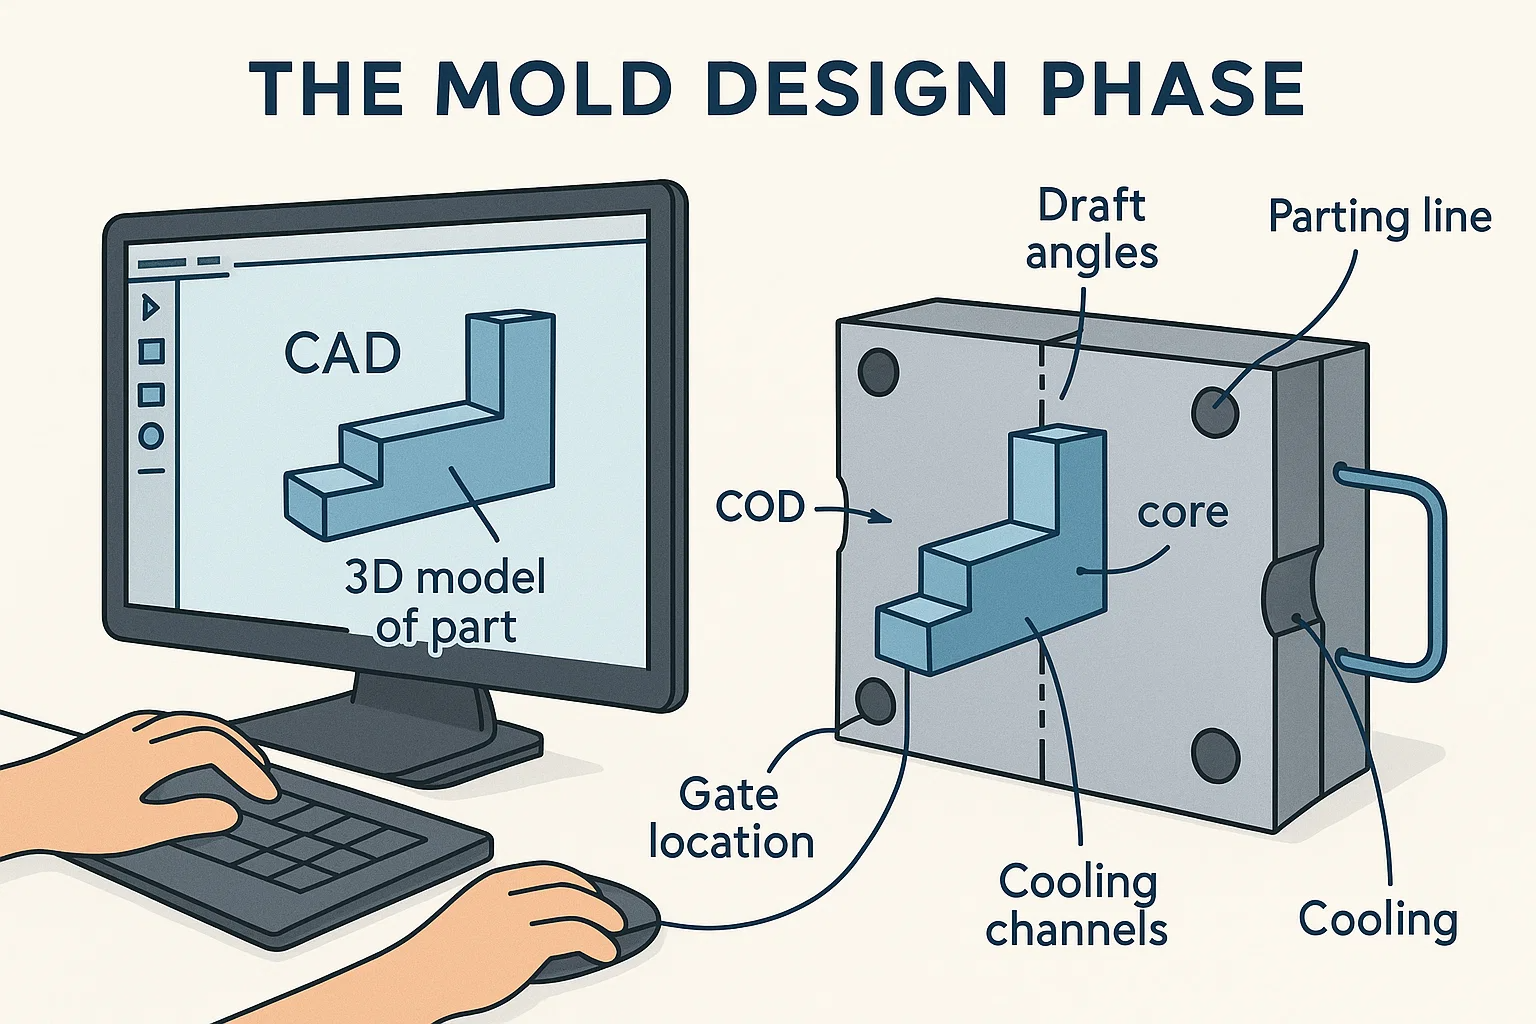
The journey of a new plastic model kit part typically starts with a concept – perhaps a historical document, a detailed blueprint of a real-world object, or an artist's rendering of a fictional design. This concept is then brought to life in a digital environment using CAD (Computer-Aided Design) software. Engineers and designers work collaboratively to:
- Create a 3D model of the part: This is an exact digital replica of the plastic component that will be molded. It includes all the intricate details, textures, and features visible on the final model kit piece.
- Design the mold around the part: Once the part itself is finalized, the focus shifts to designing the mold that will produce it. This involves creating the mold's various components, including the core and cavity halves, as well as the intricate internal structures that facilitate the molding process. Modern CAD software allows for sophisticated simulations, predicting how plastic will flow and cool within the mold, helping to identify potential issues before any physical manufacturing begins.
Considerations for Mold Design
Designing an effective mold is far more complex than simply creating a negative impression of the part. Several critical factors must be meticulously considered to ensure successful, high-quality production:
- Draft Angles: These are slight tapers added to vertical walls of the part. Without draft angles, parts would stick in the mold, making ejection difficult or impossible and potentially damaging the part or the mold itself. Even a few degrees can make a significant difference.
- Parting Lines: This is the line where the two halves of the mold meet. Its placement is crucial for both aesthetic reasons (minimizing visible lines on the final part) and functional reasons (allowing for easy part ejection and proper mold filling). Strategic parting line placement can hide the line along natural edges or contours of the part.
- Gate Locations: The gate is the small opening through which molten plastic enters the mold cavity. Its location is vital for ensuring uniform plastic flow, complete filling of the mold, and minimizing visual blemishes on the finished part. Designers consider multiple gate types and positions to achieve optimal results.
- Venting: As molten plastic fills the mold, air trapped inside must have a way to escape. Tiny vents, often just a few thousandths of an inch deep, are incorporated into the mold design along the parting line. Without proper venting, trapped air can lead to incomplete parts, burn marks, or structural weaknesses.
- Cooling Channels: As mentioned in the previous section, molds incorporate intricate channels for cooling fluids. The design of these channels directly impacts the cooling time and uniformity, which in turn affects part quality and production cycle time.
The precision and foresight applied during this design phase are paramount, as errors here can lead to costly rework or production issues down the line. It's a testament to engineering ingenuity, laying the foundation for physical creation.
This meticulous digital planning then directly informs the next critical step: the selection of the right materials for the mold itself, a decision that profoundly impacts its durability, performance, and cost.
Material Selection for Molds
Once the intricate blueprint of the mold has been meticulously designed in the digital realm, the next crucial decision involves choosing the right materials for its physical construction. This isn't merely about picking a strong metal; it's a strategic choice that balances durability, thermal properties, machinability, and cost. The selected material will dictate the mold's lifespan, its ability to produce consistent parts, and ultimately, the efficiency of the entire production process.

Different Types of Materials Used for Molds
While a variety of materials can be used, the most common choices for plastic model molds fall into a few key categories, each with distinct advantages:
- Steel: This is by far the most prevalent material for high-volume, high-precision injection molds, particularly for plastic model kits. Various grades of tool steel are used, with specific properties tailored for mold making:
- P20 Steel: A pre-hardened mold steel that offers good machinability and polishability. It's a common choice for molds requiring moderate production runs.
- H13 Steel: A hot-work tool steel known for its excellent resistance to thermal fatigue and wear. It's often used for molds with high temperature demands or for very long production runs.
- S7 Steel: A shock-resistant tool steel offering good toughness and high impact resistance, suitable for molds that might experience higher stresses during operation.
- Stainless Steel (e.g., 420 SS): Used when corrosion resistance is critical, such as for molding PVC or other corrosive plastics, or in humid environments.
- Aluminum: While less common for the highest volume plastic model molds due to its softer nature, aluminum alloys (like 7075 or 6061) are increasingly used for:
- Prototyping molds: For initial testing and limited production runs, where quick turnaround and lower cost are priorities.
- Low-volume production: When the expected number of parts is not in the millions.
- Mold inserts: For specific details within a larger steel mold, benefiting from aluminum's excellent thermal conductivity.
- Alloys (e.g., Beryllium Copper): These are specialized alloys used for specific mold components where high thermal conductivity is paramount. For example, beryllium copper inserts might be used in areas of the mold that require very rapid cooling to optimize cycle times or prevent warping.
Factors Influencing Material Choice
Several intertwined factors guide the selection of the ideal mold material:
- Durability and Wear Resistance: How many parts is the mold expected to produce? Molds intended for millions of cycles will require harder, more wear-resistant steels, while prototyping molds can use softer, less expensive materials.
- Thermal Conductivity: How quickly can the mold dissipate heat from the cooling plastic? Materials with high thermal conductivity (like aluminum or beryllium copper) can shorten cycle times, leading to faster production. Steel, while durable, conducts heat less efficiently than aluminum.
- Cost: Mold materials vary significantly in price. High-grade tool steels are considerably more expensive than aluminum. The material cost must be weighed against the expected production volume and the overall project budget.
- Machinability and Polishability: Some materials are easier to machine and polish to a high surface finish than others. This impacts manufacturing time and the final surface quality of the molded part.
- Corrosion Resistance: If the plastic material being molded is corrosive (e.g., PVC), or if the mold will be stored in a humid environment, a corrosion-resistant material like stainless steel is necessary.
Pros and Cons of Each Material
| Material Type | Pros | Cons |
| Steel | - High durability and wear resistance (long lifespan) | - Higher cost |
| - Excellent for high-volume production | - Lower thermal conductivity (longer cooling times) | |
| - Can achieve very high surface finishes | - Heavier and harder to machine | |
| - Good dimensional stability | - Can be susceptible to corrosion (unless stainless) | |
| Aluminum | - Lower cost (especially for prototyping/low volume) | - Lower durability and wear resistance (shorter lifespan for high-vol) |
| - Excellent thermal conductivity (faster cooling/cycle times) | - Softer, more prone to denting/damage | |
| - Lighter and easier to machine (faster mold creation) | - May not hold up to abrasive plastics or very high pressures | |
| Alloys | - Very high thermal conductivity (e.g., Beryllium Copper) | - Very expensive |
| - Ideal for hot spots or critical cooling areas | - Often used only for inserts, not entire molds | |
| - Good wear resistance in specific applications |
The careful selection of mold material is a testament to the engineering depth involved in mold making, directly influencing the longevity and efficiency of the subsequent manufacturing process.
Once the ideal material is chosen, the focus shifts to bringing the digital design to life through sophisticated manufacturing techniques.
Creating the Mold: CNC Machining and EDM
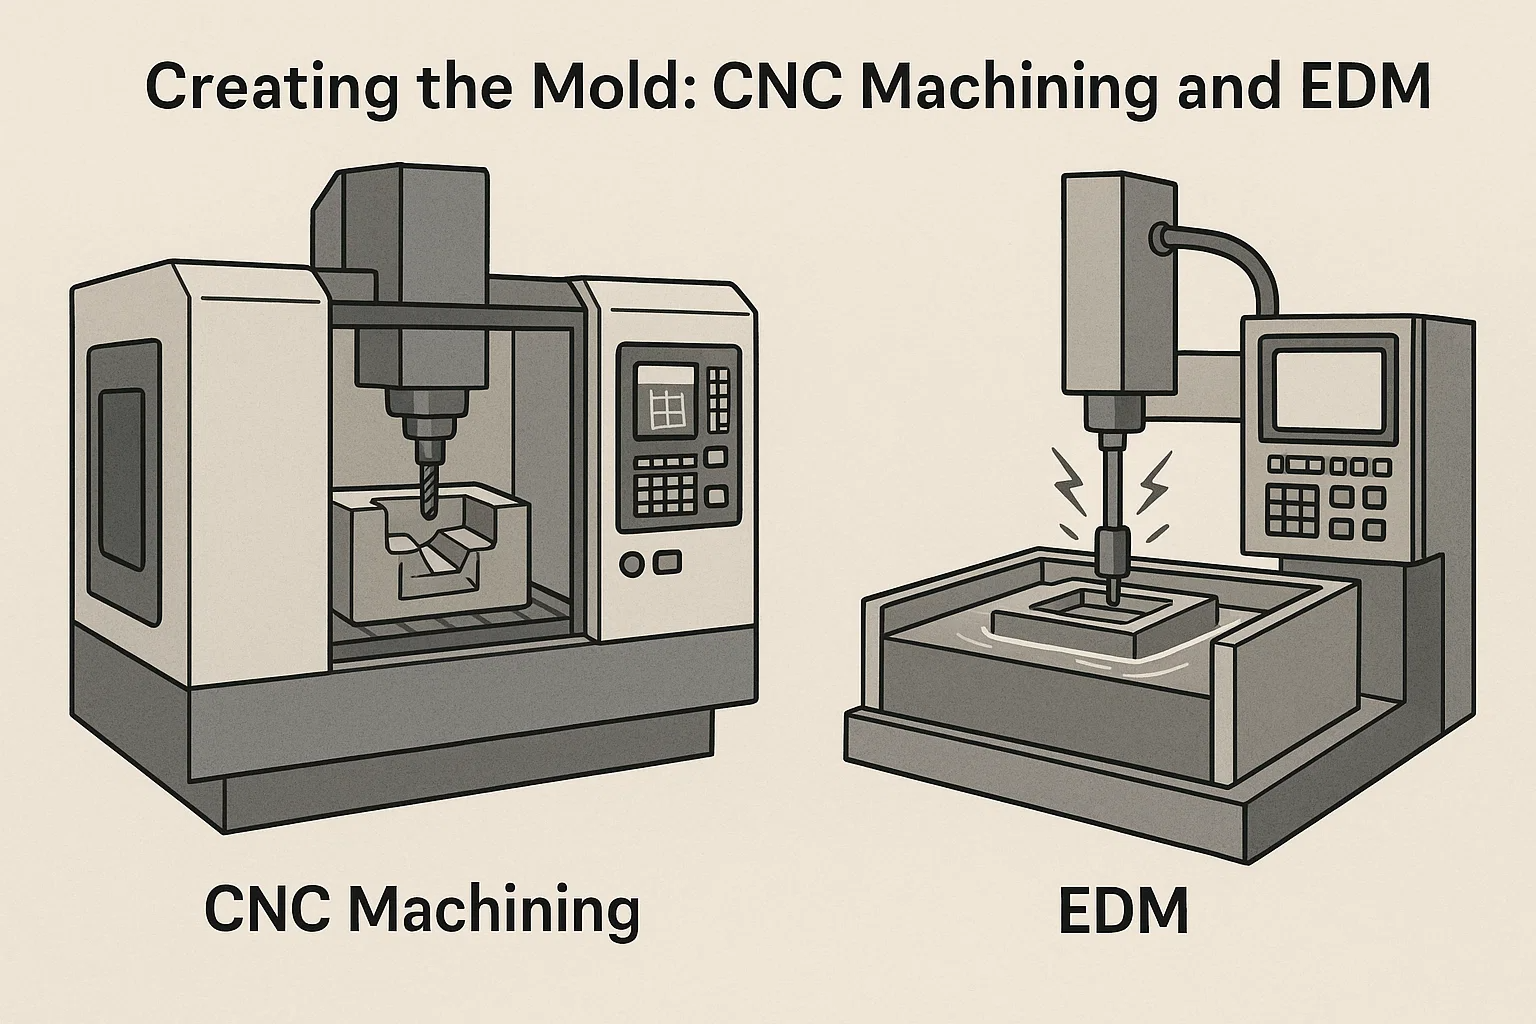
Bringing a meticulously designed mold from a digital file to a tangible, precision tool requires the mastery of advanced manufacturing techniques. Two primary technologies dominate this stage: CNC (Computer Numerical Control) machining and EDM (Electrical Discharge Machining). These processes work in tandem to carve out the complex geometries, minute details, and highly accurate dimensions necessary for high-quality plastic model molds.
CNC (Computer Numerical Control) Machining: Precision Cutting of the Mold Cavity
CNC machining is the workhorse of mold manufacturing. It's an automated subtractive process where computerized controls guide various cutting tools to precisely remove material from a block of mold steel or aluminum. Think of it like a highly sophisticated robotic sculptor.
How it works:
- Programming: The 3D CAD model of the mold is translated into a series of detailed instructions (G-code) that the CNC machine understands. This program dictates the tool paths, cutting speeds, feed rates, and depth of cut.
- Setup: The raw block of mold material is securely clamped onto the machine's bed. The appropriate cutting tools (end mills, ball mills, drills, etc.) are loaded into the machine's tool changer.
- Material Removal: Under the precise control of the computer, the cutting tool rapidly rotates and moves along the programmed path, progressively removing material layer by layer. This creates the primary shapes of the mold's cavity and core, including the general contours, draft angles, and larger features.
- Multi-Axis Machining: Advanced CNC machines, often with 3, 4, or 5 axes of motion, can rotate and tilt the workpiece or the cutting tool, allowing them to reach complex angles and machine intricate, three-dimensional surfaces with exceptional accuracy. This is particularly vital for the organic shapes and detailed textures often found in plastic model kits.
CNC machining excels at creating the bulk of the mold's geometry with high speed and accuracy, forming the main impressions of the plastic parts. However, for extremely fine details, sharp internal corners, or complex features that traditional cutting tools can't reach, another specialized technique comes into play.
EDM (Electrical Discharge Machining): Creating Complex Shapes and Fine Details
EDM, also known as spark machining, is a non-conventional machining process that uses electrical discharges (sparks) to erode material. Unlike CNC milling, which uses physical cutting tools, EDM works by generating sparks between an electrode (the tool) and the workpiece (the mold material) in a dielectric fluid. This process is ideal for creating intricate details, sharp corners, and deep, narrow features without putting mechanical stress on the material.
There are two main types of EDM used in mold making:
-
Ram (Sinker) EDM:
- A pre-machined electrode (often made of graphite or copper, and shaped like the inverse of the feature to be created) is brought very close to the mold material.
- When electricity is applied, thousands of microscopic sparks jump across the small gap, melting and vaporizing tiny particles of the mold material.
- The dielectric fluid flushes away these eroded particles.
- This process is incredibly precise and is used to create deep ribs, fine slots, sharp internal corners (which cannot be cut with a rotating milling tool), and complex textures.
-
Wire EDM:
- A thin, continuously spooled wire (typically brass) acts as the electrode.
- The wire is fed through the workpiece while submerged in dielectric fluid, and sparks erode the material along the wire's path.
- Wire EDM is primarily used for cutting precise through-holes, slots, and intricate contours, as well as for creating the mating interlocks between mold components. It's also vital for making core pins and ejector pin holes with extreme accuracy.
Step-by-Step Explanation of the Machining Process
The creation of a mold typically follows a synergistic approach, combining both CNC and EDM:
- Rough Machining (CNC): The initial phase involves aggressive CNC milling to remove large volumes of material and establish the basic shape of the mold cavity and core. This is done with larger tools and higher material removal rates.
- Semi-Finishing (CNC): Finer CNC tools are then used to refine the contours, improve surface finish, and machine closer to the final dimensions.
- Hard Machining (CNC): If the mold material is hardened before machining, specialized CNC tools can perform hard milling, though this is less common for the very fine details. More often, the mold is hardened after machining the bulk, and then finishing operations are performed.
- Detailing with EDM: For features that CNC can't achieve – such as incredibly sharp internal corners (impossible with a round milling cutter), deep, narrow ribs, or complex textures like panel lines and rivets on a model part – EDM is employed. Electrodes are created (often via CNC milling) and then used in the EDM machine to burn these precise features into the mold.
- Hole Drilling (CNC/EDM): Holes for ejector pins, cooling channels, and guide pins are precisely drilled using CNC machines, or in some cases, small-hole EDM for extremely fine or deep holes.
- Finishing Touches: After the primary machining, the mold components undergo critical finishing processes, as a smooth mold surface directly translates to a smooth plastic part.
This intricate dance between powerful CNC mills and precision EDM machines ensures that every detail, no matter how small, from the subtle curves of an aircraft fuselage to the sharp edges of a tank track, is faithfully replicated in the mold.
The incredible precision achieved in these machining stages is only part of the story; the next critical step involves refining these surfaces to perfection, preparing them for the delicate process of injection molding.
Excellent! With the intricate shapes and details precisely carved into the mold through CNC machining and EDM, the mold is now functionally complete in terms of its geometry. However, for a plastic model part to have that smooth, blemish-free finish that enthusiasts expect, the mold itself needs a final, critical treatment: polishing and finishing.
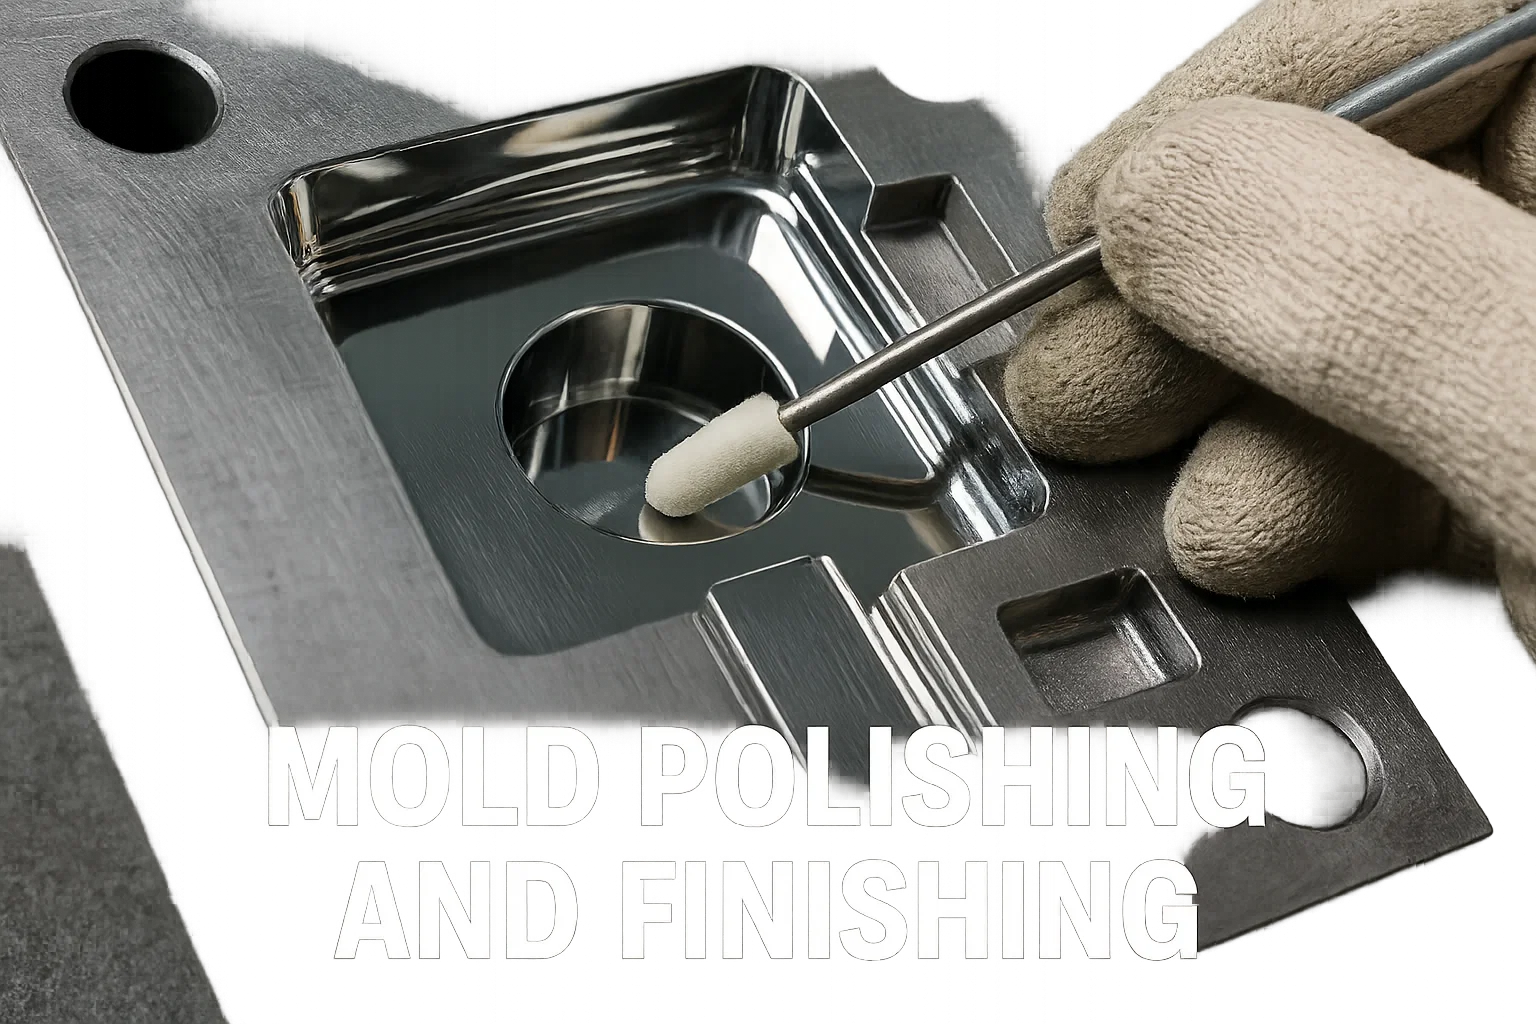
Mold Polishing and Finishing
Even after the most advanced CNC machining and EDM processes, the surfaces of a newly machined mold cavity and core will still bear microscopic tool marks or a textured, eroded finish from the EDM process. If left unaddressed, these imperfections would be directly transferred to every single plastic part produced, resulting in a rough or dull surface. Therefore, mold polishing and finishing are meticulous and highly skilled processes, absolutely crucial for achieving the desired aesthetic and functional quality of the final plastic model components.
Importance of Polishing the Mold Cavity for Smooth Parts
The primary goal of polishing is to achieve a surface finish within the mold that is significantly smoother than what machining alone can provide. This smooth surface is vital for several reasons:
- Aesthetics: A highly polished mold produces plastic parts with a glossy, smooth, and visually appealing surface. This is essential for the realism and quality expected in model kits, from the sleek lines of a car body to the smooth skin of an aircraft.
- Part Ejection: A smooth mold surface drastically reduces friction between the cooling plastic and the mold walls. This makes it much easier for the ejector pins to push the part out, minimizing the risk of part distortion, stress marks, or even damage to the part during ejection.
- Flash Prevention: A perfectly smooth and precisely matched parting line (where the two mold halves meet) is critical to prevent "flash" – excess plastic material that squeezes out between the mold halves. Polishing helps ensure this tight seal.
- Detail Clarity: While EDM creates fine details, polishing can further refine these features, ensuring crisp lines and sharp edges on the final plastic part.
- Mold Longevity: A well-polished mold surface is less prone to material sticking or minor abrasion during repeated cycles, which can contribute to the mold's overall lifespan.
Techniques Used for Polishing: Abrasive Polishing, Chemical Polishing
Mold polishing is largely a manual, labor-intensive process requiring highly skilled technicians, though some automated methods exist for simpler geometries. The techniques employed depend on the desired finish and the material of the mold.
-
Abrasive Polishing (Manual and Mechanical): This is the most common method and involves a progressive series of abrasive materials, starting from coarser grits and moving to progressively finer ones.
- Stones (Grinding Stones): Initial stages often use abrasive stones (made of aluminum oxide, silicon carbide, or diamond) of varying grit sizes. These are used manually, often with holders, to remove major tool marks and flatten surfaces. Ultrasonic machines can also vibrate these stones for more efficient material removal in complex areas.
- Abrasive Papers/Cloths: After stoning, finer abrasive papers (like sandpaper) or cloths, often lubricated with oil or water, are used. These come in extremely fine grit sizes, sometimes up to 10,000 grit or higher. They are used with small sticks, cotton swabs, or specialized tools to reach every part of the cavity.
- Diamond Compounds/Slurries: For the final, mirror-like finish, extremely fine diamond compounds or slurries are applied with felt bobs, cotton swabs, or specialized polishing tools. These compounds contain microscopic diamond particles that provide the ultimate abrasive action.
- Felt Wheels/Brushes: Rotary tools with felt wheels or brushes, combined with polishing pastes, are used for final buffing and achieving a high luster.
-
Chemical Polishing/Acid Etching (Less Common for Plastic Molds): While used in some industries for specific metals, chemical polishing (which uses a chemical solution to dissolve surface irregularities) and acid etching are generally not the primary methods for achieving mirror finishes on tool steel plastic molds. They can be used for matte finishes or specific textures, but for the clarity and smoothness required for most plastic models, abrasive polishing is preferred.
-
Vapor Polishing (Limited Application): This technique, often used for materials like polycarbonate, involves exposing the part to a chemical vapor that slightly melts and reflows the surface, creating a smooth finish. While it can smooth molded parts, it's not a direct mold polishing technique for tool steel.
Achieving the Desired Surface Finish
The level of polish achieved is categorized by industry standards (e.g., SPI finishes in the US, ranging from A-1 for a mirror finish to D-3 for a dull matte finish). For plastic model molds, an SPI A-1 or A-2 mirror finish is often targeted for visible, smooth surfaces, while textured areas (like anti-slip surfaces or specific material textures) might receive a D-grade or etched finish.
Skilled mold polishers require exceptional dexterity, patience, and a keen eye. The process is often performed under magnification to ensure every microscopic imperfection is addressed. The surface finish achieved in this stage directly dictates the visual appeal and quality feel of every single plastic model part that the mold will produce for years to come.
With the mold meticulously polished to perfection, it's now ready for its true test: proving its ability to consistently produce high-quality plastic parts.
Excellent! The journey of mold creation has brought us through design, material selection, and precision machining and polishing. Now, it's time for the ultimate validation: testing the mold under real-world conditions to ensure it performs exactly as intended. This crucial phase is where the mold's true capabilities are proven.
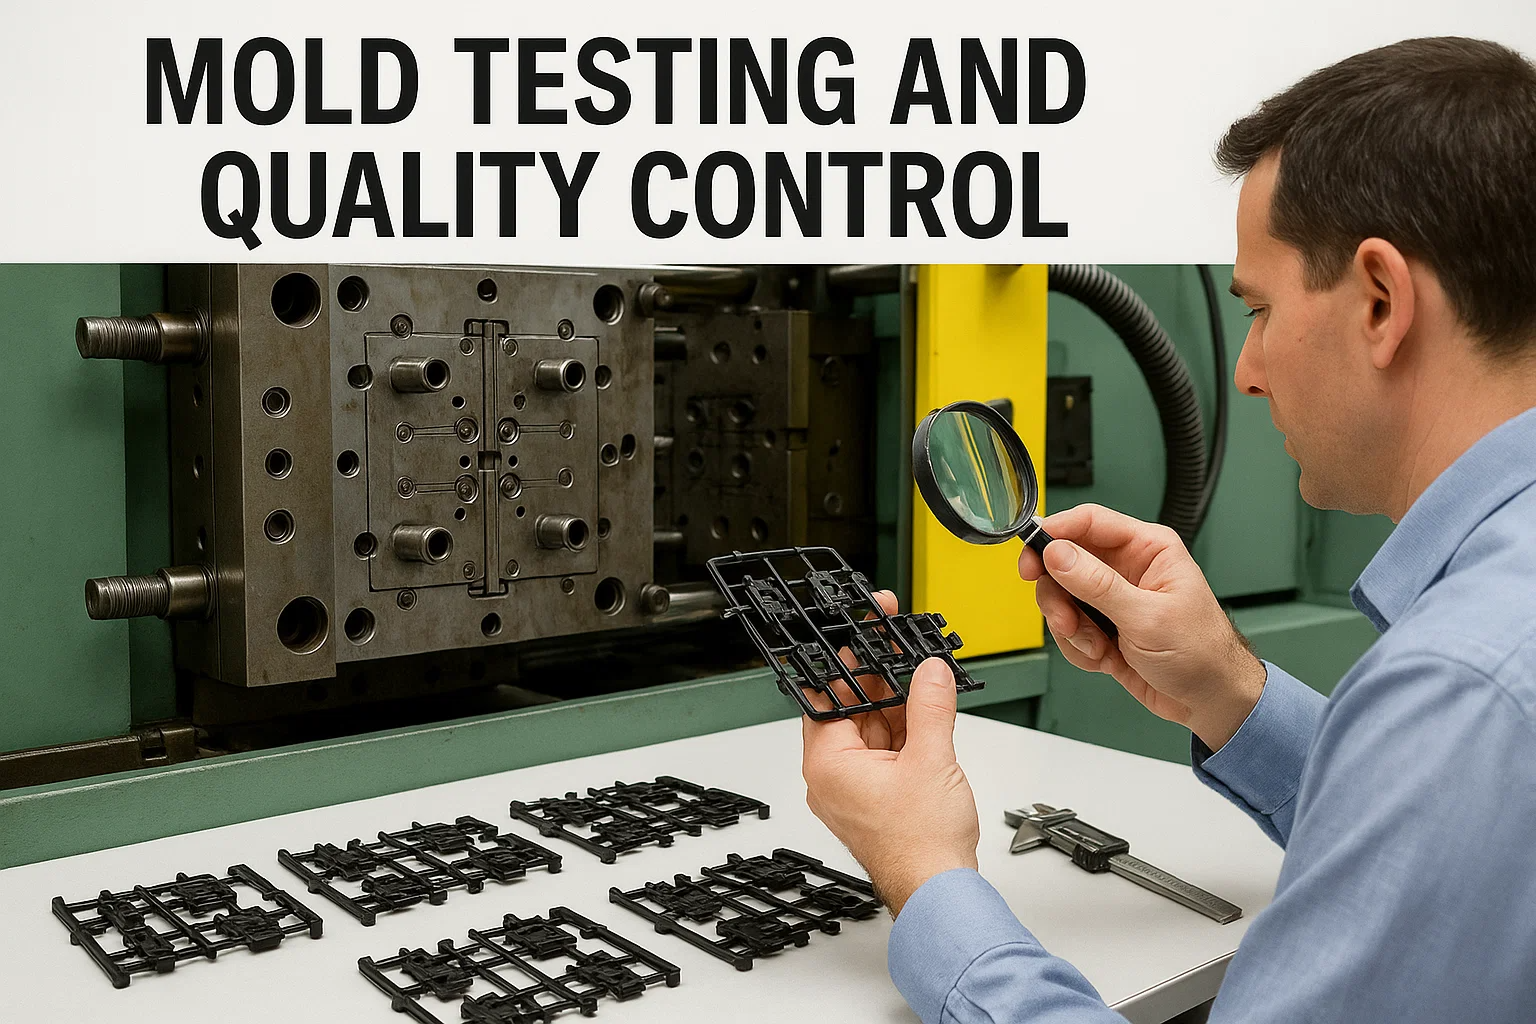
Mold Testing and Quality Control
Even the most meticulously designed and fabricated mold needs to prove itself. The Mold Testing and Quality Control phase is a critical step where the newly completed mold is put into an injection molding machine for trial runs. This process isn't just about making parts; it's about rigorously inspecting those parts, identifying any imperfections, and making necessary adjustments to the mold before it enters full-scale production. This meticulous scrutiny ensures that every subsequent part produced will meet the high standards expected for plastic model kits.
Trial Runs and Initial Testing of the Mold
Once the mold is fully assembled and polished, it is carefully mounted into a compatible injection molding machine. This initial setup is often handled by experienced technicians who understand the nuances of both the mold and the machine.
The trial run, often called a "first shot" or "tool try-out," involves several cycles of injection molding, where:
- Machine Parameter Setup: The injection molding machine's parameters – including melt temperature, injection pressure, holding pressure, injection speed, cooling time, and mold temperature – are carefully set based on the plastic material being used (e.g., polystyrene for model kits) and the mold's design.
- First Shots: A small batch of parts is molded. These initial parts are closely monitored as they are ejected from the mold.
- Visual Inspection: Immediately, parts are visually inspected for obvious defects such as:
- Short Shots: Incomplete parts where the plastic did not fully fill the mold cavity.
- Flash: Excess plastic material seeping out along the parting line or ejector pin areas.
- Warpage/Distortion: Parts that are not flat or have unwanted bends, often due to uneven cooling or stresses.
- Sink Marks: Depressions on the surface of thicker sections, caused by internal shrinkage.
- Flow Lines/Weld Lines: Visible lines on the part surface indicating where molten plastic streams met.
- Burn Marks: Discoloration due to trapped air or overheating.
- Ejector Pin Marks: Excessive or poorly placed marks from the ejection system.
- Surface Finish Issues: Dullness, streaks, or other imperfections despite the mold's polish.
- Dimensional Verification: Using precision measuring tools (e.g., calipers, micrometers, CMM - Coordinate Measuring Machine), key dimensions of the molded parts are checked against the original CAD design specifications. This ensures the parts are accurate and will fit together correctly in the final model kit.
Inspecting the Molded Parts for Defects and Imperfections
The first shots are critical for identifying even subtle issues. A dedicated quality control team, often in conjunction with the mold designers and engineers, will conduct a thorough examination, which may involve:
- Magnification and Lighting: Using magnifying glasses or microscopes to spot fine details, subtle flash, or microscopic surface flaws.
- Assembly Checks: If the part is designed to mate with other parts, actual assembly tests are performed to ensure proper fit and function, simulating the model builder's experience.
- Strength and Material Property Tests: In some cases, parts might undergo tests for strength, flexibility, or other mechanical properties to ensure they meet performance criteria.
- Color Uniformity: If the part is molded in a specific color, its uniformity and consistency are checked.
Detailed records are kept for each trial run, documenting parameters, observations, and any detected defects.
Making Necessary Adjustments and Refinements to the Mold
Based on the findings from the trial runs and inspection, necessary adjustments and refinements are made. This iterative process is crucial to perfecting the mold and can involve several rounds of testing and modification:
- Parameter Optimization: Often, initial issues like short shots, flash, or sink marks can be resolved by fine-tuning injection molding parameters (e.g., increasing pressure, adjusting temperatures, modifying cooling times).
- Mold Modifications (Re-work): For more persistent or significant issues that cannot be resolved by parameter adjustments, physical modifications to the mold itself are required. This is a delicate and often expensive process and might involve:
- Adding or Enlarging Vents: To prevent trapped air causing short shots or burn marks.
- Modifying Gate Locations or Sizes: To improve plastic flow and reduce blemishes.
- Adjusting Cooling Channels: To achieve more uniform cooling and prevent warpage.
- Polishing or Texturing Specific Areas: To improve surface finish or aid ejection.
- Adding or Modifying Ejector Pins: To ensure clean and consistent part ejection.
- Re-machining or Laser Welding: For correcting dimensional inaccuracies or repairing minor damage. Material might be added via laser welding and then re-machined.
- Hardening/Treatments: Sometimes, after initial trials, it might be decided that specific mold sections require additional hardening or surface treatments for improved wear resistance.
This meticulous testing and refinement loop ensures that when the mold finally goes into full-scale production, it is a finely tuned instrument capable of churning out millions of perfect plastic model components, cycle after cycle.
With the mold now fully validated and optimized through rigorous testing, it's ready for its primary purpose: mass production, where consistency and efficiency become paramount.
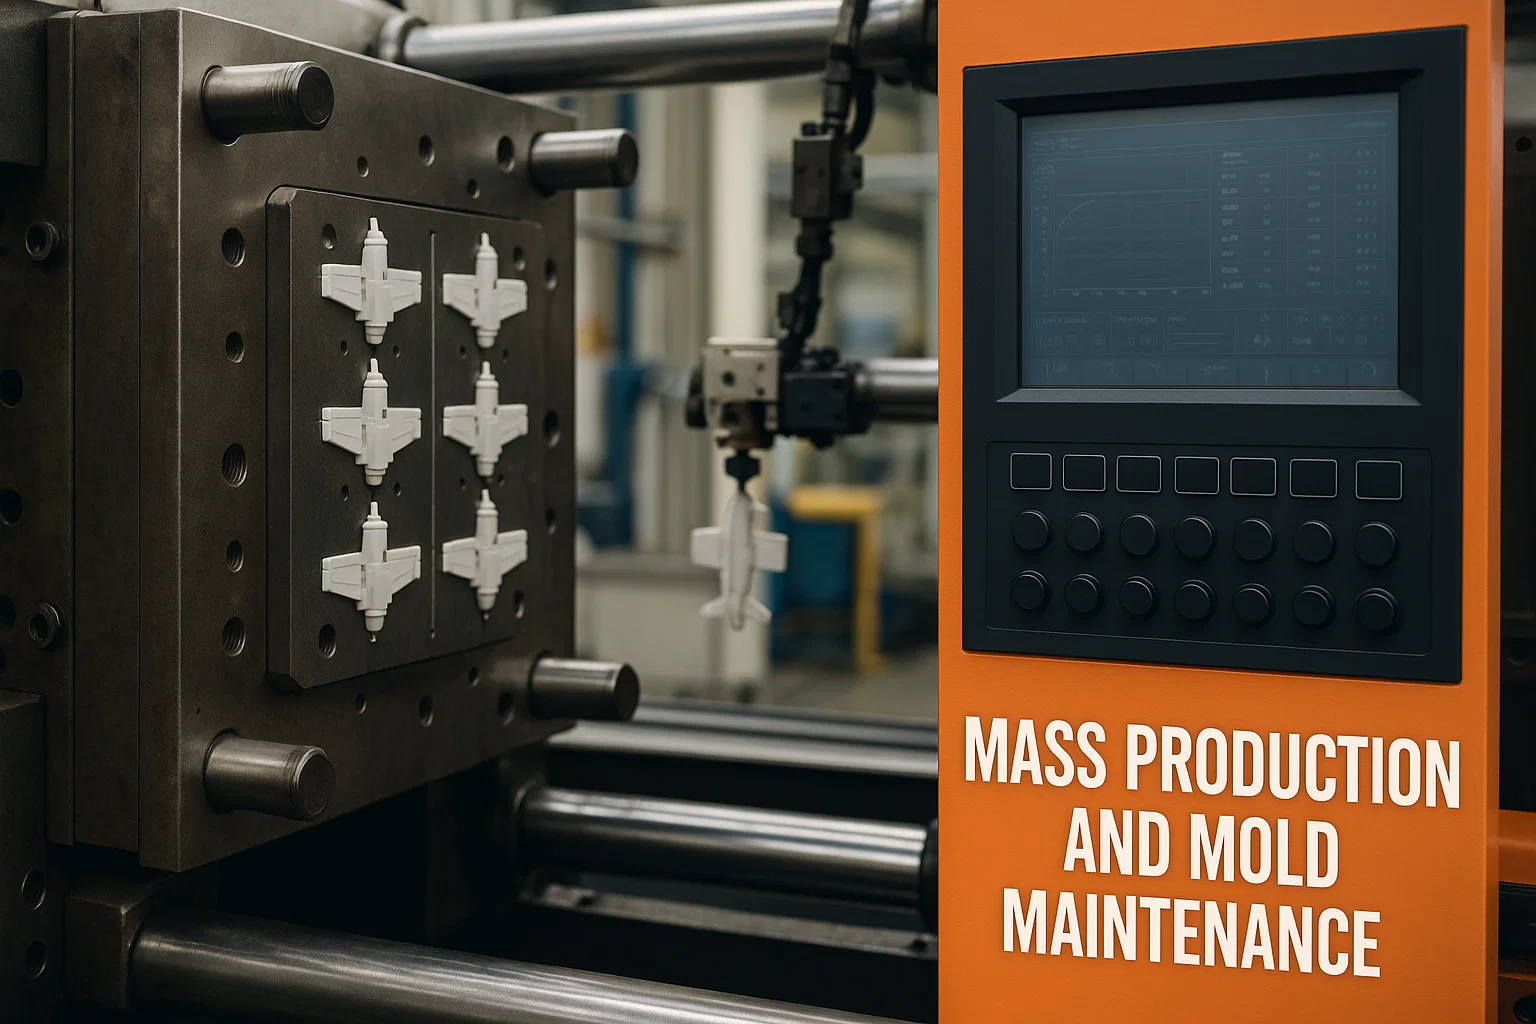
Mass Production and Mold Maintenance
After the exhaustive design, fabrication, and testing phases, the plastic model mold transitions into its operational prime: mass production. This is where the initial investment of time and resources truly pays off, as the finely tuned mold begins to efficiently churn out thousands, or even millions, of identical plastic model components. However, the work doesn't stop once production begins; continuous monitoring and diligent mold maintenance are absolutely crucial to ensure consistent quality and extend the mold's lifespan for years of reliable service.
Setting up the Injection Molding Machine for Mass Production
The transition to mass production involves optimizing the injection molding machine and its environment for continuous, efficient operation:
- Final Parameter Lock-down: Based on the successful trial runs, the optimal injection molding parameters (temperatures, pressures, speeds, cooling times, clamp force, etc.) are locked in. These settings are critical for consistently producing high-quality parts with minimal defects.
- Automated Operation: Modern injection molding machines are highly automated. Once parameters are set, they can operate continuously, often with robotic arms for automated part removal and placement, further boosting efficiency and reducing labor costs.
- Material Handling: Large quantities of plastic pellets are fed into the machine from industrial hoppers, ensuring a continuous supply. Drying equipment may be used to remove moisture from hygroscopic plastics, which can otherwise cause defects.
- Quality Assurance Sampling: Even during mass production, continuous quality control is maintained. Parts are regularly sampled from the production line for visual inspection and dimensional checks. This proactive monitoring helps catch any drift in quality early on.
Monitoring the Molding Process for Consistency
Maintaining consistency throughout long production runs is paramount. Any deviation in the molding process can lead to a batch of defective parts. Operators and automated systems constantly monitor key indicators:
- Process Parameters: Real-time sensors within the injection molding machine track temperatures, pressures, cycle times, and other critical parameters. Deviations from the set points trigger alerts.
- Part Quality: Automated vision systems can be integrated into the production line to perform rapid, automated inspections for common defects like flash or short shots. Manual spot checks by operators remain essential.
- Machine Performance: Energy consumption, hydraulic pressure, and other machine health indicators are monitored to ensure the equipment is running smoothly and efficiently, preventing unexpected downtime.
- Scrap Rate: The percentage of defective parts is closely tracked. An increase in the scrap rate is a red flag indicating a potential issue with the mold, machine, or process parameters.
The goal is a stable and repeatable process that produces identical, high-quality parts with every single cycle.
Regular Maintenance and Cleaning of the Mold to Ensure Longevity
A plastic model mold is a significant investment, often costing tens or even hundreds of thousands of dollars. To protect this investment and ensure millions of cycles over its lifespan, diligent and proactive mold maintenance is essential. Neglecting maintenance can lead to costly repairs, premature wear, and production downtime.
Maintenance typically involves:
- Routine Cleaning: During production, plastic residues, dust, and other contaminants can accumulate on the mold surfaces, vents, and ejector pins. Regular cleaning, sometimes even during short production breaks, helps prevent surface defects on parts and ensures proper mold function. This can involve wiping surfaces, using compressed air, or specialized cleaning agents.
- Preventive Maintenance (Scheduled Downtime): Periodically, the mold is removed from the injection molding machine for more thorough inspection and maintenance. This schedule is typically based on the number of cycles or operating hours.
- Disassembly and Deep Cleaning: The mold is often partially or fully disassembled for comprehensive cleaning of all cavities, cores, cooling channels, and moving components.
- Lubrication: Moving parts, such as guide pins, bushings, and ejector pins, are cleaned and re-lubricated to ensure smooth operation and prevent wear.
- Inspection for Wear: Technicians meticulously inspect the mold surfaces for signs of wear, abrasion, corrosion, or minor damage (e.g., nicks, dents). Critical features, like parting lines and gate areas, are closely examined.
- Component Replacement: Worn components like ejector pins, springs, or small inserts are replaced before they fail and cause production issues.
- Cooling System Maintenance: Cooling channels are flushed to prevent clogs and ensure efficient heat transfer.
- Repair and Refurbishment: If significant damage or wear occurs, the mold may need to be sent back to a specialized tool shop for repair. This can involve welding, re-machining specific areas, re-polishing, or even replacing entire mold components.
- Proper Storage: When not in use, molds are thoroughly cleaned, protected with rust-preventive coatings, and stored in controlled environments to prevent corrosion and physical damage.
Through meticulous monitoring and proactive maintenance, a well-made plastic model mold can remain a productive asset for many years, underpinning the continuous supply of high-quality model kits to enthusiasts worldwide.
The journey of mold making doesn't stand still; ongoing advancements continue to refine and revolutionize the process.
Innovations in Mold Making
The world of manufacturing is constantly evolving, and the realm of plastic model mold making is no exception. While the core principles of injection molding and mold fabrication remain, continuous innovation is introducing exciting new techniques and capabilities. These advancements are not only improving efficiency and reducing costs but also enabling the creation of even more intricate and complex plastic model parts, pushing the boundaries of what hobbyists can expect.
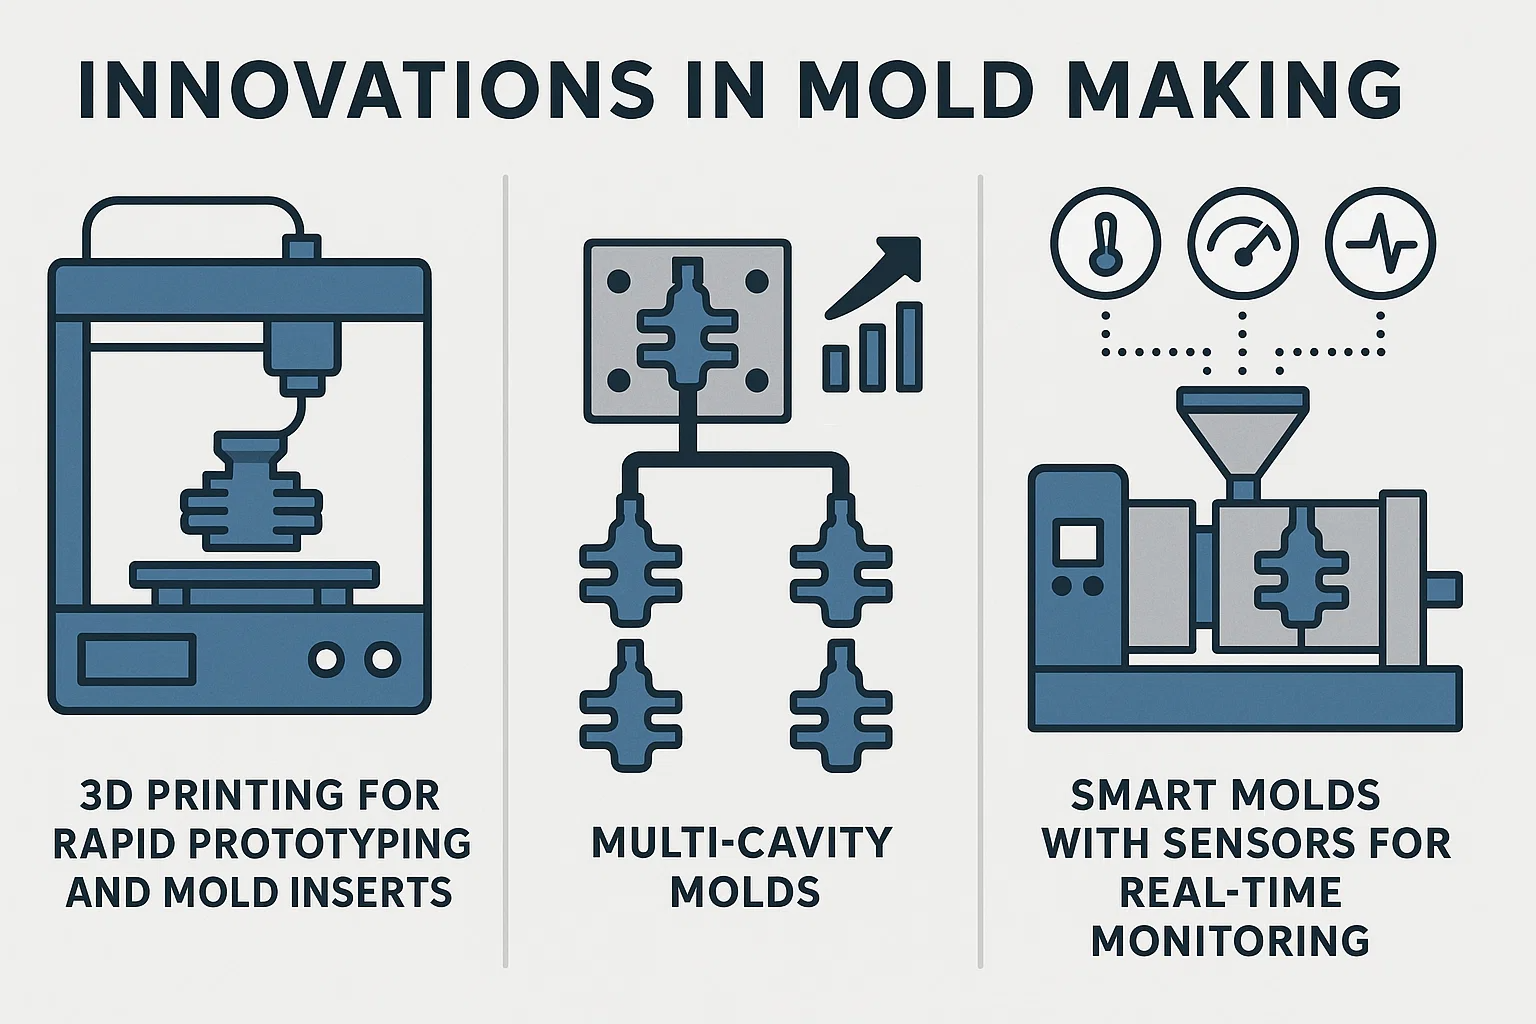
3D Printing for Rapid Prototyping and Mold Inserts
Perhaps one of the most transformative innovations is the integration of 3D printing (additive manufacturing) into the mold-making workflow. While direct 3D printing of full-scale production molds is still limited due to material strength and surface finish requirements, its impact on prototyping and specialized mold components is immense:
- Rapid Prototyping of Parts: Before committing to expensive mold fabrication, designers can quickly 3D print actual model kit parts to test fit, ergonomics, and aesthetics. This allows for rapid iteration and design validation, catching issues much earlier in the process.
- 3D Printed Mold Inserts: For low-volume production or for specific, complex features within a larger steel mold, specialized 3D printing technologies (like metal 3D printing or high-resolution resin printing) can create mold inserts. These inserts can incorporate highly intricate internal cooling channels (conformal cooling) that are impossible to achieve with traditional drilling, leading to faster and more uniform cooling of parts and reduced cycle times. They're also excellent for creating detailed textures.
- Temporary Molds: For very short runs or proof-of-concept parts, some high-strength resin 3D printers can even produce temporary, sacrificial molds capable of injecting a limited number of plastic parts.
Multi-Cavity Molds and Their Benefits
While not entirely new, the sophisticated design and manufacturing of multi-cavity molds continue to be refined and optimized. Instead of producing one plastic part per injection cycle, a multi-cavity mold produces several identical parts (or sometimes different, related parts) in a single shot.
- Increased Production Efficiency: The primary benefit is a drastic reduction in production time and cost per part. If a single-cavity mold takes 30 seconds per part, a 4-cavity mold could produce 4 parts in roughly the same 30 seconds.
- Consistency Across Parts: Because all parts in a multi-cavity mold are molded simultaneously under the same conditions, they exhibit high consistency in quality, dimensions, and material properties.
- Reduced Machine Wear: Fewer cycles are needed to produce the same quantity of parts, which can reduce wear and tear on the injection molding machine.
The design of multi-cavity molds is complex, requiring precise balancing of plastic flow to ensure all cavities fill uniformly. Hot runner systems, which keep the plastic molten right up to the cavity, are often employed to enhance efficiency and reduce material waste in these molds.
Smart Molds with Sensors for Real-Time Monitoring
The advent of the Industrial Internet of Things (IIoT) has led to the development of "smart molds." These are molds equipped with integrated sensors that provide real-time data on the molding process directly from within the mold cavity itself.
- Temperature Sensors: Monitor plastic temperature as it enters and cools within the cavity, ensuring optimal cooling and preventing warpage or sink marks.
- Pressure Sensors: Measure the pressure inside the mold during injection, providing insights into mold filling, packing, and potential short shots or flash.
- Humidity Sensors: Can detect moisture issues, especially relevant for hygroscopic plastics.
- Cycle Counters/Wear Sensors: Track the number of cycles and can even detect subtle wear on critical mold components, prompting proactive maintenance before issues arise.
Benefits of Smart Molds:
- Enhanced Quality Control: Real-time data allows for immediate detection of process deviations, enabling operators to correct issues instantly, reducing scrap rates.
- Predictive Maintenance: By monitoring wear and performance, smart molds can predict when maintenance is needed, allowing for scheduled downtime rather than unexpected breakdowns.
- Process Optimization: The rich data collected helps engineers fine-tune molding parameters to achieve even greater efficiency and part quality.
- Traceability: Each part's molding conditions can be logged, providing a complete history for quality assurance and troubleshooting.
These innovations highlight a future where mold making is not just about precision manufacturing but also about intelligent, data-driven processes, further solidifying the foundation for increasingly sophisticated and high-quality plastic model kits.
Conclusion
From the initial spark of an idea to the finely tuned hum of an injection molding machine, the creation of plastic model molds is a testament to precision engineering, advanced manufacturing, and meticulous craftsmanship. We've explored each critical stage, uncovering the complexity that underpins the seemingly simple act of assembling a model kit.
Recap of the Mold-Making Process
Our journey began with the crucial design phase, where CAD software transforms concepts into detailed 3D blueprints, meticulously planning every aspect from draft angles to parting lines. This digital precision then guides the material selection, a strategic choice balancing durability, thermal properties, and cost, with high-grade tool steels often being the preferred choice for their longevity and ability to hold fine detail.
The physical creation unfolds through the powerful tandem of CNC machining and EDM, which carve out the intricate mold cavities and cores with sub-micron accuracy, capturing every panel line and rivet. Following this, the vital process of mold polishing and finishing transforms rough machined surfaces into mirror-smooth impressions, ensuring flawless plastic parts and effortless ejection.
Before mass production, the mold undergoes rigorous testing and quality control, where trial runs identify and rectify any imperfections, ensuring dimensional accuracy and consistent part quality. Finally, the mold enters mass production, meticulously monitored and sustained through diligent maintenance to guarantee years of reliable service.
Importance of Precision and Quality in Mold Creation
The underlying theme throughout this entire process is the absolute imperative of precision and quality. In the world of plastic model kits, accuracy is paramount. Every component must fit perfectly, every detail must be crisp, and every surface must be flawless. Any compromise in mold quality directly translates into defects in the final product, leading to frustration for the model builder and damage to the brand's reputation. The upfront investment in high-quality design, materials, and manufacturing processes for a mold pays dividends many times over in the form of consistent, high-fidelity parts that delight enthusiasts.
Future Trends in Plastic Model Mold Manufacturing
Looking ahead, the field of mold manufacturing continues to be an exciting arena of innovation. 3D printing is set to play an even larger role, not just in prototyping but potentially in creating complex conformal cooling channels or highly detailed mold inserts that were previously impossible. The rise of smart molds with integrated sensors promises real-time data and predictive analytics, leading to even more optimized processes, reduced downtime, and unparalleled quality control. As materials science advances, we may also see new mold alloys that offer superior combinations of thermal conductivity, hardness, and machinability.
In essence, the intricate process of plastic model mold making is a hidden marvel of engineering. It's a continuous pursuit of perfection, ensuring that the passion for assembling miniature worlds is met with components of the highest possible quality, making the intricate hobby of plastic modeling accessible and enjoyable for generations to come.

