 English
 Indonesia
Introduction to Insert Overmolding
In the vast landscape of modern manufacturing, the ability to integrate diverse materials into a single, high-performance component is a critical advantage. Traditional assembly methods often involve multiple steps, fasteners, and adhesives, leading to increased complexity, higher costs, and potential points of failure. This is where insert overmolding emerges as a transformative solution, offering a streamlined and efficient path to creating sophisticated, multi-material parts.
Whether you're an engineer designing the next generation of medical devices, an automotive designer seeking enhanced aesthetics and functionality, or a product developer aiming for greater durability in consumer goods, understanding insert overmolding is paramount.
What is Insert Overmolding?
At its core, insert overmolding is a specialized injection molding process where a pre-formed component, known as an "insert," is placed into a mold cavity, and then a molten thermoplastic or thermoset material is injected over, around, or through it. The insert becomes an integral part of the final molded product, creating a single, cohesive unit with enhanced properties or functionality.
Think of it as embedding one material within another to achieve a synergistic effect. The insert, often made of metal, a different plastic, ceramic, or even electronic components, provides specific characteristics like strength, electrical conductivity, or tactile feel, while the overmolded material typically offers properties such as ergonomics, sealing capabilities, insulation, or aesthetics. The result is a hybrid component that leverages the best attributes of both materials, often surpassing what could be achieved with either material alone.
Benefits of Insert Overmolding
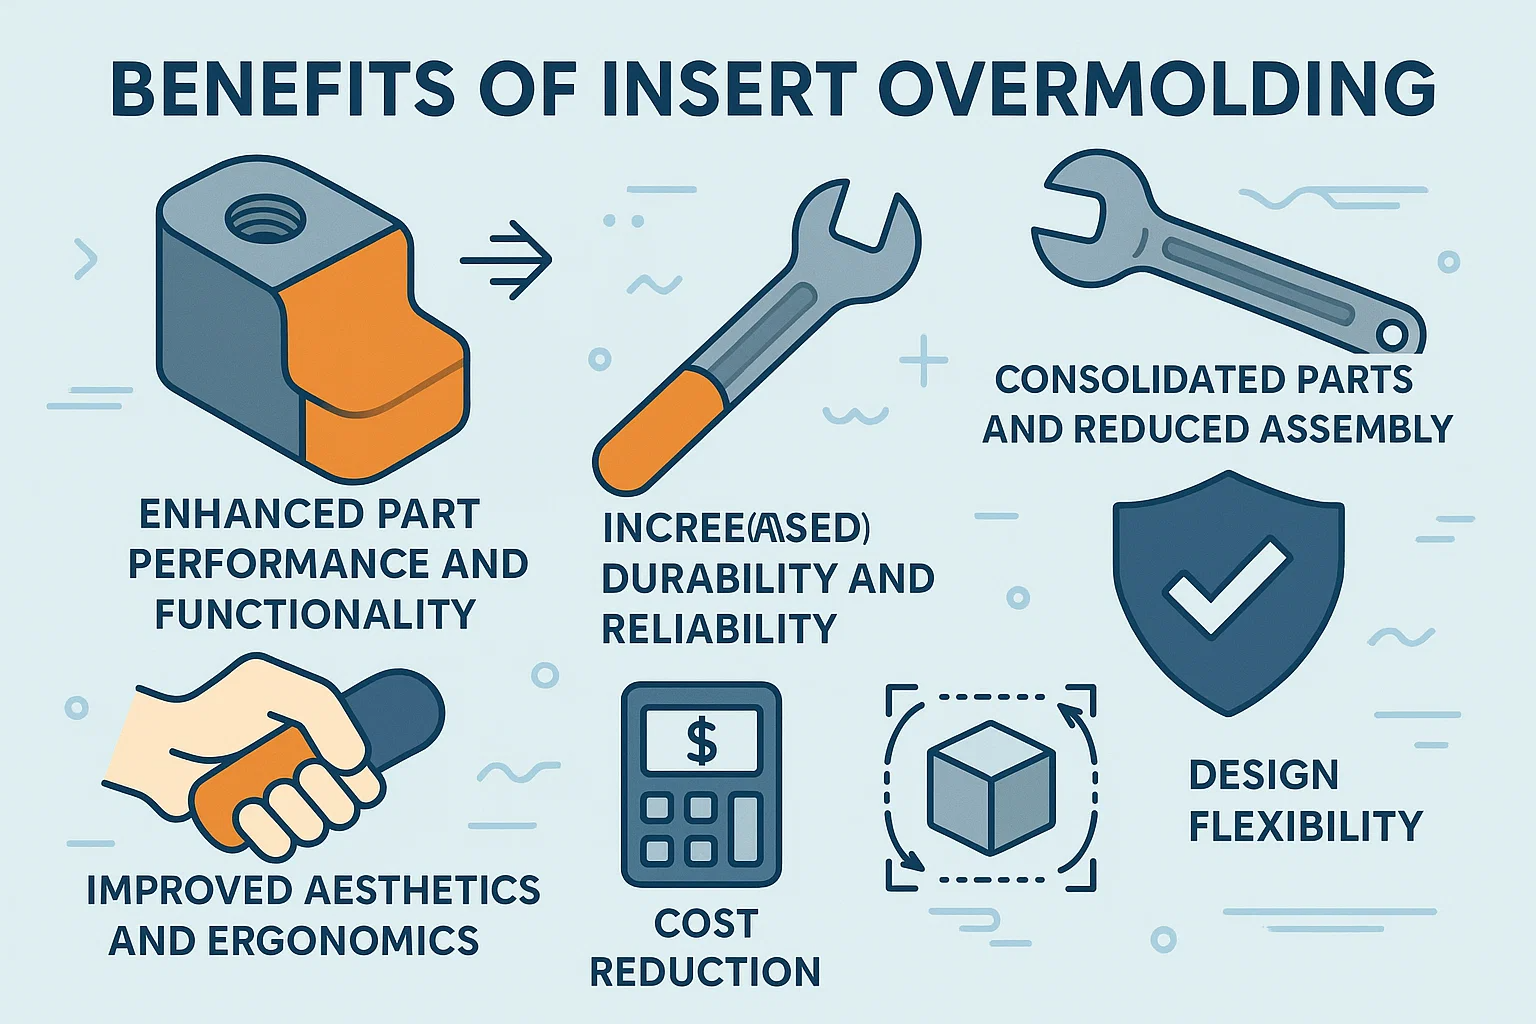
The strategic adoption of insert overmolding offers a multitude of compelling advantages that drive its widespread use across diverse industries:
Enhanced Part Performance and Functionality: By combining materials with distinct properties (e.g., rigid metal for strength, soft plastic for grip), overmolding allows for the creation of parts with superior mechanical, electrical, thermal, or aesthetic characteristics.
Consolidated Parts and Reduced Assembly: Overmolding eliminates the need for separate assembly steps, fasteners (screws, rivets), or adhesives, significantly streamlining manufacturing processes, reducing labor costs, and minimizing inventory.
Improved Aesthetics and Ergonomics: Soft-touch overmolds can provide comfortable grips, vibration dampening, and attractive finishes, enhancing user experience and product appeal. Color combinations are also easily achievable.
Increased Durability and Reliability: The intimate bond between the insert and the overmolded material often results in a more robust and reliable part, reducing the likelihood of loosening, rattling, or premature wear compared to assembled components.
Cost Reduction: While initial tooling costs can be higher, the long-term savings from reduced assembly time, fewer components to manage, and lower scrap rates often lead to significant overall cost efficiencies.
Design Flexibility: Overmolding empowers designers to create complex geometries and integrate features that would be challenging or impossible with single-material molding or traditional assembly. It allows for the creation of hermetic seals, integrated circuitry, and robust mechanical connections.
Applications of Insert Overmolding

The versatility of insert overmolding has made it an indispensable process across virtually every sector of modern manufacturing. Its ability to create multi-functional, high-performance components means you encounter overmolded parts in countless everyday items. While we will explore these in greater detail later, some prominent examples include:
Automotive Industry: Gear shift knobs, interior trim components, sensor housings, wire harnesses, steering wheel elements, and numerous under-the-hood applications where metal inserts require a protective or insulating plastic layer.
Medical Devices: Surgical instrument handles, diagnostic equipment components, medical tubing connectors, and wearable devices that require biocompatible materials combined with rigid structures.
Consumer Products: Electric toothbrush handles, power tool grips, kitchen utensil handles, electronic device enclosures (e.g., remote controls, smart home devices), and personal care products where a soft-touch or aesthetic finish is desired.
Industrial Components: Gaskets and seals, impellers, brackets, control knobs, electrical connectors, and components requiring vibration isolation or chemical resistance in harsh environments.
The Insert Overmolding Process
Understanding the theoretical benefits of insert overmolding is one thing; comprehending the practical steps involved is another. The process, while conceptually straightforward, requires precision, specialized equipment, and careful consideration of several variables to achieve successful, high-quality results.
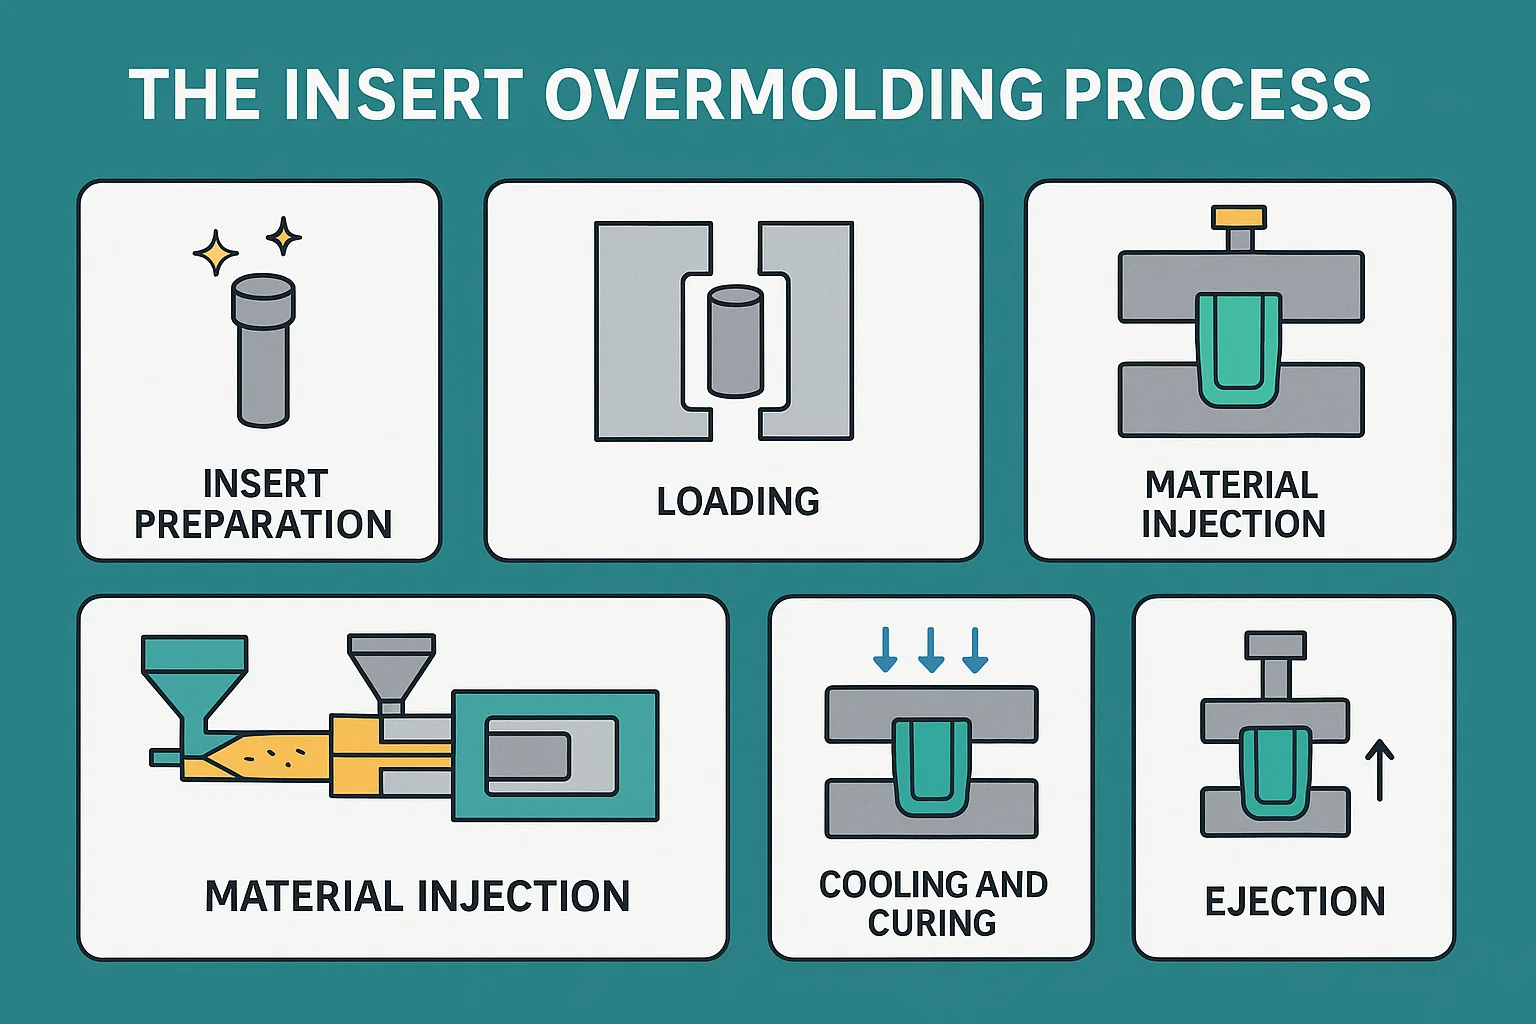
Step-by-Step Guide to the Overmolding Process
While variations exist based on part complexity and production volume, the core insert overmolding process generally follows these key stages:
Insert Preparation:
Cleaning: The insert must be meticulously cleaned to remove any contaminants (oils, dust, oxides) that could hinder adhesion with the overmolding material. This might involve degreasing, ultrasonic cleaning, or other surface preparation techniques.
Pre-treatment (Optional but Recommended): Depending on the material combination and desired bond strength, the insert's surface may undergo pre-treatment. This can include plasma treatment, flame treatment, mechanical abrasion, or the application of a primer/adhesive promoter to enhance chemical or mechanical bonding.
Loading: The prepared insert is then precisely loaded into the mold cavity. This can be done manually by an operator, robotically for high-volume production, or through an automated pick-and-place system. The mold cavity is designed with features to securely hold the insert in place during injection.
Mold Closure:
Once the insert is correctly positioned, the injection mold closes and clamps shut under high pressure. This ensures that the mold halves are tightly sealed, preventing material leakage and maintaining part dimensions.
Material Injection:
Molten plastic (thermoplastic or thermoset) is injected under high pressure into the mold cavity, flowing around and encapsulating the insert. The injection parameters (temperature, pressure, speed) are meticulously controlled to ensure complete fill, proper bonding, and minimal stress on the insert. The material flows into the space between the insert and the mold cavity walls.
Cooling and Curing:
For thermoplastics, the molten material cools and solidifies within the mold cavity. The mold is often temperature-controlled to facilitate uniform cooling and prevent warping or internal stresses.
For thermosets, the material undergoes a chemical reaction (curing) within the heated mold cavity, cross-linking to form a rigid, irreversible structure.
Ejection:
Once the overmolded part has cooled sufficiently (or cured in the case of thermosets), the mold opens. Ejector pins typically push the finished part out of the mold cavity. Care must be taken to ensure the part is ejected without damage, especially if the insert itself is delicate.
Post-Processing (Optional):
Depending on the part's requirements, minor post-processing may be needed, such as de-gating (removing the runner system), flash removal, or further finishing operations.
Types of Overmolding
While the fundamental principles remain consistent, overmolding can be executed through various methods, primarily distinguished by how the overmolding material is applied:
Insert Overmolding (Single-Shot):
This is the most common method described above. A pre-manufactured insert is placed into a standard injection mold, and a single shot of molten plastic is injected around it. It's often used for metal-to-plastic or plastic-to-plastic combinations.
Multi-Shot (Two-Shot / Multi-Material) Overmolding:
This advanced process involves two or more injection units on a single molding machine. The first material (often the rigid substrate or first overmold layer) is molded. Then, either the mold rotates, or a robotic arm transfers the partially molded part to a second cavity within the same mold tool. The second material is then injected over the first, creating a seamless, multi-material part in a single cycle without manual handling. This is ideal for soft-touch grips (e.g., rigid plastic base with a TPE overmold) or creating multi-color parts.
In-Mold Labeling (IML) / In-Mold Decoration (IMD):
While technically not "overmolding" in the traditional sense of encapsulating a structural insert, IML/IMD is a related process where a pre-printed label or decorative film is placed into the mold cavity before injection. The molten plastic is injected behind the label, fusing it permanently to the part surface, resulting in a durable, scratch-resistant graphic or finish.
Compression Overmolding:
Less common for rigid plastics, but relevant for materials like Liquid Silicone Rubber (LSR). Here, a pre-formed insert is placed into an open mold, and then a pre-measured amount of un-cured material is placed into the cavity. The mold then closes, compressing the material around the insert and initiating the curing process.
Tooling and Equipment
Successful insert overmolding heavily relies on precisely engineered tooling and specialized equipment:
Injection Molding Machine: A standard injection molding machine is used, but it must be appropriately sized for the part and have sufficient clamping force. For multi-shot overmolding, a specialized multi-barrel or rotary platen machine is required.
Insert Overmolding Tool (Mold): This is the most critical component. The mold is custom-designed with specific features to:
Securely hold the insert: Often utilizing pins, detents, or custom cavities that perfectly nest the insert, preventing movement during injection.
Manage material flow: Gates, runners, and vents are designed to ensure the overmolding material flows uniformly around the insert without damaging it or creating voids.
Facilitate ejection: Ejector pins are strategically placed to push the finished part off the mold without damaging the insert or overmold.
Accommodate mold rotations/transfers (for multi-shot): If a multi-shot process, the mold design will include mechanisms for rotating platens or robotic part transfer.
Automated Insert Loading Systems (Optional): For high-volume production, robots or automated pick-and-place systems precisely load inserts into the mold cavity, improving cycle times and reducing labor costs.
Material Handling Systems: Equipment for drying plastic pellets, feeding them to the injection machine, and handling regrind.
Temperature Control Units (TCUs): Used to maintain precise mold temperatures, which is crucial for consistent part quality, adhesion, and cooling times.
Post-Processing Equipment: Tools for degating, trimming, or other secondary operations.
Design Considerations for Insert Overmolding
Successful insert overmolding begins long before any material is injected. It starts with meticulous design. The interaction between the insert, the overmolding material, and the mold tool is complex, and overlooking key design principles can lead to costly manufacturing challenges, compromised part performance, or outright failure. This section outlines the critical design considerations for both the insert and the overmolded part.
Part Geometry and Design Principles
The overall geometry of both the insert and the overmolded plastic plays a pivotal role in process success and final part quality.
Insert Design:
Rigidity and Stability: The insert must be rigid enough to withstand the forces of injection molding (high pressure, temperature, molten plastic flow) without deforming or shifting within the mold. Thin, flimsy inserts are prone to bending or displacement.
Features for Retention: Design the insert with features that promote mechanical interlocking. This could include:
Undercuts/Through-holes: The overmolding material can flow into these features, creating a strong mechanical interlock that prevents the insert from pulling out.
Knurling, Grooves, Ribs: These surface textures or geometries provide increased surface area and anchor points for the overmolding material to grip.
Tabs or Flanges: Can help secure the insert's position in the mold and provide additional surface area for bonding.
Smooth Transitions: Avoid sharp corners or abrupt changes in thickness on the insert that could create stress concentrations in the overmolded material or cause turbulent flow.
Consider Surface Finish: A rougher surface on the insert generally promotes better mechanical bonding. However, it should be consistent and controlled.
Overmolded Part Design:
Uniform Wall Thickness: Aim for consistent wall thickness in the overmolded plastic around the insert. Varying thicknesses can lead to differential cooling, warping, sink marks, and residual stresses, especially problematic when encapsulating an insert. If variations are unavoidable, ensure smooth transitions.
Encapsulation vs. Partial Overmold: Clearly define how much of the insert needs to be encapsulated. Full encapsulation offers maximum protection and bonding, while partial overmolding (e.g., a grip on a tool handle) requires careful consideration of the transition line and potential stress points.
Minimize Stress Concentration: Avoid sharp corners, abrupt changes in material thickness, or features that could concentrate stress, especially at the interface of the insert and overmold. Use generous radii.
Wall Thickness and Rib Design
These elements are crucial for both structural integrity and process efficiency:
Overmolded Wall Thickness:
Minimum Thickness: Ensure there is sufficient thickness of the overmolding material surrounding the insert. Too thin, and the material may not flow adequately, leading to voids, poor encapsulation, or weak bonds. It also increases the risk of damage to the insert from injection pressure.
Thermal Expansion: Account for the differing thermal expansion coefficients of the insert and the overmolding material. Sufficient wall thickness can help mitigate stresses caused by differential shrinkage during cooling.
Encapsulated Features: If the insert has features that need to be fully encapsulated (e.g., an electrical pin), ensure there's enough material to cover it completely and provide adequate insulation/protection.
Rib Design (for Overmolded Material):
Reinforcement: Ribs are used to add strength and stiffness to the overmolded plastic without increasing overall wall thickness, thus reducing material usage and cooling time.
Placement: Place ribs strategically to support the overmolded material, especially where it transitions from the insert or where additional rigidity is needed.
Thickness: Rib thickness at the base should typically be 50-60% of the nominal wall thickness to avoid sink marks. Use generously radiused transitions where ribs meet the main wall.
Draft: Always incorporate draft angles on ribs to facilitate easy ejection from the mold.
Gate Location and Venting
Proper gate and vent design are paramount for successful material flow and part quality.
Gate Location:
Away from Inserts: Ideally, place gates away from direct contact with the insert, especially delicate or sensitive inserts (like electronics). Direct impingement of molten plastic can cause insert damage, displacement, or uneven bonding.
Uniform Flow: Position gates to promote uniform material flow around the insert, minimizing weld lines and ensuring complete encapsulation.
Minimizing Shear Stress: Avoid gate locations that create excessive shear stress on the molten material as it flows around the insert, which can degrade material properties.
Aesthetics: Consider the gate vestige on the final part for cosmetic purposes.
Venting:
Air Traps: As molten plastic fills the mold, air must be allowed to escape. Poor venting leads to air traps, which can cause burn marks, voids, incomplete fills (short shots), and weaken the bond to the insert.
Strategic Placement: Vents should be placed at the last areas to fill, especially in blind corners or areas where air might become trapped around the insert.
Venting the Insert Pocket: It's often necessary to vent the specific pocket in the mold that houses the insert to prevent air from becoming trapped between the insert and the overmolded material.
Draft Angles and Undercuts
These moldability features directly impact part ejection and tooling cost.
Draft Angles:
Essential for Ejection: Apply appropriate draft angles (taper) to all vertical walls of the overmolded part that are parallel to the mold opening direction. This allows the part to be easily ejected from the mold without sticking or creating drag marks.
Minimum Recommended Draft: Typically, a minimum of 0.5 to 1 degree per side is recommended, but more may be needed for deeper parts, textured surfaces, or softer materials.
Consider Insert's Draft: If the insert itself has draft, ensure the overmolded part's draft complements it.
Undercuts:
Avoid if Possible: Undercuts in the overmolded plastic (features that prevent direct pull-out from the mold) should generally be avoided as they require complex and expensive tooling (e.g., slides, lifters, or unscrewing mechanisms).
Strategic Use: If undercuts are absolutely necessary (e.g., for mechanical interlocking with the insert), they must be carefully designed.
Insert Undercuts for Bonding: As mentioned, undercuts on the insert are highly desirable for mechanical interlocking, but these do not necessarily require complex tooling for the overmolded part itself, as the plastic flows into these features.
Material Selection for Insert Overmolding
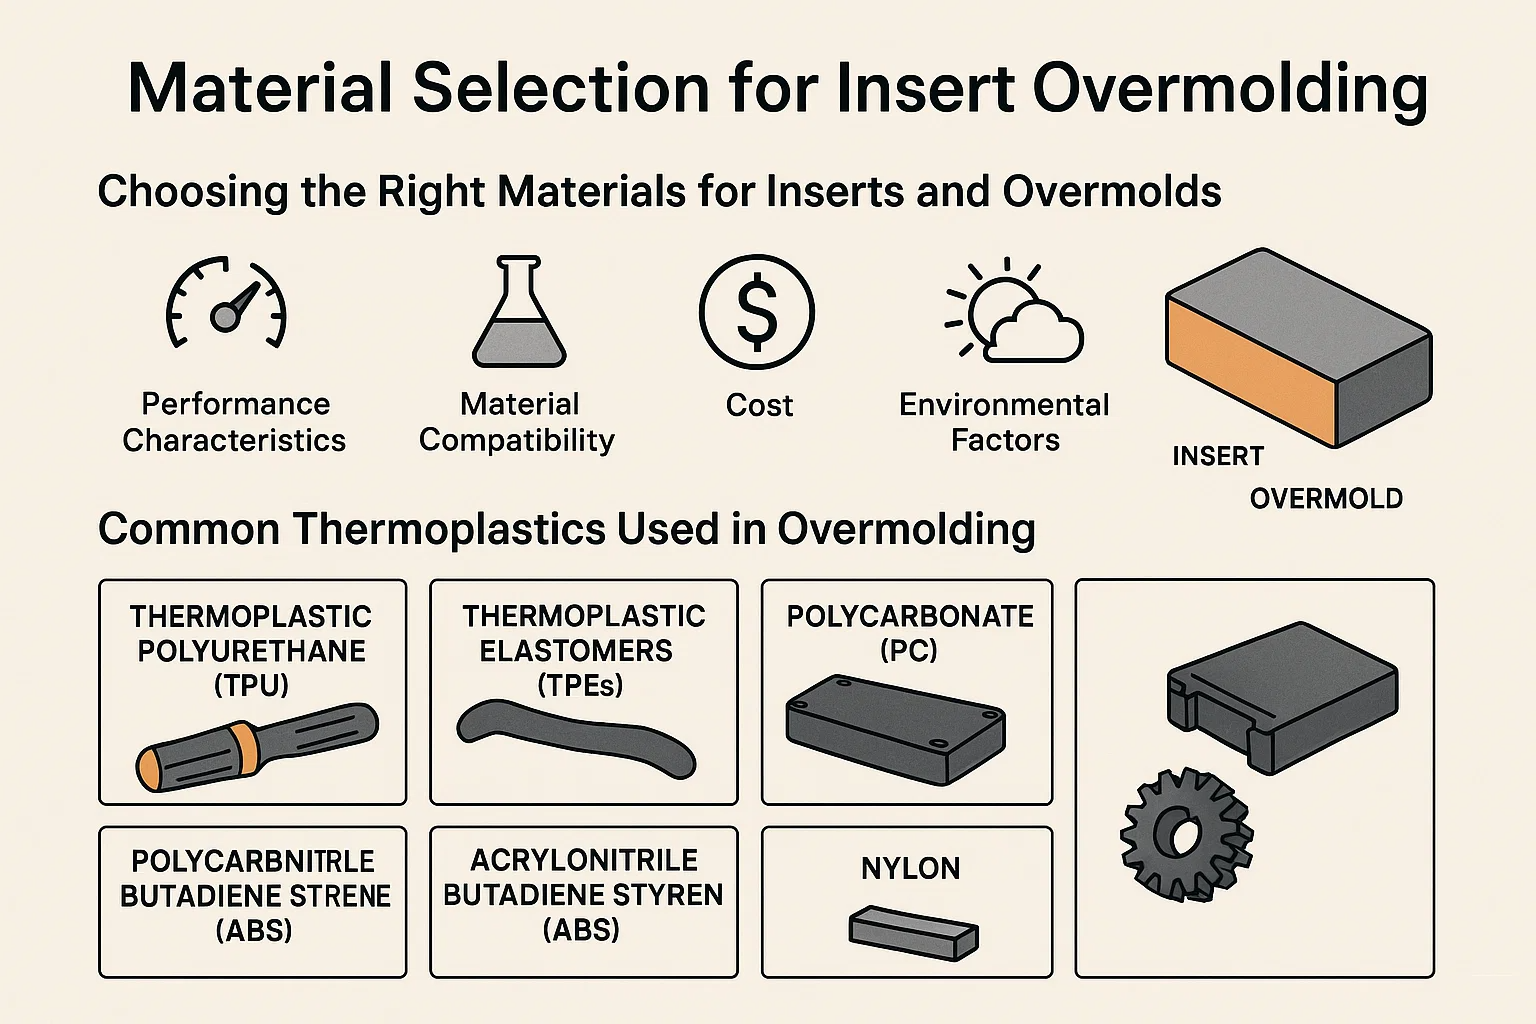
The heart of successful insert overmolding lies in the intelligent selection of materials. Achieving a strong, durable, and functional integrated component requires careful consideration of the properties, compatibility, and adhesion characteristics of both the insert material and the overmolding material. This section will guide you through the process of choosing the right combination.
Choosing the Right Materials for Inserts and Overmolds
The primary goal in material selection is to ensure the two materials work synergistically to meet the final product's functional, aesthetic, and performance requirements. Key factors to consider include:
Desired Performance Characteristics: What properties does the final part need? (e.g., strength, flexibility, electrical insulation, chemical resistance, thermal stability, UV resistance, tactile feel, aesthetic appeal). This will dictate the initial broad categories of materials to consider.
Material Compatibility: This is paramount. The insert and overmolding material must be compatible in several ways:
Thermal Compatibility: Their melt temperatures and coefficients of thermal expansion (CTE) are crucial. A large difference in CTE can lead to significant residual stresses, warpage, or even delamination as the part cools, especially for large inserts. The overmolding material's melt temperature should not degrade or melt the insert.
Chemical Compatibility: They should not react adversely with each other. Some plastics might degrade or soften certain insert materials.
Adhesion Potential: Can a strong bond be formed? This relates to surface energy, polarity, and the potential for mechanical or chemical bonding.
Processing Conditions: The chosen materials must be moldable under feasible conditions. Consider the injection molding temperature, pressure, and cooling rates required for the overmolding material, and how the insert will withstand these conditions.
Cost: Material cost is always a factor. Balance performance requirements with budget constraints.
Environmental Factors: Will the part be exposed to chemicals, UV light, extreme temperatures, or moisture? Select materials that can withstand these environments over the product's lifespan.
Regulatory Compliance: For applications like medical devices or food contact, materials must meet specific regulatory approvals (e.g., ISO 10993, FDA).
Common Thermoplastics Used in Overmolding
Thermoplastics are the most common choice for overmolding due to their melt-reprocessability and wide range of properties.
Thermoplastic Polyurethane (TPU):
Properties: Excellent abrasion resistance, high elasticity, good tensile strength, good chemical resistance, soft-touch feel, wide range of hardness (Shore A to D).
Common Inserts: Often overmolded onto rigid plastics (e.g., PC, ABS, Nylon) or metals to provide soft grips, seals, or impact protection.
Applications: Medical device handles, power tool grips, sporting goods, electronic device cases, automotive interior components.
Thermoplastic Elastomers (TPEs):
Properties: Similar to TPU but often broader families (styrenic block copolymers, copolyesters, polyolefins). They offer rubber-like flexibility, excellent tactile feel, and good sealing properties.
Common Inserts: Rigid plastics (ABS, PC, Nylon, PP, PE) and metals.
Applications: Consumer product grips, seals, buttons, vibration dampeners, cable overmolds, wearable bands.
Polycarbonate (PC):
Properties: High impact strength, good optical clarity (if transparent), good heat resistance, dimensional stability.
Common Inserts: Metal inserts for structural reinforcement or electrical conductivity. Can also be overmolded onto other rigid plastics.
Applications: Electronic housings, medical components, automotive interior parts, industrial covers.
Acrylonitrile Butadiene Styrene (ABS):
Properties: Good balance of strength, rigidity, and toughness, good processability, often chosen for aesthetic parts due to ease of coloring and plating.
Common Inserts: Often used as a rigid substrate for TPE/TPU overmolds. Metal inserts for threaded fasteners or structural support.
Applications: Consumer electronics, automotive interior parts, appliance components.
Nylon (Polyamide - PA):
Properties: High strength, stiffness, good fatigue resistance, good chemical resistance, excellent wear properties. Often glass-filled for enhanced strength.
Common Inserts: Metal (brass, steel, aluminum) for bearing surfaces, threaded inserts, or structural reinforcement.
Applications: Automotive under-the-hood components, industrial gears and bearings, electrical connectors, power tool housings.
Polypropylene (PP) & Polyethylene (PE):
Properties: Low cost, good chemical resistance, good fatigue resistance, good electrical insulator. PP offers higher stiffness than PE.
Common Inserts: Often used as substrates for TPE overmolds in consumer goods. Metal inserts for simple fasteners.
Applications: Bottle caps, automotive interior components (PP), flexible connectors (PE), consumer goods.
Common Metals Used as Inserts
Metals are frequently used as inserts to provide strength, rigidity, electrical conductivity, thermal conductivity, or specialized features like threads.
Aluminum:
Properties: Lightweight, good strength-to-weight ratio, excellent thermal and electrical conductivity, good corrosion resistance (especially anodized).
Considerations: Lower melting point than steel, relatively soft. Can be difficult to bond chemically with some plastics without surface treatment.
Applications: Heat sinks, lightweight structural components, electrical connectors, aerospace parts.
Brass:
Properties: Good electrical conductivity, excellent machinability, good corrosion resistance, non-magnetic.
Considerations: Heavier than aluminum, more expensive than steel.
Applications: Threaded inserts (e.g., for screws), electrical contacts, plumbing components, bushings. Its excellent machinability makes it ideal for complex small inserts.
Steel (Stainless Steel, Carbon Steel):
Properties: High strength, high stiffness, good wear resistance, excellent durability. Stainless steel offers superior corrosion resistance.
Considerations: Heavier than aluminum, can be prone to rust (carbon steel). Requires high processing temperatures for overmolding.
Applications: Structural reinforcement, shafts, bearing surfaces, cutting edges (surgical instruments), fasteners, heavy-duty industrial components.
Material Compatibility and Adhesion
Achieving a strong, reliable bond between the insert and the overmolding material is the ultimate goal. This bond can be achieved through various mechanisms, often working in combination:
Mechanical Interlocking: This is arguably the most common and reliable bonding mechanism. It relies on the overmolding material flowing into and around features (undercuts, holes, knurling, grooves) on the insert, physically locking the two components together.
Chemical Bonding: This occurs when the overmolding material chemically bonds with the surface of the insert. This often requires materials with compatible polarities or surface treatments on the insert (e.g., primers, plasma treatment) to promote adhesion. Materials like TPUs and TPEs are often designed to bond well with specific rigid plastic substrates.
Adhesive Bonding (In-Mold Adhesion): Sometimes, a thin layer of adhesive is applied to the insert before it's placed in the mold. The heat and pressure of the molding process activate the adhesive, creating a bond.
Friction Fit / Shrink Fit: The overmolding material, upon cooling, shrinks tightly around the insert, creating a strong compressive force that holds it in place. This is particularly effective when the overmold material has a higher shrinkage rate than the insert.
Bonding Techniques in Insert Overmolding
The success of an insert overmolding project hinges critically on the robust adhesion between the insert and the overmolding material. Unlike traditional assembly, where fasteners or external adhesives create a joint, insert overmolding aims for an integrated, often seamless, bond.
1. Mechanical Interlocking
This is arguably the most common, reliable, and straightforward method for creating a strong bond in insert overmolding, particularly when overmolding plastic onto metal or dissimilar plastics.
Principle: Mechanical interlocking relies on the molten overmolding material flowing into and encapsulating features on the insert that prevent it from being pulled out. As the plastic cools and solidifies, it physically locks around these features, creating a robust physical connection.
Design Features for Mechanical Interlocking:
Through-holes: Holes drilled or punched through the insert allow the plastic to flow from one side to the other, forming a 'rivet' of plastic that securely locks the insert in place.
Undercuts: Features on the insert that create a cavity or recess. When the plastic flows into this undercut, it forms a mechanical lock.
Knurling: A pattern of ridges or grooves on the surface of the insert (often on pins, shafts, or cylindrical features). The molten plastic flows into these depressions, providing numerous small anchor points.
Grooves and Ridges: Intentional channels or raised lines on the insert's surface provide pathways and anchor points for the plastic.
Mesh/Perforated Surfaces: For larger inserts or areas requiring significant encapsulation, a metal mesh or perforated sheet can provide an expansive surface for the plastic to flow through and bond.
Advantages: Highly reliable, relatively insensitive to surface contamination (compared to chemical bonding), and often provides excellent pull-out strength.
Disadvantages: Requires specific design features on the insert, which can sometimes add complexity to insert manufacturing.
2. Chemical Bonding
Chemical bonding occurs when the overmolding material forms molecular bonds with the surface of the insert. This type of bonding creates a very strong, often invisible, interface.
Principle: This process relies on the chemical compatibility between the two materials. When the molten plastic contacts the insert surface, especially if the surface has been prepared or is inherently reactive, chemical reactions (e.g., covalent bonding, hydrogen bonding, or van der Waals forces) occur at the interface, fusing the materials at a molecular level.
Material Specificity: Some thermoplastic elastomers (TPEs) and thermoplastic polyurethanes (TPUs) are specifically formulated to chemically bond with certain rigid plastic substrates (e.g., TPEs designed to bond with ABS, PC, Nylon, or PP). This is achieved by engineering the TPE's chemistry to be compatible with the substrate's polymer chain.
Importance of Surface Energy: For effective chemical bonding, the surface energy of the insert needs to be higher than or compatible with the surface tension of the molten plastic. Low surface energy (e.g., on oily or unclean surfaces) can lead to poor wetting and weak bonds.
Advantages: Creates an extremely strong and durable bond, often forming a hermetic seal. No need for macroscopic mechanical features on the insert.
Disadvantages: Very sensitive to surface cleanliness and material compatibility. Requires specific material pairings.
3. Adhesive Bonding (In-Mold Adhesion)
While less common as the primary bonding method than mechanical or chemical bonding, in-mold adhesive bonding involves using an adhesive layer to promote adhesion.
Principle: A thin layer of a compatible adhesive is applied to the insert before it is placed into the mold. The heat and pressure from the injection molding process then activate or cure the adhesive, forming a bond between the insert and the overmolded material.
Types of Adhesives: Specialized in-mold adhesives are typically thermosetting resins or reactive hot melts designed to withstand the molding temperatures.
Advantages: Can facilitate bonding between otherwise incompatible materials. Can provide strong, uniform adhesion.
Disadvantages: Adds an extra step to the manufacturing process (adhesive application). Requires careful control of adhesive thickness and curing parameters. Can increase overall part cost due to adhesive material and process complexity. Less common for high-volume, automated processes unless absolutely necessary.
Surface Preparation
Regardless of the primary bonding mechanism, proper surface preparation of the insert is crucial for maximizing adhesion. Contaminants and inconsistent surface energy can significantly weaken any bond.
Cleaning: This is the most fundamental step. Inserts must be free from oils, grease, dust, mold release agents, fingerprints, and other residues. Common cleaning methods include:
Solvent Degreasing: Using solvents like isopropyl alcohol, acetone, or specialized industrial cleaners.
Aqueous Cleaning: Using detergents and water, often followed by rinsing and drying.
Ultrasonic Cleaning: Using high-frequency sound waves in a liquid bath to dislodge contaminants.
Surface Activation/Modification: To enhance chemical bonding, the insert's surface energy can be increased or its chemical reactivity improved:
Plasma Treatment: Using a plasma discharge to clean, etch, and activate the surface at a molecular level. Highly effective for plastics and some metals.
Flame Treatment: Passing the surface quickly through a flame to oxidize and activate it. Common for polyolefins.
Corona Treatment: Using a high-frequency electrical discharge to alter the surface.
Mechanical Abrasion: Lightly roughening the surface (e.g., sandblasting, grit blasting) to increase surface area and create micro-features for mechanical interlocking. Care must be taken not to damage the insert.
Primers/Adhesion Promoters: Applying a chemical primer that acts as a bridge between the insert and the overmolding material. This is often used for difficult-to-bond substrates or when a very strong chemical bond is required.
By meticulously considering these bonding techniques and implementing thorough surface preparation, manufacturers can ensure the creation of highly durable and reliable overmolded components that meet the most demanding performance specifications.
Applications of Insert Overmolding
The unique ability of insert overmolding to combine the best properties of disparate materials into a single, cohesive component has made it an indispensable process across a vast range of industries. From enhancing safety and durability to improving aesthetics and functionality, overmolding solutions are found in countless products we use every day.
1. Automotive Industry
The automotive sector is a major adopter of insert overmolding due to its demands for lightweighting, improved aesthetics, noise reduction, and integration of complex functions.
Gear Shift Knobs and Interior Trim: Often feature a rigid plastic or metal core overmolded with soft-touch thermoplastic elastomers (TPEs) or thermoplastic polyurethanes (TPUs) for ergonomic comfort, a premium feel, and vibration dampening.
Sensor Housings and Connectors: Critical electronic sensors (e.g., for engine management, ADAS systems) are frequently overmolded with robust, heat-resistant plastics. Metal pins or circuitry are encapsulated to protect against moisture, chemicals, and vibration, ensuring reliability in harsh under-the-hood environments.
Steering Wheel Components: Metal armatures and electronic components are overmolded with various plastics to create a complete, ergonomic, and aesthetically pleasing steering wheel assembly, often incorporating soft-touch grips and functional buttons.
Wire Harnesses and Cable Assemblies: Metal terminals and wires are overmolded with plastic to create robust, sealed connectors that are resistant to pull-out, moisture, and wear, crucial for the vehicle's electrical system.
Door Handles and Latches: Overmolding can integrate metal actuation mechanisms with plastic housing for durability and a smooth, aesthetically pleasing finish.
Brake Pedal Pads: Metal pedal arms are overmolded with anti-slip rubber or TPE materials for safety and improved driver feel.
2. Medical Devices
Precision, biocompatibility, sterilization capabilities, and ergonomic design are paramount in the medical field, making insert overmolding a highly valued process.
Surgical Instrument Handles: Rigid metal surgical tools (e.g., scalpels, forceps) are commonly overmolded with TPEs or silicones to provide a comfortable, non-slip grip for surgeons, improving control and reducing fatigue during long procedures. These materials must often withstand harsh sterilization cycles.
Diagnostic Equipment Components: Internal electronic components, probes, or fluidic pathways are often overmolded with biocompatible plastics to create sealed, sterile, and easy-to-clean housings.
Medical Tubing and Connectors: Metal or rigid plastic connectors are overmolded with flexible materials (e.g., medical-grade TPEs, silicones) to create leak-proof seals, secure connections, and ergonomic interfaces for IV lines, catheters, and other fluid delivery systems.
Wearable Medical Devices: Sensors and circuit boards are encapsulated within soft, skin-friendly overmolds for devices like glucose monitors or continuous heart rate trackers, ensuring comfort and protection.
Dental Tools: Metal working tips are overmolded with ergonomic plastic handles for improved dentist comfort and control.
3. Consumer Products
From handheld gadgets to household appliances, overmolding enhances durability, aesthetics, and user experience in a wide array of consumer goods.
Power Tool Grips: The most recognizable application. Rigid plastic or metal tool bodies are overmolded with TPEs to provide comfortable, non-slip, vibration-dampening grips for enhanced safety and user comfort.
Electric Toothbrush Handles: Internal motors and batteries are sealed within a rigid plastic shell, which is then often overmolded with TPE for a comfortable, waterproof, and aesthetically pleasing grip.
Kitchen Utensil Handles: Metal spatulas, whisks, and knives are overmolded with heat-resistant, ergonomic plastic or silicone handles for comfort and improved grip during cooking.
Electronic Device Enclosures: Remote controls, gaming controllers, and smart home devices often feature hard plastic bases with soft-touch TPE overmolds for improved grip, durability, and a premium feel. Internal circuitry can also be encapsulated.
Sporting Goods: Bicycle grips, golf club grips, scuba masks, and athletic footwear often utilize overmolding to combine rigid structural elements with softer, grippier materials for performance and comfort.
Personal Care Products: Razor handles, hairbrushes, and cosmetic applicators use overmolding for ergonomic designs and enhanced tactile appeal.
4. Industrial Components
In industrial settings, overmolding is utilized to create robust, high-performance components that can withstand demanding operating conditions, improve safety, and consolidate functions.
Gaskets and Seals: Metal inserts can be overmolded with elastomeric materials to create highly durable and precise sealing solutions for pumps, valves, and enclosures, offering superior performance compared to traditional compression gaskets.
Electrical Connectors and Switches: Metal contacts and terminals are overmolded with insulating plastics to create sealed, robust, and safe electrical connections, protecting against moisture, dust, and electrical shock.
Impellers and Gears: Metal shafts or hubs can be overmolded with engineered plastics to create lightweight impellers or gears with improved corrosion resistance, noise reduction, and reduced inertia, while maintaining a strong interface to the drive shaft.
Hand Tools and Wrenches: Metal tool bodies are overmolded with comfortable, chemical-resistant plastic handles to improve ergonomics, provide electrical insulation, and reduce user fatigue.
Vibration Mounts and Dampeners: Metal fasteners or rigid plastic bases are overmolded with soft elastomers to create components that effectively isolate vibration in machinery and equipment, reducing noise and extending product life.
Advantages and Disadvantages of Insert Overmolding
While insert overmolding offers a powerful solution for creating multi-material components, like any manufacturing process, it comes with its own set of benefits and limitations. A clear understanding of these pros and cons is essential for determining if overmolding is the most suitable approach for a given application.
Advantages (Pros)
Insert overmolding delivers significant benefits that often outweigh its challenges, making it a preferred choice for many complex product designs.
Cost Reduction (Long-Term):
Reduced Assembly Time: By integrating multiple components into one, overmolding eliminates the need for separate assembly steps, such as screwing, gluing, or welding. This significantly reduces labor costs and speeds up production cycles.
Fewer Components to Manage: Consolidating parts simplifies inventory management, purchasing, and supply chain logistics.
Reduced Scrap and Rework: A well-designed overmolding process can produce highly consistent parts, minimizing rejects associated with faulty assembly or misaligned components.
Improved Part Performance and Functionality:
Synergistic Material Properties: Allows for the combination of materials with vastly different characteristics (e.g., rigid metal for strength, flexible plastic for grip, electrically conductive metal with insulating plastic) to achieve superior overall performance.
Enhanced Durability and Reliability: The integrated bond between the insert and overmold often results in a more robust part, reducing rattling, loosening, or material fatigue that can occur in traditionally assembled components. It creates a stronger, more permanent connection.
Enhanced Sealing Capabilities: Overmolding can create hermetic seals around inserts, protecting sensitive electronics or preventing fluid leaks.
Vibration and Noise Reduction: Soft overmolds can absorb shock and dampen vibrations, improving product longevity and user comfort.
Design Flexibility and Aesthetics:
Complex Geometries: Enables the creation of intricate parts that would be difficult or impossible to manufacture using single-material molding or conventional assembly methods.
Integrated Features: Allows for the seamless integration of features like threaded inserts, electronic circuitry, sensors, or ergonomic grips directly into the part.
Improved Aesthetics: Offers designers the ability to create multi-color, multi-texture, and soft-touch surfaces that enhance product appeal and ergonomics, often eliminating visible fasteners or seams.
Disadvantages (Cons)
Despite its numerous advantages, insert overmolding presents certain challenges that need to be carefully considered during the planning and design phases.
Higher Initial Tooling Costs:
Complex Molds: Overmolding tools are inherently more complex than standard injection molds because they must precisely accommodate and secure the insert. This often requires intricate core and cavity designs, special gate locations, and potentially automation features, leading to higher upfront investment.
Multi-Shot Tooling: For multi-shot overmolding, the tooling complexity and cost increase significantly as it involves multiple cavities, rotating platens, or transfer mechanisms within a single mold.
Material Compatibility Issues:
Adhesion Challenges: Achieving a strong and consistent bond can be challenging, especially between dissimilar materials with low surface energy or large differences in thermal expansion coefficients. This can lead to delamination, warpage, or cracking.
Processing Temperature Limitations: The overmolding material's melt temperature must be low enough not to damage or degrade the insert material. This can limit material choices.
Differential Shrinkage: As the overmolded plastic cools, it shrinks. If the insert material has a significantly different coefficient of thermal expansion, this differential shrinkage can induce internal stresses, leading to warping, cracking, or bond failure over time.
Increased Cycle Times (in some cases):
Insert Loading: If inserts are loaded manually, this adds to the overall cycle time, impacting production efficiency. Even automated loading adds a small increment.
Cooling Time: The presence of an insert can sometimes affect cooling uniformity, potentially requiring longer cooling cycles to prevent warpage or achieve full solidification, especially if the insert acts as a heat sink.
Risk of Insert Damage or Misplacement:
High Injection Pressure: The forces of molten plastic injection can potentially bend, break, or displace delicate inserts if they are not adequately supported or if the injection parameters are not optimized.
Precise Positioning: Maintaining exact insert placement within the mold can be challenging, and any misalignment can lead to defective parts.
Design Complexity:
Interdependent Design: The design of the insert and the overmold are inextricably linked. Changes to one often necessitate changes to the other, requiring a more integrated and iterative design process.
DFM Importance: Design for Manufacturability (DFM) is even more critical in overmolding. Mistakes in design can be very costly to rectify once tooling is made.
Despite these challenges, when carefully planned and executed, the advantages of insert overmolding in terms of part performance, cost efficiency in high volumes, and design freedom often make it the superior choice for complex, multi-material applications. The key to success lies in thorough design, material selection, and process optimization.
Case Studies
Real-world examples powerfully illustrate the transformative potential of insert overmolding. These case studies highlight how this process solves complex engineering challenges, optimizes performance, and achieves significant manufacturing efficiencies.
Case Study 1: Automotive Sensor Housing
Challenge: A leading automotive manufacturer needed to produce a compact, highly durable sensor housing for an advanced driver-assistance system (ADAS). The sensor required precise alignment, protection from harsh under-the-hood environments (temperature fluctuations, moisture, chemicals), and electrical isolation of delicate internal circuitry. Traditional assembly with gaskets and potting compounds was expensive, prone to leaks, and labor-intensive.
Overmolding Solution: Insert overmolding was chosen to encapsulate the metal sensor and its internal wiring.
Insert: A precisely machined metal sensor component with embedded wires and connection pins.
Overmold Material: A high-performance, glass-filled PBT (Polybutylene Terephthalate) was selected for its excellent chemical resistance, thermal stability, and dimensional stability.
Process: The metal sensor was robotically placed into the mold. The PBT was then injected, completely encapsulating the sensor and creating a robust, hermetic seal around the electrical connections.
Benefits Achieved:
Enhanced Durability: The seamless overmold provided superior protection against environmental factors, significantly extending the sensor's lifespan.
Cost Reduction: Eliminated multiple assembly steps (potting, gasketing, fastening), reducing labor and material costs by over 30%.
Improved Reliability: Reduced potential leak paths and points of failure compared to traditional assembly.
Miniaturization: Allowed for a more compact design due to the integrated nature of the component.
Case Study 2: Ergonomic Surgical Instrument Handle
Challenge: A medical device company aimed to improve the ergonomics and safety of a reusable surgical cutting tool. The existing metal handle was slippery when wet, caused hand fatigue during long procedures, and required a separate, labor-intensive gluing process for a rubber grip. Sterilization compatibility was also critical.
Overmolding Solution: The metal blade and shank were overmolded with a specialized, medical-grade thermoplastic elastomer (TPE).
Insert: The rigid stainless steel blade and its integral tang (handle portion).
Overmold Material: A custom-formulated, biocompatible TPE was chosen for its soft-touch feel, non-slip properties even when wet, and ability to withstand repeated steam sterilization (autoclaving) cycles without degradation or delamination.
Process: The metal tang was precisely positioned in the mold cavity. The TPE was injected around it, forming an ergonomic grip with textured features. Mechanical interlocking features (grooves, through-holes) were designed into the metal insert to ensure a strong, permanent bond.
Benefits Achieved:
Superior Ergonomics: The soft-touch TPE grip significantly improved surgeon comfort and control, reducing hand fatigue.
Enhanced Safety: The non-slip surface reduced the risk of accidental slippage during critical procedures.
Improved Manufacturability & Cost Savings: Eliminated the manual gluing step, resulting in a cleaner process, reduced labor, and faster production.
Sterilization Compatibility: The selected TPE maintained its integrity and bond strength through rigorous sterilization protocols.
Case Study 3: Consumer Electronics Remote Control
Challenge: A consumer electronics manufacturer wanted to improve the tactile feel, drop resistance, and overall aesthetics of a high-end remote control. The original design was rigid plastic, prone to cracking when dropped, and felt "cheap."
Overmolding Solution: A two-shot (multi-shot) overmolding process was employed to create the remote's body.
First Shot (Insert/Substrate): A rigid ABS (Acrylonitrile Butadiene Styrene) plastic formed the structural core and button wells of the remote.
Second Shot (Overmold): A specially formulated TPE was injected over parts of the ABS, creating a soft, grippy outer shell and accent areas.
Process: The ABS component was molded in the first cavity, then automatically transferred (via mold rotation or robotic arm) to the second cavity where the TPE was injected.
Benefits Achieved:
Premium Tactile Feel: The TPE overmold provided a pleasant, soft-touch surface that significantly enhanced the user experience.
Improved Drop Resistance: The elastomeric outer layer absorbed impact forces, making the remote more durable and less prone to damage from accidental drops.
Aesthetic Enhancement: Enabled multi-material design with distinct textures and color contrasts, elevating the perceived quality and design sophistication of the product.
Streamlined Production: The two-shot process allowed for the creation of a complex, multi-material part in a single molding cycle, reducing assembly time and logistics.
These examples underscore that insert overmolding is not just about combining materials; it's about engineering integrated solutions that deliver superior performance, efficiency, and market appeal.
Best Practices for Insert Overmolding
Achieving consistent, high-quality results in insert overmolding requires adherence to proven best practices throughout the design, tooling, and manufacturing stages.
1. Design for Manufacturability (DFM) Guidelines
Proactive design decisions are the most impactful way to ensure overmolding success.
Collaborate Early: Engage with your molders and material suppliers from the initial design phase. Their expertise can prevent costly redesigns.
Account for Material Properties: Understand the thermal expansion, shrinkage, and adhesion characteristics of both materials. Design tolerances should account for these differences.
Promote Mechanical Interlocking: Prioritize designing features on the insert (undercuts, holes, knurling) that maximize mechanical bond strength.
Maintain Uniform Wall Thickness: Strive for consistent overmold wall thickness around the insert to minimize differential cooling, warpage, and sink marks.
Generous Radii: Use generous radii (fillets) on internal and external corners, especially where the overmold meets the insert, to reduce stress concentrations and improve material flow.
Optimize Gate and Venting: Strategically place gates to ensure balanced flow around the insert and vents to prevent air traps, which can lead to voids and poor bonding.
Ensure Insert Robustness: Design inserts to withstand injection pressures and temperatures without deformation. Consider their rigidity and thermal mass.
Clearance for Mold Components: Ensure sufficient space around the insert for mold components (e.g., core pins) to engage without interference.
2. Quality Control and Inspection
Rigorous quality control throughout the process is essential to ensure part integrity and performance.
Incoming Material Inspection: Verify the quality, dimensions, and cleanliness of all incoming inserts and raw overmolding materials.
In-Process Monitoring:
Automated Vision Systems: Use cameras to verify correct insert placement before mold closure.
Process Parameter Monitoring: Continuously monitor and log injection pressure, temperature, cycle time, and cooling profiles to ensure consistency.
Robot/Automation Calibration: Regularly calibrate robotic insert placement systems for precision.
Post-Molding Inspection:
Visual Inspection: Check for cosmetic defects, flash, voids, short shots, and proper encapsulation of the insert.
Dimensional Inspection: Use calipers, micrometers, CMMs (Coordinate Measuring Machines), or optical scanners to verify critical dimensions.
Adhesion Testing:
Pull-Out Tests: Apply a measured force to the insert to determine the bond strength required to pull it out of the overmold.
Peel Tests: Measure the force required to peel the overmold material from the insert surface (common for flat interfaces).
Torque Tests: For threaded inserts, measure the torque required to spin or strip the insert.
Environmental Testing: Subject samples to extreme temperatures, humidity, chemical exposure, or UV radiation to ensure long-term performance and bond integrity in their intended environment.
Functional Testing: Test the finished part in its intended application to verify all functions are met.
By integrating these best practices, manufacturers can significantly reduce risks, optimize production, and consistently produce high-quality insert overmolded components.
Future Trends in Insert Overmolding
The field of insert overmolding is continuously evolving, driven by advancements in materials science, manufacturing technology, and increasing demands for integrated and sustainable products.
Advancements in Materials and Technologies:
Multi-Material Integration: Expect continued development in highly specialized TPEs and TPUs that offer superior chemical bonding to a wider range of engineering plastics and metals, reducing the reliance on surface treatments.
Smart Materials and Sensors: Growing integration of advanced electronics, sensors (e.g., pressure, temperature, RFID), and even flexible circuits directly into overmolded components, creating "smart" parts with embedded functionality.
Sustainable Materials: Increasing use of bio-based, recycled, and recyclable overmolding materials to meet environmental regulations and consumer demand for greener products.
Additive Manufacturing (3D Printing) for Inserts: Prototyping and even low-volume production of complex inserts via 3D printing is becoming more prevalent, offering unprecedented design freedom and speed.
Liquid Silicone Rubber (LSR) Overmolding: As LSR molding technology matures, its use for overmolding onto plastics and metals for soft-touch, sealing, and medical applications will continue to grow due to its unique properties (biocompatibility, wide temperature range).
Enhanced Simulation Software: More sophisticated simulation tools will allow engineers to predict material flow, bond strength, residual stresses, and potential warpage with greater accuracy, optimizing designs virtually before tooling is cut.
Increased Automation and Industry 4.0 Integration:
Robotics for Insert Placement: Further advancements in high-speed, precise robotic systems for automated insert loading will improve efficiency and consistency, especially for delicate or complex inserts.
Integrated Manufacturing Cells: Overmolding lines will become more integrated with downstream processes (assembly, testing, packaging) in fully automated, "lights-out" manufacturing environments.
Real-Time Process Control: Leveraging AI and machine learning for real-time monitoring and adaptive control of molding parameters, further optimizing quality and reducing waste.
Digital Twins: Creation of digital replicas of the manufacturing process to predict performance, troubleshoot issues, and optimize operations remotely.
These trends indicate a future where insert overmolding will become even more sophisticated, versatile, and central to the creation of advanced, multi-functional products across all industries.
So
The journey through insert overmolding reveals a sophisticated and immensely valuable manufacturing process that stands as a cornerstone of modern product design. From enhancing performance and aesthetics to consolidating components and driving down long-term costs, its capabilities are transformative.
Recap of Key Points:
What it is: Insert overmolding precisely encapsulates a pre-formed component (insert) with an injection-molded material, creating a single, integrated part.
Core Process: Involves careful insert preparation, secure placement in the mold, precise material injection, cooling, and ejection, often leveraging automated systems for efficiency.
Design is Paramount: Success hinges on meticulous design of both the insert and the overmolding plastic, considering aspects like mechanical interlocking features, uniform wall thickness, proper gating, and draft angles to ensure moldability and bond strength.
Material Compatibility is Critical: The selection of insert and overmolding materials must account for thermal, chemical, and adhesion compatibility to achieve a strong, reliable bond, often leveraging common thermoplastics like TPEs, TPUs, PC, ABS, and metals such as aluminum, brass, and steel.
Bonding Mechanisms: Adhesion is primarily achieved through robust mechanical interlocking, chemical bonding (especially with specialized materials), or, less commonly, in-mold adhesives, all supported by meticulous surface preparation.
Broad Applications: From enhancing ergonomics and protecting sensitive electronics in medical devices and consumer products, to improving durability and functionality in automotive and industrial components, overmolding's versatility is vast.
Pros & Cons: While offering significant advantages in performance, part consolidation, and long-term cost reduction, it demands higher initial tooling investments and careful management of material compatibility and process complexity.

