 English
 Indonesia
Introduction
In plastic injection molding, the surface finish of a part is far more than a cosmetic choice. It directly influences how a product feels in a consumer’s hand, how light reflects off its contours, and more critically, how cleanly the part ejects from the mold cavity during production. Choosing the wrong finish can lead to micro-scratches, cosmetic sink marks, or parts getting stuck in the tool, drastically driving up scrap rates.
To standardize these finishes across the supply chain, the Society of the Plastics Industry (now known simply as PLASTICS) established the SPI surface finish classification system. While the association has updated its name, global toolmakers and manufacturing engineers still universally refer to these as the “SPI Standards.”
Understanding the nuances of these standards—and how different polymers interact with them—is the key to balancing aesthetic intent with manufacturing reality.
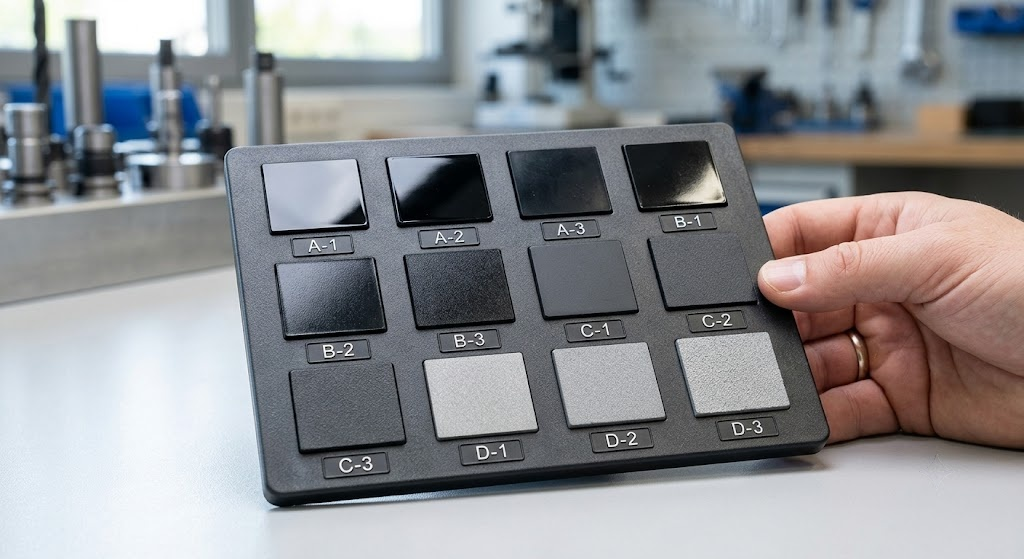
The 4 Primary SPI Finish Classifications
The SPI standard categorizes finishes into four distinct letter grades (A, B, C, and D), determined by the media and method used to polish the mold steel. Within each grade, numbers 1 through 3 designate the level of processing and the resulting surface roughness average (Ra).
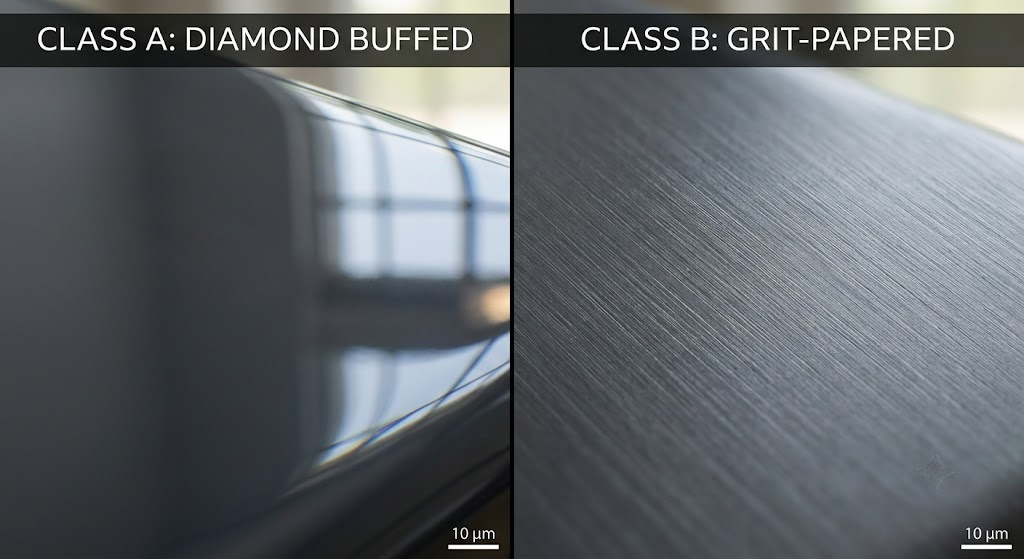
Class A: Glossy/Shiny Finishes (Diamond Polish)
Class A finishes represent the pinnacle of optical clarity and high-gloss aesthetics. These finishes are achieved by painstakingly hand-polishing the mold cavity using progressively finer grades of diamond powder buffing pastes.
- SPI A-1: The highest standard, utilizing a Grade 3 diamond buffing paste to achieve an ultra-smooth surface roughness of approximately 0.012 to 0.025 micrometers Ra. It yields a mirror-like, highly reflective finish.
- SPI A-2: Utilizes a Grade 6 diamond paste, resulting in a slightly higher Ra value (0.025 to 0.05 micrometers) but maintaining a premium gloss.
- SPI A-3: Polished with a Grade 15 diamond paste, offering a sharp, glossy appearance but allowing a slightly more forgiving roughness profile (0.05 to 0.10 micrometers Ra).
Manufacturing Insights:
Achieving a true Class A finish requires high-quality, high-hardness mold steels like NAK80 or S136. Standard tool steels contain micro-impurities or porosity; when polished to an A-1 level, these impurities “tear out,” leaving microscopic pits that ruin the finish.
Furthermore, Class A surfaces act as a magnifying glass for internal part defects—any slight volumetric shrinkage (sink marks) behind a rib or boss will be instantly visible under light reflection.
- Common Applications: Optical lenses, transparent light pipes, face shields, mirrors, and high-end consumer electronics housings where a premium piano-black or crystal-clear look is required.
Class B: Semi-Gloss Finishes (Grit Paper)
Class B finishes are designed for parts that require a neat, professional appearance without the extreme costs or fragility of a mirror finish. These surfaces are achieved using fine-grit sandpaper applied in a linear, overlapping motion.
- SPI B-1: Finished with 600-grit paper, producing an exceptionally clean semi-gloss surface with a typical roughness of 0.05 to 0.10 micrometers Ra.
- SPI B-2: Polished with 400-grit paper, offering a moderate semi-gloss look (0.10 to 0.15 micrometers Ra).
- SPI B-3: Polished with 320-grit paper, yielding a soft satin sheen with visible, uniform micro-scratches (0.28 to 0.35 micrometers Ra).
Manufacturing Insights:
Because grit paper polishing introduces a directional, linear scratch pattern to the mold, the toolmaker must align the polishing strokes with the direction of the mold’s opening (ejection path). If the grit lines run perpendicular to the pull direction, the molded plastic will grip the micro-grooves, leading to scuff marks and severe ejection difficulties during the production run.
- Common Applications: Consumer appliance housings, automotive interior trim panels, handheld electronic enclosures, and commercial office equipment.
Class C: Matte Finishes (Stone Polish)
Class C finishes are characterized by a soft, dull, non-reflective matte appearance. Toolmakers achieve this texture by using profiling oilstones (grit stones) to aggressively smooth out the mold steel.
- SPI C-1: Achieved using a fine 600-grit polishing stone, resulting in a smooth matte finish (0.35 to 0.40 micrometers Ra).
- SPI C-2: Finished with a 400-grit stone, creating a distinct matte texture (0.45 to 0.55 micrometers Ra).
- SPI C-3: Finished with a coarser 320-grit stone, removing all tooling marks to leave a rougher, completely flat matte look (0.63 to 0.85 micrometers Ra).
Manufacturing Insights:
In industrial applications, Class C is rarely chosen purely for “decorating” a part. Instead, it is the industry’s go-to “cost-efficiency” finish. The primary purpose of a stone polish is to quickly and economically erase the rough machining marks (scallops and grooves) left behind by CNC milling cutters or EDM electrodes. It is the default finish for parts that the end-user will never see.
- Common Applications: Internal structural ribs, electronic brackets, automotive structural components, fuel tanks, and concealed industrial hardware.
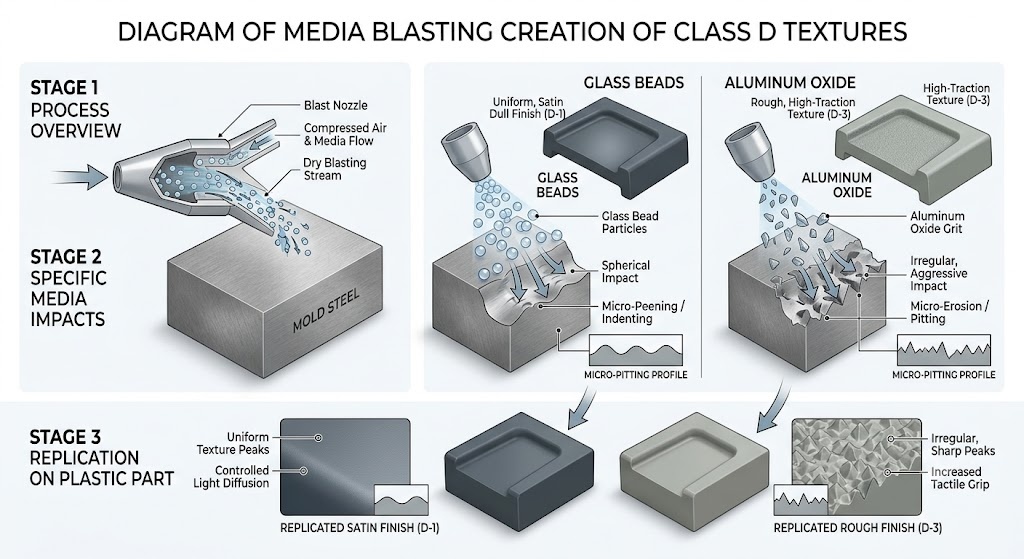
Class D: Textured Finishes (Blast/Sandblasting)
Class D finishes provide a rough, heavily textured, or satin feel. This is a “destructive” texturing process where the mold cavity is subjected to dry media blasting under high pressure.
- SPI D-1: Created by blasting the mold steel with fine glass beads, resulting in a uniform, satin-like dull finish (0.80 to 1.10 micrometers Ra).
- SPI D-2: Blasted with a medium-grade blast media or sand, producing a rougher, non-slip texture (1.10 to 1.60 micrometers Ra).
- SPI D-3: Blasted with coarse aluminum oxide or heavy sand grains, yielding a highly tactile, rough, completely flat finish (2.30 to 3.20 micrometers Ra).
Manufacturing Insights:
Class D finishes are incredible for hiding surface defects like weld lines or minor sink marks. However, engineers must plan for “texture degradation.” Over a long production run (e.g., hundreds of thousands of cycles), abrasive engineering plastics like glass-filled nylon will slowly erode and “polish” the sharp peaks of a blasted mold cavity. As a result, a D-1 texture can gradually morph into a semi-matte texture over time, requiring the mold to be pulled from production and re-blasted to restore the original specification.
- Common Applications: Heavy-duty tool handles, plastic steering wheels, textured luggage shells, consumer electronics grips, and industrial enclosures designed to mask fingerprints and scratches.
SPI Surface Finish Comparison Chart
| SPI Grade | Finishing Method / Medium | Typical Roughness Average (Ra - Micrometers) | Typical Roughness Average (Ra - Microinches) | Visual Appearance & Gloss Level | Relative Tooling Cost Multiplier |
|---|---|---|---|---|---|
| A-1 | Grade 3 Diamond Buff | 0.012 to 0.025 | 0.5 to 1.0 | High Mirror Polish, Highly Reflective | 2.5x to 3.0x |
| A-2 | Grade 6 Diamond Buff | 0.025 to 0.05 | 1.0 to 2.0 | Mirror Polish, Good Reflectivity | 2.0x to 2.5x |
| A-3 | Grade 15 Diamond Buff | 0.05 to 0.10 | 2.0 to 4.0 | High Gloss, Soft Reflections | 1.5x to 2.0x |
| B-1 | 600 Grit Paper | 0.05 to 0.10 | 2.0 to 4.0 | Semi-Gloss, Fine Linear Sheen | 1.3x |
| B-2 | 400 Grit Paper | 0.10 to 0.15 | 4.0 to 6.0 | Medium Semi-Gloss | 1.2x |
| B-3 | 320 Grit Paper | 0.28 to 0.35 | 11.0 to 14.0 | Soft Satin, Mild Sheen | 1.1x |
| C-1 | 600 Grit Stone | 0.35 to 0.40 | 14.0 to 16.0 | Fine Matte, Non-Reflective | 1.0x (Baseline) |
| C-2 | 400 Grit Stone | 0.45 to 0.55 | 18.0 to 22.0 | Medium Matte, Flat Finish | 0.9x |
| C-3 | 320 Grit Stone | 0.63 to 0.85 | 25.0 to 34.0 | Coarse Matte, Erases Tool Marks | 0.8x |
| D-1 | Dry Glass Bead Blast | 0.80 to 1.10 | 32.0 to 44.0 | Dull Satin, Fine Pearlescent Texturing | 1.2x |
| D-2 | Fine Sand Blast | 1.10 to 1.60 | 44.0 to 64.0 | Dull Textured, Completely Flat | 1.3x |
| D-3 | Coarse Sand / Oxide Blast | 2.30 to 3.20 | 90.0 to 130.0 | Very Rough, Tactile Grip Texture | 1.4x |
Key Factors When Choosing an SPI Surface Finish
Selecting a surface finish requires a calculated trade-off between material properties, geometry, and budget. Here are the core factors that should guide your Decision for Manufacturing (DFM).
Material Selection: Crystalline vs. Amorphous Polymers
The molecular structure of your plastic resin directly dictates how well it replicates the mold’s finish.
- Amorphous Polymers (e.g., Polycarbonate, ABS, Acrylic/PMMA) have a random molecular layout that flows perfectly against polished steel. They excel at picking up Class A diamond finishes for absolute transparency or high gloss.
- Crystalline Polymers (e.g., Nylon/PA, Polypropylene, Polyethylene) undergo structured crystallization as they cool, causing higher shrinkage. Furthermore, if you add glass fibers (GF) to these materials for strength, the fibers tend to float to the surface. Specifying a Class A finish on a 30% Glass-Filled Nylon is a waste of capital—the surface will inherently look streaky and mottled. These materials perform much better on Class C or Class D finishes.
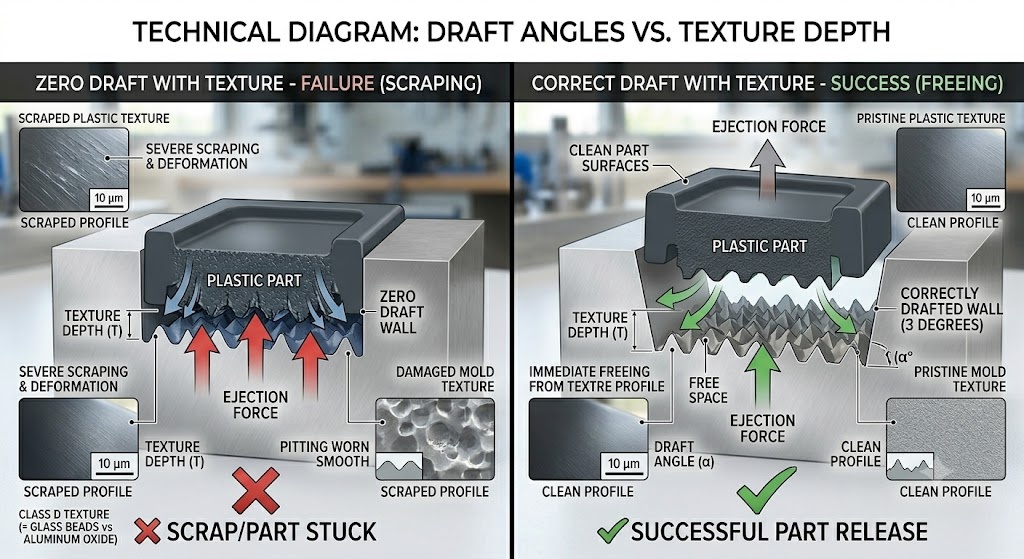
The Draft Angle Penalty
Surface textures create microscopic peaks and valleys. When the mold opens, the plastic part must pull away cleanly. If the vertical walls of the part lack sufficient draft (taper), the textured steel will physically scrape, tear, or mark the cooling plastic during ejection.
- The Industry Golden Rule: For standard smooth finishes (Class A and B), a minimum draft angle of 0.5 to 1.0 degree per side is acceptable.
- Textured Rule of Thumb: For Class D sandblasted finishes, you must add approximately 1 extra degree of draft angle for every 0.025 mm (equal to 1 mil or 0.001 inches) of texture depth. Failing to account for this will result in severe drag marks and part deformation.
Tooling Costs & Lead Times
As shown in the comparison chart, a Class A finish significantly inflates mold manufacturing costs. Hand-polishing a tool to an A-1 finish can add days or even weeks to a tooling lead time because it must be done step-by-step (e.g., you cannot jump from a 320-grit stone straight to diamond paste without ruining the steel matrix). Class C stone finishes are by far the fastest and cheapest to produce.
Part Functionality
Consider the end-use environment. High-gloss Class A finishes are notorious scratch magnets and show greasy fingerprints instantly. If a product is meant to be handled daily (like a controller or electronic grip), a Class D satin texture provides tactile friction while successfully hiding wear and tear over the product’s lifespan.
How to Specify SPI Finishes on Engineering Drawings
Clear communication prevents costly tooling re-works. When preparing your production blueprints or 2D engineering drawings, apply these industry best practices:
- Avoid General Callouts: Never write “Polish Outer Surfaces” in the drawing notes. This leaves the definition completely up to interpretation. Instead, use explicit callouts like:
SURFACE FINISH TO BE SPI A-2 ON VISIBLE COSMETIC FACES. - Use Texture Boundary Splines: If a single molded part features multiple finishes (e.g., a Class A glossy accent strip on a Class D textured housing), draw a clean, dashed boundary line on your 2D print to show the exact transition zones.
- Cross-Reference Global Standards: If you are dealing with global supply chains, your manufacturing partner might be more accustomed to European VDI 3400 (which is based on spark-erosion scales) or proprietary texture catalogs like Mold-Tech. Note the equivalent values if applicable (e.g., SPI C-1 roughly aligns with VDI 18 to 21).
- Request Physical Texture Plaques: Before authorizing a toolmaker to texture a multi-thousand-dollar mold cavity, request a physical sample chip molded in your exact chosen resin material. Textures look vastly different on natural Polypropylene than they do on black Polycarbonate.
Conclusion
Mastering SPI surface finish standards bridges the gap between industrial design concepts and real-world manufacturing performance. By understanding that a Class A finish demands premium tool steel and flawless part design, or that a Class D texture requires generous draft angles, you can avoid manufacturing bottlenecks, lower your part rejection rates, and control your tooling budget.
Always consult with your injection molding partner during the early DFM stage to align your material choice, geometric draft, and desired SPI standard before cutting steel.

